Whenever you want to stream film, perhaps Netflix is the first answer that you hear from the rest of the 69 million dedicated subscribers. Netflix is the top streaming services from Hollywood. Watching movies and TV shows on that smart TV have been never been so fun till we knew Netflix. They are known to provide the best of DVD rentals by mail and have even surpassed the popularity of the likes of Walmart and Blockbuster eventually. But, you may find the Netflix streaming content of mediocre quality and not at par with DVD or the Blu-ray disc quality.
What if Netflix not working? Here tells you the solution. We will show you top 5 sites that you can use instead of Netflix to watch TV and movies. While there are many great paid alternatives to Netflix, there are several free alternatives as well which can keep you entertained.

Top 10 Netflix Alternatives For Online Media Streaming
1. Amazon Instant Video
Amazon is really picking up the pace when it comes to video streaming—their original content is getting more recognition for being high-quality, they’re getting a lot of the shows and movies that people want to watch, and the price for instant video is also included in Amazon Prime, which has plenty of its own benefits. And now, with the addition of the Top Gear replacement show, it’s going to have some worldwide exclusives that will bring new viewers.

With a lot of new releases available to view or buy, Amazon is good way to go for viewers who want fast access to the newest movies available. It also offers a free 30-day trial to see if you like the selection of movies and shows that they have on offer. And at $99 per year after that, it’s very competitively priced, especially with the bonuses you get with Prime.
Visit Website
Also Learn >> Best Movie Download Sites | Best 10 Free TV Show Websites | Stream Netflix 4K to PS4
2. Hulu Plus
If you’re just looking for TV shows, Hulu Plus is a great way to go—with episodes of the newest shows, you won’t miss out on any of your favorites when you can stream them instantly. Signing up for the Plus option at $8 per month gives you the most options for what to watch, and removes the pervasive ads that have long been the bane of non-paying users of Hulu.

With shows like South Park, Empire, Mythbusters, CSI, Law and Order, and The Tonight Show, you can watch the biggest names out there in the most popular shows. Hulu Plus does also offer movies, though the selection isn’t nearly as good as most other streaming services (though there are many hidden gems that can be found).
Visit Website – Watch American Netflix on PS4 Outside the US.
3. Vudu
Owned by Walmart, Vudu has a lot of purchasing power and so offers quite a few of the most popular movies and shows online. One of the coolest parts of Vudu is that you can buy movies and TV shows, much like on Amazon, but there’s always a Deals section available—at the time of this writing, Spaceballs is available for $8, Collateral can be had for $5, there are plenty of two-movie sets for $10, and there are seasons of popular shows for $20.

With the wide selection of movies and TV shows, and awesome deals on bundles, it’s tough to beat Vudu for mainstream things to watch. Unfortunately, there’s no free trial, but you can see a lot of the titles that are available from the homepage.
Visit Website
4. iTunes
You might not think of iTunes as a streaming service, but you can rent just about any movie from the iTunes library for a few bucks, making it a viable alternative to Netflix, especially if you don’t watch very many movies. For $3 or $4, you can find tons of movies in both standard and high definition to rent for 48 hours.

If you watch a lot of movies or want to stream TV shows whenever you want, iTunes might not be the best for you. But if you feel impulsive and want to rent a movie now and then—or buy and download something new right away—it’s hard to beat the wide selection offered by Apple.
Visit Website5. BoxTV (India)
If you’re looking for Indian-made and -produced films, BoxTV is perfect. With movies in nine different languages (including Hindi, Bhojpuri, Kannada, and Urdu), the service offers hundreds of movies that will appeal to Indian audiences, no matter where they live; BoxTV is available in India, Singapore, the UAE, the UK, and the US.

BoxTV, compared to many other services, is also very affordable—at ₹199, £4.99, or $4.99, it’s not much more than a cup of coffee. For that price, it’s hard to beat if you’re looking for Indian movies and shows.
Visit Website
6. Stan (Australia)
Although Netflix is generally considered to be the best streaming service in Australia, Stan is making a run for the top spot. The company has made deals with a lot of content providers, and has a number of exclusives, including Breaking Bad and Better Call Saul. Stan is also producing its own content to rival the shows and movies produced by other streaming services.

Its $10 per month price tag is tough to beat, especially with the wide variety of movies and shows that you’ll find on the service, including a few things produced by Amazon, which will likely never make it to Netflix.
Visit Website
7. Acorn.TV
People around the world love British shows, like Holy Flying Circus, Queer as Folk, and Outnumbered, all of which can be streamed in the US and Canada through Acorn.TV for the very reasonable sum of $5 per month. There are lots of weekly releases, bonus features, and trailers to check out, too.

The selection is rather limited, but if you’re a Brit abroad in North America—or just an Anglo-TV-phile—it might be worth it to subscribe to catch your favorite shows.
Visit Website
8. Crackle
Sony’s online streaming service, Crackle, is free to watch, but includes commercials. If you’re trying to cut costs but still want to catch your shows and movies, this might be your best bet. It’s hard to know if you’re going to be able to find what you’re looking for, but there are quite a few options that will appeal to many viewers. Right now, National Lampoon’s Van Wilder, House of Flying Daggers, Seinfeld, and District 9 are all available.

You absolutely can’t beat free, and with the solid selection offered by Crackle, it can serve as a great replacement or supplement to another streaming service. Ads are annoying, but they’re not the worst thing in the world, and they could save you $10 a month, which adds up quickly.
Visit Website
9. Fandor
Are you into indie and foreign movies? If so, Fandor has you covered. Popular indie flicks like Insomnia and Blind, documentaries including Propaganda and 5 Broken Cameras, and quirky cult classics like Ichi the Killer and Dark Star are all available on this service. While you’ll find some movies here that are also on other services, this is definitely the place to look for movies you can’t find anywhere else.

Plans start at only $7.50 per month, and half of what you pay goes back to the rights owners of the movies, so you can be confident that you’re supporting the indie and foreign film industries by becoming a member.
Visit Website
10. M-GO
A newcomer to the online streaming scene, M-GO aims to become your one-stop shop for movies and TV shows. Because they’re new, the selection isn’t quite as good as some of the other services, but it’s growing quickly, and this site could be a major player in the very near future. The site itself is one of the biggest advantages of the service; it’s well-organized, can help you find lots of things that you’re looking for, and provides great recommendations.

M-GO doesn’t provide unlimited streaming like Netflix or Amazon, but serves as a portal through which you can buy movies and TV shows (like iTunes). It also allows you to accrue rewards points to save money on future purchases.
Visit Website
Source:http://beebom.com/netflix-alternatives/.
Reading until now, you may feel a tad puzzled why the aforementioned Netflix alternatives features movie and TV show streaming, lack in function to DVD enjoyment. Calm down! The following will show you the best Netflix alternative for DVD enjoyment.
Watching Movies with Netflix Rental DVD Disc, Best Way? Not Really!
Many movie fans are apt to rent DVD disc from Netflix for watching the favorite films since the subscriber can keep the rented movie as long as desired, but to rent a new movie, the subscriber must mail the previous one back to Netflix in a metered reply mail envelope. Upon receipt of the disc, Netflix ships the next available DVD disc in the subscriber’s rental queue.
But DVD discs are susceptible to all kinds of damage when they’re not in their case. A single scratch can render a DVD disc unreadable by your player. In consequence, imagine if something unfavourable happened to your rental DVD disc-compensation for its damage would be an expensive proposition.
Best Netflix DVD Ripper – Pavtube BDMagic for Windows 10/Mac OS Sierra
In such case, DVD copy software serves as a bulwark against these troubles by allowing you to back up your Netflix rental DVD to iPhone iPad for on-the-move enjoyment as well as protect your rental DVD from being accidently scratched. That’s quite a win-win solution, right? To reach the above two goal, a DVD Ripper is a necessity. Pavtube BDMagic (review) is a top-ranked DVD Ripper in this field. which can give you the best approach to bypass copy protection or remove region code restriction from Netflix, Redbox, Amazon borrowed Blu-ray/DVD. With it, you can 1:1 copy and convert rental Blu-ray/DVD to virtually any regular formats MP4, MOV, MKV, FLV… to play anywhere with original quality. Its key features are shown as below:
- With decent decrypting capability of removing CSS Copy-protections and DVD region codes including the latest Netflix DVD discs
- Rip Netflix DVD to H.265, M3U8, MP4, AVI, WMV, MOV, MPEG, FLV, 3GP, FLAC, MP3 and other video/audio formats
- Has optimized preset for numbers of popular devices like iPad Air, iPhone 6, Galaxy Tab S, Galaxy Note 4, PS4, WD Sony TV, Apple TV and media players such as Roku 3, Chromecast, Microsoft, TV, etc while converting Netflix DVD
- Copy the entire disc in original file structure with all subtitle tracks and audio streams preserved.
- Save 100% intact VOB main movie from your Netflix DVD Disc without any quality loss.
- Allows you to decide the video/audio bitrate, frame rate, size, codec, sample rate, channel during DVD ripping process
Free download and install:


Other Download:
– Pavtube old official address: http://www.pavtube.cn/blu-ray-ripper/
– Cnet Download: http://download.cnet.com/Pavtube-BDMagic/3000-7970_4-75922877.html
You can simply return the rented DVD to Netflix after you enjoyed. However, why not leave something? After all, we paid.
Copy Netflix DVD Rentals to Your Computer for Watching in TV at Anytime?
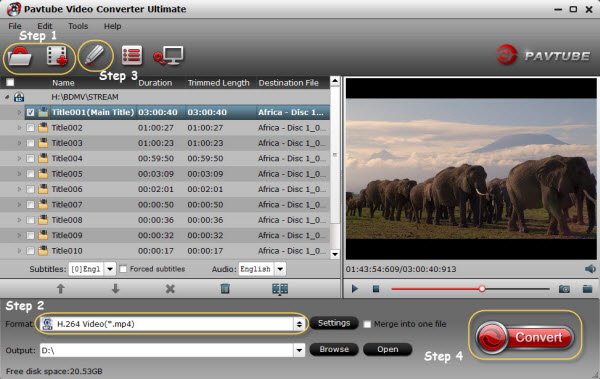
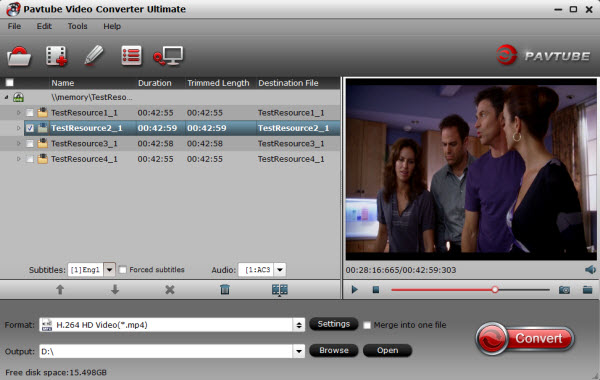
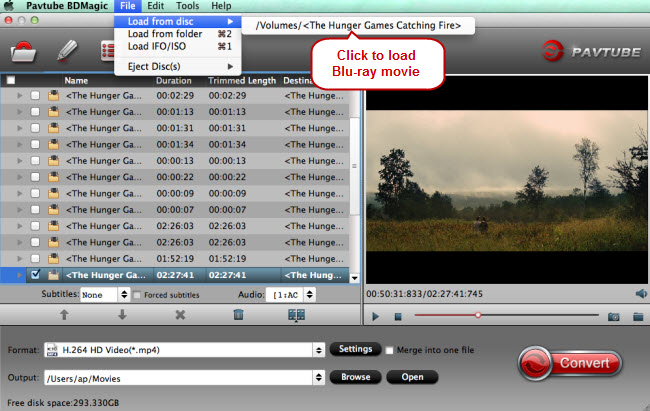
Step 1. Import Netflix movies
Insert your Netflix rented DVD into your computer’s hard disk and launch this Netflix DVD rentals converter. Then load the DVD by clicking the button on top left corner.
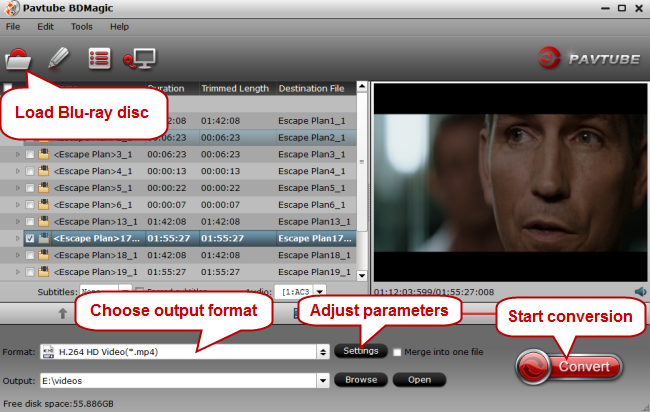
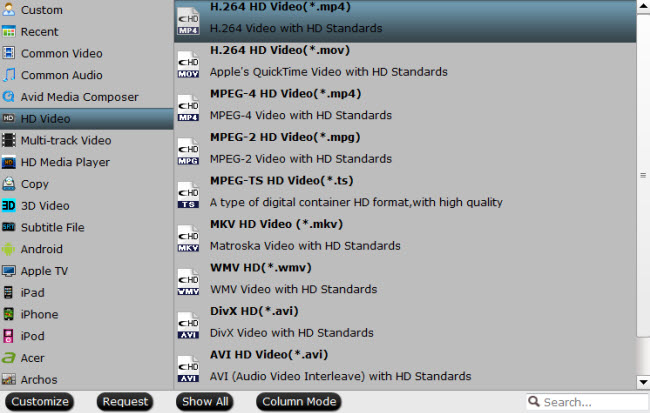
Step 2. Choose output format
Click “Format” bar and select one of the formats you like. Or select a format depending on which device you want to watch the movie in.

There are two options: “Copy the entire disc” and “Directly Copy”. “Copy the entire disc” means copy the whole content of disc with the same structure with the original disc. “Directly Copy” means copy the selected movie title.
Step 3. Rip and copy Netflix DVD rentals to computer
Just click “Convert”button, after a while, it will finish the conversion from Netflix DVD to your computer. Now it means you can own the movie forever. Try to connect your computer to your TV or other devices now and enjoy at anytime!
Best Alternative for Netflix Videos Enjoyment with Nary a Trouble
No matter that you have Rented Blu-ray or DVD Movies from RedBox, NetFlix, Amazon? Or need a tool which can help you get the downloaded Netflix Videos on iPhone, iPad, Android for watching and stream? Pavtube Video Converter Ultimate can do a favor for you, you can also use it to help Play Netflix on Apple TV, Add Subtitles to Netflix Streamed Movies an so on. Just use the way as you like.
Other Cheap Netflix Rental DVD Movie Copy Software – Pavtube DVDAid
Best DVD copy software for Netflix rental DVD is Pavtube DVDAid to backup Netflix DVD by removing any DVD copy protections, like CSS encryption, region code, Disney copy protection, Sony ARccOS, Disney X-project DRM, etc.
• DRM revomal: Remove and decrypt any Netflix rental DVD encryption tech, like Disney new X-project DRM, Sony ARccOS, CSS, Region Code, etc.
• DVD backup: Copy Netflix DVDs to ISO image or a single MPEG-2 file; backup DVD with original video/audio quality in a few minutes.
• Rip DVD to iPhone iPad Android devices: Able to rip Netflix DVD to iPhone 6S/ Plus, iPad Pro, iPad mini 4/Air 2, iMovie, Samsung Galaxy S6 edge+/Note 5, etc.
Read More: