Although shiny silver platters have as much of a future as videotapes, they’re still a desirable option for car DVD players, Blu-ray home theaters, laptops with optical drives, and so on. Apart from purchasing DVD discs, you also can rent DVD online. Netflix, featuring exclusively a movies-by-mail service, drives consumers to get wanted DVD movies in a pretty convenient way. However, the rental period limitation and high maximum charge become the biggest troubles. To handle the problems, many people want to rip rented Netflix DVDs to their local movie collection. So today the article will focus on the way to rip rented Netflix DVDs to movie collections on Mac (macOS High Sierra/macOS Sierra).
As we all known, commercial DVDs inlcuding Rented Netflix DVD have complex copy protection so if you want to save the DVD to Mac Drive, you need a DVD Ripper for Mac to remove DVD copy protection.
Pavtube BDMagic for Mac is able to get rid of the tricky DVD copy protections, such as RCE, CSS encryption, Sony ARccOS DVD protection, Disney New DVD Copy Protection, APS, UOP, etc while making a copy of rental Netflix DVD at fast speed. It can easily transcode your rental Netflix DVD movies to playable formats like MP4, AVI, WMV, MOV, M4V on Mac. Apart from converting Netflix DVD to digital files, BDMagic for Mac also can full disc copy DVD to Video-TS folder and directly copy DVD to VOB files on Mac. It is fully compatible with Mac OS X 10.13 macOS High Sierra, Mac OS X 10.12 macOS Sierra, Mac OS X 10.11 El Capitan, Mac OS X 10.10 Yosemite, 10.9 Mavericks, 10.8 Mountain Lion, 10.7 Lion, 10.6 Snow Leopard, 10.5 Leopard.
Free download and install:
| Pavtube ByteCopy for Windows/Mac can rip rented Netflix to lossless MKV with chapter markers and all subtitle/audio tracks and copy DVD to MP4/MOV/AVI with multi-track subtitle and audio. |
How to Permanently Save rented Netflix DVDs on Mac (macOS High Sierra/macOS Sierr)?
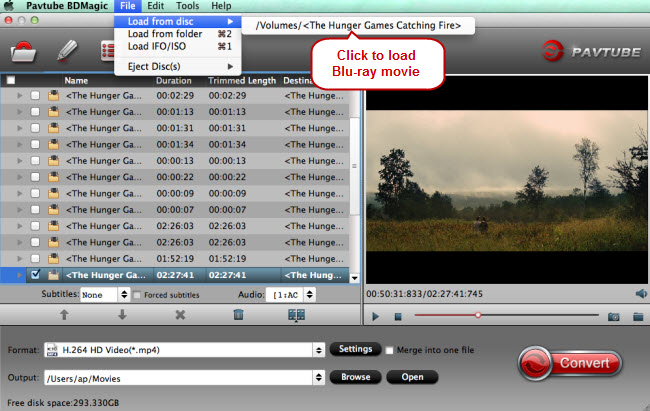
Step 1. Import Netflix movies
Insert your Netflix rented DVD into your computer’s hard disk and launch this Netflix DVD rentals converter. Then load the DVD by clicking the button on top left corner.
Read: Top Netflix Alternative for Video Streaming and DVD Enjoyment

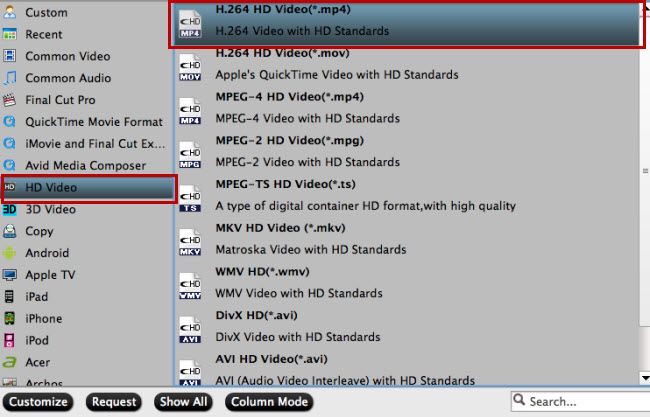
Step 2. Choose output format
Click “Format” bar and select one of the formats you like. Or select a format depending on which device you want to watch the movie in.

There are two options: “Copy the entire disc” and “Directly Copy”. “Copy the entire disc” means copy the whole content of disc with the same structure with the original disc. “Directly Copy” means copy the selected movie title.
Step 3. Rip and copy Netflix DVD rentals to computer
Just click “Convert”button, after a while, it will finish the conversion from Netflix DVD to your computer. Now it means you can own the movie forever. Try to connect your computer to your TV or other devices now and enjoy at anytime!
Apart from Netflix, there are many other online sites allowing you rent DVDs, such as RedBox, Amazon, etc. If you want, you also can use BDMagic for Mac to save your Redbox DVD rentals to hard drive.


