Enjoy DVD movies on Nexus 9 Full HD Screen with Intact Quality

Leave a comment

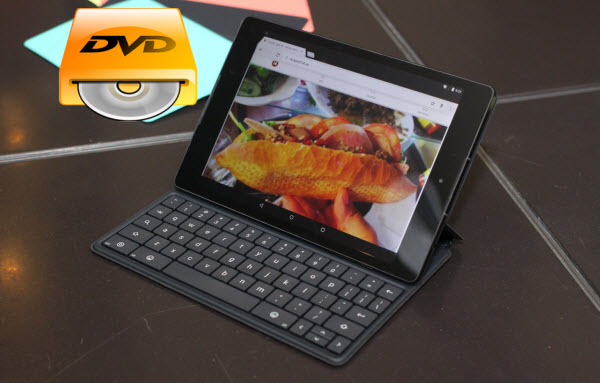
Can Nexus 9 tablet play DVD movie?

This smart Nexus 9 provides features to improve how you live, work and play. Nexus 9 has 8.9 inch display, which is big enough to enjoy movies, the resolution is 1536*2048. You can have wonderful video appreciating experience, but still unable to play DVD movies. If you can play DVD movies on Nexus 9, you can watch DVD movies to kill time while commuting or during the journey. To make it come true, you should rip DVD movie to Nexus 9 playable formats firstly.

Nexus 9 tablet play DVD movie

Best DVD Ripper for Nexus 9 tablet

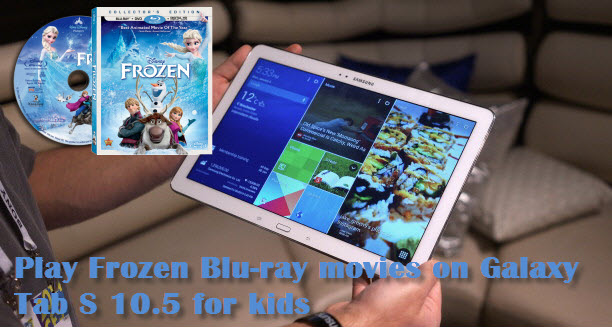
In order to fulfill DVD to Nexus 9 conversion task, you need to prepare a piece of high-end DVD ripper software, such as Pavtube BDMagic, supporting ripping copy protected DVD movies, say, Frozen, Transformers: Age of Extinction, Guardians of the Galaxy and How to Train Your Dragon 2, that HandBrake can’t deal with.

Overall, it can remove any disc copy protection and rip Blu-ray/DVD to Nexus 9 viewable video format in a few clicks so as to access your converted movie to Nexus 9 without limitation. The sticking point is that this tool also allows Nexus followers to rip DVD to Nexus 7, Nexus 7 2013, Nexus 6, Nexus 10 and other Nexus gadgets effortlessly with intact quality. The mac version is BDMagic for Mac.

How to rip DVD to Nexus 9 supported video formats

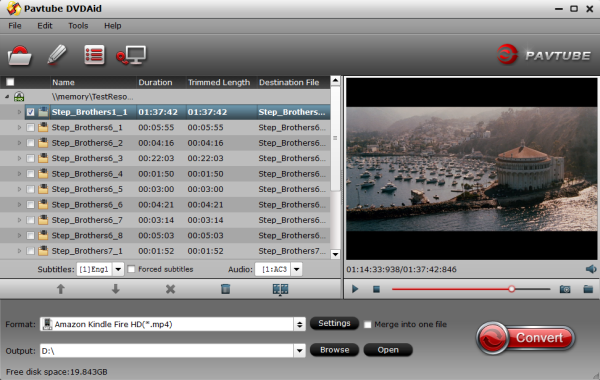
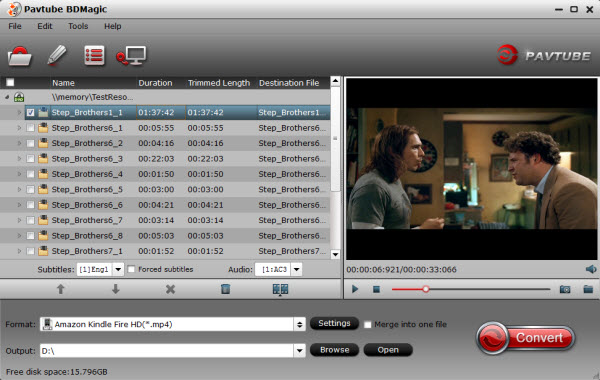
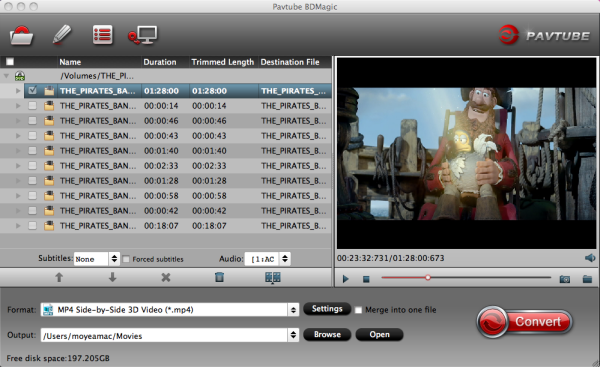
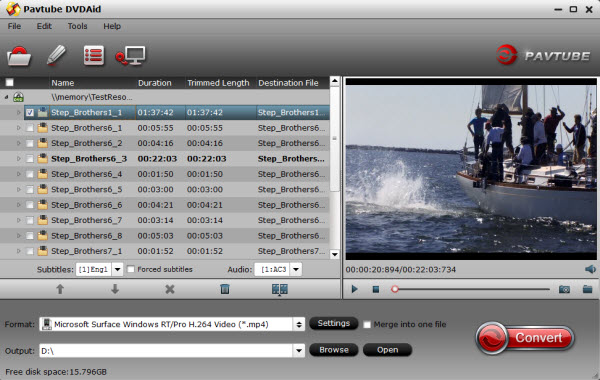
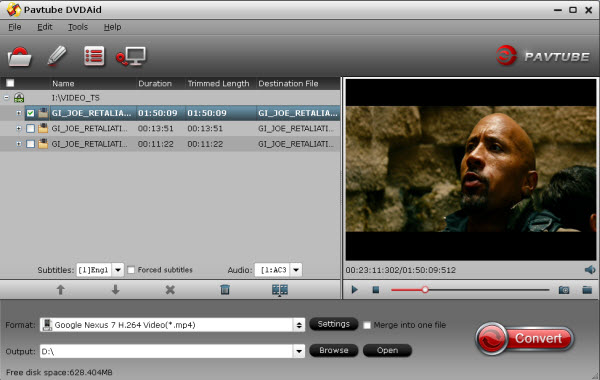
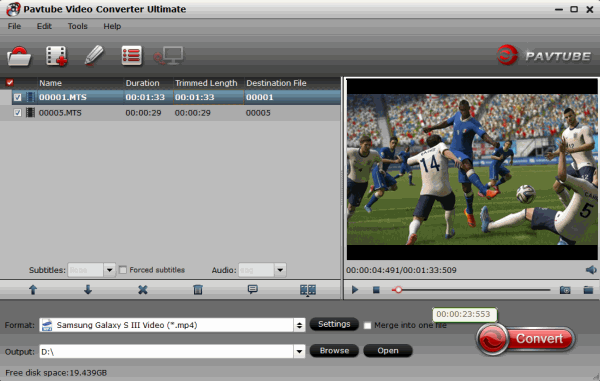
Step 1. Import DVD movies

Insert the DVD disc into your DVD drive and launch the Nexus 9 DVD ripper. Click “Load DVD” to select and import the DVD movies you want to rip for Nexus 9. ISO and IFO files are also supported.

Nexus 9 DVD ripper

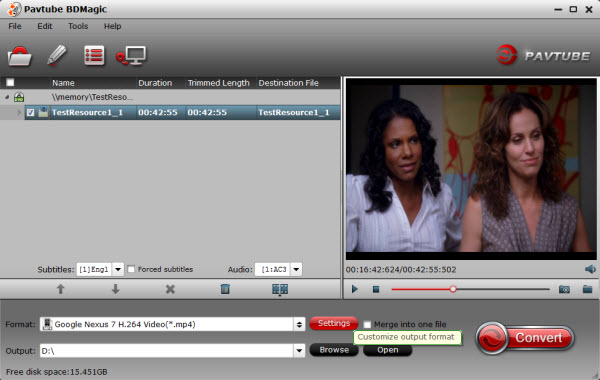
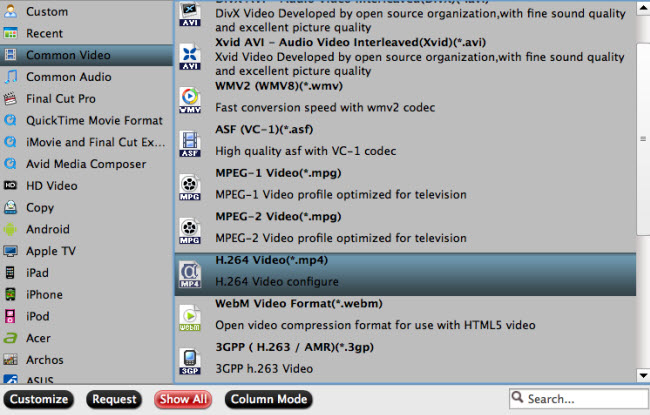
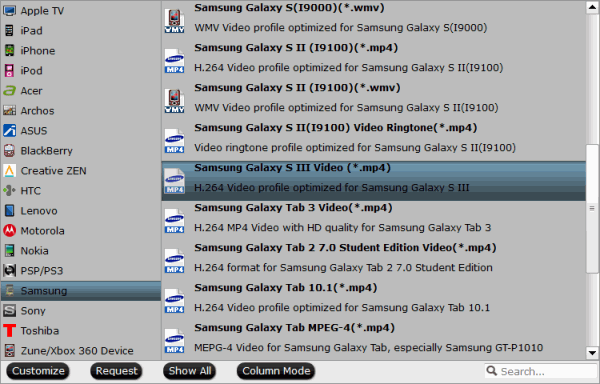
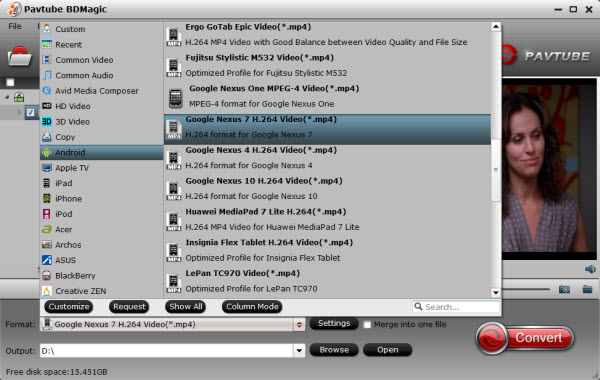
Step 2. Specify output format

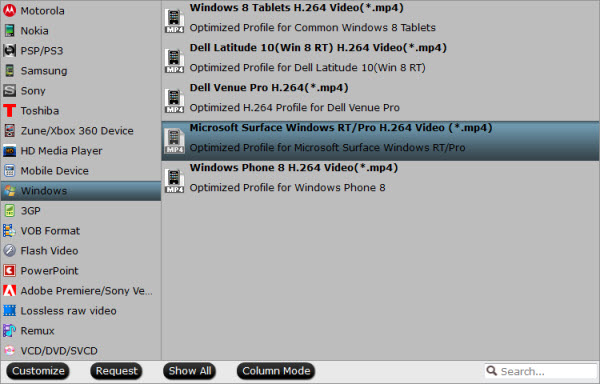
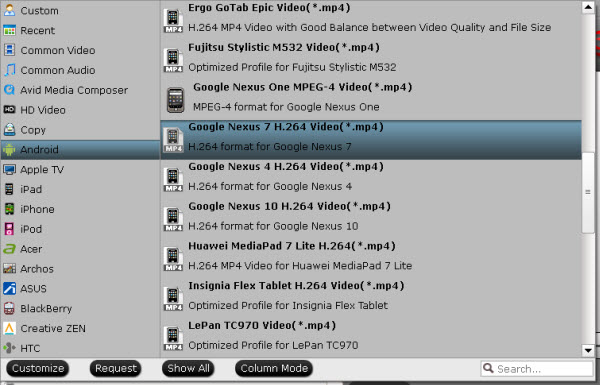
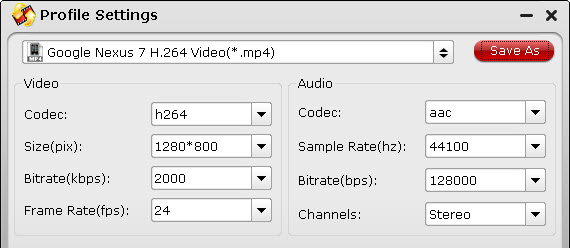
Click the “Format” bar to choose the output format for Nexus 9. Here you can simply choose “Android > Google Nexus 7 H.264 Video(*.mp4)” as the output video format. Then click “Settings” to adjust video codec, bit rate, frame rate, etc. if necessary.

Nexus 9 video format

Step 3. Start to convert DVD to Nexus 9

Now go to the last step: click “Convert” to begin ripping DVD to Nexus 9 compatible MP4 video files. After the conversion, you can tap “Open” to locate the converted videos immediately. Then connect your Nexus 9 to computer and transfer the video files to your device for enjoyment on the go.

Transfer Harry Potter DVD ISO/IFO movie to Kindle Fire HD 6 for enjoyment with kids

Leave a comment

Amazon’s Fire HD 6 is the brightly colored peacock of the dirt-cheap tablet underground. The chunky little tablet sports a 6-inch screen and comes in cheerful, exciting colors. Sure, it’s got mid-to-low-end specs and isn’t the fastest slate out there, but it certainly is cute. It’s the kind of tablet you’d give a kid for Christmas. Thus, to turn your Kindle Fire HD 6 as your portable media player is a really nice choice. If you are a DVD movie fans, and have some DVD ISO/IFO files backed up from DVD like Harry Potter at hand, you probably cannot wait to transfer the DVD ISO/IFO movie to Kindle Fire HD 6 for enjoyment with kids anytime anywhere.

transfer DVD ISO/IFO movie to Kindle Fire HD 6

Frustratingly, Kindle Fire HD 6 can’t directly play DVD or DVD backup files. For those people who want to put Harry Potter DVD IFO/ISO movies files onto Kindle Fire HD 6, the easiest and fastest solution is to rip/convert DVD IFO/ISO to Kindle supported video format such as MPEG-4/H.264, etc. In that case, an easy-to-use DVD ISO/IFO convert tool is necessary indeed.

Pavtube DVDAid is a dynamic DVD ripping tool that can help you rip DVD, DVD ISO/IFO files, VIDEO_TS folder to Amazon Kindle Fire HD 6 highly supported MP4 video files with high output video quality and fast ripping speed. Besides, the best Mac DVD ISO/IFO to Kindle Fire Converter allows you to select the subtitles and audio for your movie freely and edit the DVD movies by trimming, cropping, adjusting video effects, etc. to get the very wanted part and effects as you like. The equivalent Mac version is DVDAid for Mac. Just get it now and follow the steps below to copy Harry Potter DVD ISO/IFO movies to Kindle Fire HD 6 for smoothly playing with kids!

Blu-ray, DVD and videos can also be played on your Kindle Fire HD 6

How to Convert Harry Potter DVD ISO/IFO to Kindle Fire HD 6 compatible video formats

Step 1: Launch the best Fire HD 6 DVD ISO/IFO Ripper. Click on “IFO/ISO” icon to load your ISO image file into this program.

Fire HD 6 DVD ISO/IFO Ripper

Step 2: Click “Format” bar, you can easily find the optimized videos for the Kindle Fire HD 6 under ” Amazon > Amazon Kindle Fire HD(*.mp4)”. The preset is specially designed for Kindle Fire HD 6 full screen playback.

Kindle Fire HD 6 Video Format

If you like, you can also click the “Settings” button to change the video resolution, encoder, frame rate, etc. I found bitrate higher results in big file size, and lower visible quality loss, and vice versa.

Step 3: When everything is OK, just press the “Convert” button to start the conversion for DVD ISO/IFO to Kindle Fire HD 6 videos. It will not take much time. Just wait for the conversion process to get done.

Bingo! After the conversion, just transfer the converted video files to your Fire HD 6 Tablet. In this way, you can watch Harry Potter DVD ISO/IFO image files on Amazon Kindle Fire HD 6 and enjoy the DVD movies with your kids!

Backup Disney Blu-rays to Kindle Fire HD Kids Edition for Entertainment

Leave a comment

FAQ: “I need a best tool which can converting Disney Blu-rays to Kindle Fire HD Kids Edition for my daughter while traveling in back of car. And I will stream some movies to watch on TV. Any advice?”

Kindle Fire HD Kids Edition

Solved: Well, if you’ve already invested in lots of Disney Blu-ray films, then it’s really not worth re-purchasing all your content on Amazon just to have it on your computer at the same resolution. I mean, there you need to convert Disney Blu-rays to Kindle Fire HD Kids Edition compatible video formats with a professional ripping tool.

With Pavtube BDMagic, you can easily making digital copy of Blu-ray. It can rip the latest 3D/2D Blu-ray and DVD and convert to various video formats for some popular smartphones and tablets as well as editing software. And you can add srt/ass/ssa subtitles to the output videos to make it unique and perfect. Simple interface but effective conversion. (For Mac users, you can use Pavtube BDMagic for Mac.)

How to Rip/Convert/Backup Disney Blu-ray to Kindle Fire HD Kids Edition Effortlessly?

Step 1: Load Blu-ray movies into the program.

Once you run the Disney Blu-ray Ripper, click Blu-ray disc button to load Blu-ray movie up into the Blu-ray ripping program.

Backup Disney Blu-rays to mp4

Step 2. Decide Blu-ray output format.

Click on the pull down menu of “Format”, and select “Android -> Amazon Kindle Fire HD H.264 video (*.mp4 )” as target format. The output videos could fit on Kindle Fire HD Kids Edition perfectly.

Backup Disney Blu-rays settings

Tip: If you like, you can click on Settings you could easily set bitrate, frame rate, codec, channels, sample rate, etc to adjust parameters that affect video quality and file size for the video you prefer. Keep in mind that bitrate higher results in big file size, and lower visible quality loss, and vice versa.

Step 3. Click on “Convert” button to start converting Disney Blu-ray to Kindle Fire HD Kids Edition. Once the process completes, just click “Open” to find the Fire HD playable MP4 videos after the conversion and transfer them to your device with ease.

Now, you can enjoy Disney Blu-rays to Kindle Fire HD Kids Edition with your daughter while traveling in back of car.

If you haven’t handed on how to convert any videos to InnoTab 2S/2 for viewing for kids, you can read here. For enjoying  DVD to Fuhu DreamTab with multiple audio tracks, read here.Try to find an easy way to convert Frozen Blu-ray movies on Galaxy Tab S 10.5? Read here.

Ripping Commercial DVDs to iTunes 12, 11 on Mac for Personal Use

Leave a comment

“I have a range of TV Series such as Yes Minister, West Wing, All Creatures Great and Small as well as general family movies and music DVDs. And I’m trying to find an easy way to ripping commercial DVDs that I had purchased onto iTunes for personal use. But have no idea. Any suggestions?”

Most Commercial DVDs are copy protected for there is encryption within and it is still not an impossible task to ripping commercial DVDs onto iTunes 12,11 for personal use. Let me walk you through the basic steps and available software applications to get those movies off the plastic and into your Mac. In actually, I discovered Pavtube BDMagic for Mac on several websites that recommended it as the best and simplest ripping software. And I had already tried Handbrake with no success.

Overall, it is especially designed for Mac, and is free and easily handles CSS, Region Code protections, even Disney, Paramount, Dream Works ones with more output video format on Mac. For our purposes, the mission is to get a commercial DVD into iTunes so we can watch it on an iPhone 6/ 6 Plus, iPad Mini 3 or through an Apple TV 3. Pavtube will not let you down. For Windows users, you can free download Pavtube BDMagic.

How to Convert Commercial DVDs to iTunes 12, 11 on Mac?

Step 1: Load DVD source.

First, insert your DVDs into DVD Drive, and then click “Add dics” icon to load the DVD files to the program. You can also add Blu-ray/DVD ISO, Blu-ray/DVD folder files that you can want to rip to iTunes.

Rip Commercial DVDs to iTunes

Step 2. Choose export format.

You can click the dropdown menu between “Format” and “Settings”, you will see many presets sorted of different device models and programs. Move your cursor over the left column to locate your device model/manufacturer, or you can try the small search box on the bottom right corner. For example, if you own an iPhone, iPad, iPod, just choose the best profile from iPad/iPhone/iPod column.

Rip Commercial DVDs to mp4 onto iTunes

Tips: You might wonder how to watch YouTube videos on your iPhone 6/6 Plus? Read here. To viewing DVD movies on iPad Mini 2 with subtitles, you can use the Pavtube BDMagic to help you easily.

Step 3. Adjust specs or edit video before conversion (Optional).

Click “Settings” button to configure target file quality. After entering “Profile Settings” panel, you are allowed to adjust video and audio parameters such as bit rate, frame rate, sample rate, etc.

Step 4. Start conversion.

Now hit the big red “Convert” to start converting DVD movies to MP4 with best settings for playback on different devices. After the conversion, you can get the converted DVD rips in *.mp4 format by clicking the “Open” or “Open output folder” icon.

Tips: If you don’t know how to Sync Local Contents to iTunes on PC/Mac? You can read here. And then, you need to transfer  Media Files from iTunes Library to iPhone or iPad. Have fun!

Now, you can have DVD videos in iTunes library as many as possible to enjoy HD videos without buying. It is fair legal to backup your own DVDs for non-commercial use.

Effective Tips: Play Frozen Blu-ray movies on Galaxy Tab S 10.5

Leave a comment

“My kids recently always humming a song “Let it go, Let it go, Can’t hold you back anymore; Let it go, Let it go, Turn my back and slam the door…”, they told me this song is from a movie which called “Frozen”. So, here is a problem: I’m looking for an easy way to convert the Frozen Blu-ray movies to Galaxy Tab S 10.5 with me on holidays to keep kids quite for part of the day…”

Have the same situation? What is the best way to ensure free and smooth Blu-ray playback on my Galaxy Tab S 10.5 and 8.4 as well as not affecting its life? A Galaxy Tab S Blu-ray Ripper will be of great help. And Pavtube BDMagic definitely won’t let you down. It can rip your Blu-ray movies to Galaxy Tab S best video format to guarantee pleasant Blu-ray enjoyment with high quality. Plus, it offers optimized format for the Samsung Galaxy Tab to generate best videos suitable for viewing on Galaxy Tab S. If you are not satisfied with the quality, you could even tweak the video, audio settings.

rip-frozen-blu-ray-to-tabs-10.5

How to rip Frozen Blu-ray to the Galaxy Tab S 10.5 for enjoying with kids use Pavtube BDMagic.

Requirements:

Before anything else, you have to download an app that you are going to use later. You are required to download and install:

PC running Windows 8.1 Blue, Windows 8, Windows 7, Windows Vista, Windows XP

Source media (commercial Frozen Blu-ray Disc)

a BD drive for ripping Blu-ray

Step 1. Import Blu-ray disc/ISO/folder.

Click “Load files” to choose import from ROM, Blu-ray ISO/IFO or Blu-ray folder, DVD discs, DVD ISO. It will detect and check the main title automatically; so keep it as default unless you want to include tidbits.

rip-frozen-blu-ray-to-tabs-10.5

Note:If you are a Mac user, you can use the BDMagic for Mac to reformat Blu-ray to Galaxy Tab S 10.5 on Mac (Mavericks included).

Step 2. Choose output profile.

Choose output profile via clicking the Format bar. Here I recommend you select “Samsung > Samsung Galaxy Tab 3 Video(*.mp4)” as the export format. The output videos could fit on Galaxy Tab S 10.5 perfectly.

rip-frozen-blu-ray-to-tabs-10.5

Step 3. You can customize the settings including video size, video bitrate, frame rate, audio sample rate, audio, etc for the output.

Tips: Here, Click on “Settings” to modify the video size (resolution) as 1920*1080. For watching videos on Galaxy Tab S 10.5, 2000~2500kbps is just all right.

rip-frozen-blu-ray-to-tabs-10.5

Step 4. Start Blu-ray to Galaxy Tab S conversion

When everything is OK, just press “Convert” button to start to rip Blu-ray to Galaxy Tab S 10.5 with MP4 videos. If you don’t know how to transfer the converted MP4 videos to Galaxy Tab S 10.5, click here for help.

That’s all, everything could be easy. Take this top Blu-ray Ripper to solve your playback issues and keep kids quite for holidays.

In addition, A total guide help you rip Blu-ray for Galaxy Tab 3 with optional subtitle and language

2014 Back to School Coupon Codes – Get 30% Off Pavtube DVDAid

Leave a comment

Now it’s almost time to back to school, have enjoyed a color and meaningful Summer break? Let’s get ready and be excited for another great term! Meanwhile, after a long summer holiday, are you looking forwared to see everyone and prepare some cool gifts for your classmates or teachers?

Welcome to the Pavtube 2014 Back to School Promotion Center where Up to AMAZING 35% OFF Back to School Specials are waiting for you. You be surely be entertained at your free time.

The giveaway includes Blu-raysDVDs and HD Videos related software which will give you great experience when enjoying these videos and movies on Android/Apple/Windows devices. Besides that, you will have no worry about any compatibility issues when editing the MTS/MOV/MXF files in Mac editors(FCP, FCE, iMovie, Avid Media Composer, Adobe Premiere, etc.), and Windows editing programs (Sony Vegas, Premiere Pro, Movie Maker, etc.)!

Hurry to get- 30% OFF DVDAid now!

Powerful abilities to remove DVD protection, convert DVD to any video and audio format, and edit DVD to create personal movie.

TERMS & CONDITIONS APPLIED:

The deal is valid from 15th Aug to 15th Sep, 2014

More details are here:

http://www.multipelife.com/back-to-school-specials-2014

From: http://movie-tips-review.blogspot.com/2014/08/2014-back-to-school-coupon-codes.html

Watch DVD on Surface 8.1 Tablet

4 Thoughts

There are more and more Windows 8.1 tablets like Surface 2, Surface Pro 2, Surface Pro 3, etc. hit the market along with the updated Windows 8.1 system. Windows 8.1 advances Windows 8 and Windows 7 in many ways, so, if conditions permit, there is no reason why it should not to update Windows 8 to Windows 8.1.

And you may be one of the Surface 8.1 tablet owners in this prevalence, then you may ask the question “how to watch DVD movies and videos on Surface 8.1 tablets and PCs more safely, conveniently and portably” as below:

1. I am desperately looking for solutions to watch DVDs via an external DVD drive on my Surface
2. I know there are many others with the same wish (and we have some customers at our company that want this too!)!!
3. With Windows 7, DVD playing was supported natively by the OS. Unfortunately, MS removed it with Windows 8.1, without the possibility to add them again.

Well, in this article, I don’t generally do reviews but I did want to share the tips and tricks with all of you how to play DVD on Surface 8.1 tablet.

At first, to watch DVD movies on Surface 8.1 tablet, you will need to rip and convert DVD to a common supported video format by Surface. Then a DVD to Surface 8.1 ripper is badly needed. You can search the related key words on line, and many results would be available. Here, Pavtube DVDAid is recommended to accomplish your task in a few mouse clicks! With it, you can fast convert DVD movies to Surface 8.1 supported MP4 video files with excellent output video quality. If you are using a Mac and want to convert DVD movies to Surface 8.1 on Mac, please turn to DVDAid for Mac.

How to rip your purchased DVD movies to Surface 8.1 Tablets in clicks

Step 1. Run DVD to Surface 8.1 Converter; load DVD movies

Click the disc button to browse and import DVD disc from ROM, or load the ISO/IFO files that you want to convert for viewing on Windows 8.1-based surface devices.

Pavtube DVDAid will detect and list the main title (the full length of this movie with all the chapters) and check it by default. So just keep it untouched and let’s move on to Step 2.

Step 2. Choose export format

You can click the dropdown menu between “Format” and “Settings”, you will see many presets sorted of different device models and programs.

Here “Windows -> Microsoft Surface Windows RT/Pro H.264 Video (*.mp4)” is a suitable format for Surface 8.1 tablets. Or if you have other Windows 8.1 tablets, you can choose a suitable video format from “Windows” catalogue depending on your device.

Step 3. Adjust specs or edit video before conversion (Optional)

Click “Settings” button to configure target file quality. After entering “Profile Settings” panel, you are allowed to adjust video and audio parameters such as bit rate, frame rate, sample rate, etc..

If you think the video size this not suitable for your Surface 8.1 Tablet, you can first choose any one of the provided type, then change the settings. Generally speaking, the higher video bit rate will result in the larger output file size, and vice versa.

Step 4. Start conversion

Now hit the big red “Convert” to start converting purchased DVD movies to MP4 with best settings for playback on different Surface 8.1 tablets.

After the conversion, you can get the converted DVD rips in *.mp4 format by clicking the “Open” or “Open output folder” icon.

Transfer videos, music, photos from PC to Surface 2 on Windows 8.1/8

Additional Tips

1. Not a Surface 8.1 user? It doesn’t matter, Pavtube DVDAid also supports “common” video formats like MOV, M4V, MP4 and has presets for all the models of iPad, iPhone, iPod Touch and Apple TV, or Samsung Galaxy Tab, Galaxy Note, Xperia Series, BlackBerry, etc., so you should be able to create files compatible with your Android based devices and other Windows devices.

2. I used another Pavtube program called ByteCopy to backup my DVDs without quality loss. Meanwhile, several audio tracks and subtitles are preserved so I can switch language when watching movies.

3. If you want to convert all kinds of videos (including MKV, AVI, Tivo, VOB, FLV, MPG, DVD, Blu-ray, ISO, IFO, etc.), a software can be completely solved, it is Pavtube Video Converter Ultimate.

Get DVD ISO onto your Nexus 7 (2013) Tablet for watching

Leave a comment

Simply follow this guide to rip and convert DVD ISO to MP4 videos for playing on Google Nexus 7 (2013) Tablet conveniently.

The most mentionable thing is that the new Nexus 7 is the first device to support the latest version of OpenGL ES: 3.0. Combing with the high resolution of 1920×1200. If you have ripped your DVD movies to ISO files or have some DVD ISO image files downloaded from the Internet and now wanna get these ISO files onto your Nexus 7 (2013) Tablet for watching, the you are definitely in the right place here! In this article, you are going to learn how to convert DVD ISO to Google Nexus 7 (2013) with fast ripping speed and lossless video quality.

Requirements

Before anything else, you have to download an app that you are going to use later. You are recommended to download and install:

Pavtube DVDAid. Get the Windows version here, and the Mac version here.

Instructions

The program is an easy-to-use yet professional ISO to Nexus Converter. It is easy to use for editing and conversion and good at dealing with DVD discs, DVD iso/ifo image files even DVD Folders. The audio/video synchronization is very good, the size of the subtitles too. The encoding speed is faster. I’ve had success using the software to convert DVD ISO to a friendly format by my Nexus 7 2013. I’ve found the quality to be excellent, and see no difference when compared to playing the ISO movies themselves. Just free download it and follow the steps below to copy DVD ISO image files to your Nexus 7 (2013) Tablet for playing in just a few clicks.

Tip:

If you have any requirements of outputting 3D (Anaglyph, T/P, SBS) or keeping multiple audio tracks/subtitles, you are suggested to try this Blu-ray/DVD to Nexus Converter Pro.

Convert DVD ISO to H.264 MP4 videos for Nexus 7 (2013) Tablet

1. Run the program, and add your ISO image files to the software.

2. Select a Google Nexus 7 (2013) friendly format, e.g. H.264 .mp4 for conversion.

Click “Format” drop-down list and choose “Android > Google Nexus 7 H.264 Video(*.mp4)” as the compatible MP4 preset with best video quality.

Tips: You can adjust the output parameters of the video by click ‘Settings’ button. Please remember the file size is based more on bitrate than resolution which means bitrate higher results in big file size, and lower visible quality loss.

3. Click the big Convert button to encode DVD ISO to MP4 videos for Nexus 7 (2013) Tablet for watching.

The software will do the rest automatically. When the conversion finishes, you can click ‘Open’ to access to the converted mp4 videos. In this way, you can transfer converted DVD ISO videos to your Nexus 7 (2013) Tablet and enjoy them on the go!

Additional Tips

Android tablets only recognize SD cards formatted in FAT 32, this limits a single file size less than 4GB. If you worry about getting a big video file larger than 4GB, you can use split feature in Pavtube software to split a large 1080p/720p file into multiple chunks under 4GB. Learn to split a large video file into several small files under 4GB for Android device.

Read more:

How to play MPG on Galaxy S5 in full screen

Leave a comment

If you have problems when playing MPG video on Galaxy S5, you can follow this way to convert MPG to MP4 videos for Samasung Galaxy S5 phone.

Ahem…No way to transfer my MPG files over USB??? I tried to transfer my MPG files to my Galaxy S5 which is 100% stock and every time I drag and drop the MPG files over (Doesn’t matter if I drag and drop 1 or 50) Windows explorer crashes. Anyone found a way to fix it from doing this…?

First, what you have to understand the truth is that the S5, same as its predecessor, only supports certain specified video formats such as MPEG4, H.264, etc. So, how to transfer MPG to Galaxy S5 for smooth playback especially some MPG files? According to our testing and using experience, the easiest solution is to transcode MPG to H.264 for Galaxy S5 with a professional video convert tool.

Below I will take Pavtube Video Converter Ultimate for an example to show you how to put MPG videos to Galaxy S5 for smoothly playback.

Free download Pavtube MPG to Galaxy S5 Converter, a very easy-to-use video to Galaxy S5 converting program which comes with flawless video quality and quick conversion speed. It is an all-in-one converting program, and it features outputting 3D (Side-by-Side, Top-Bottom, Anaglyph) in MKV/MP4/AVI/MOV/WMV formats. You can reach the Mac version here: Galaxy Video Converter Ultimate for Mac.

Converting MPG to MP4 videos for Galaxy S5 playback in full screen

1. Install and launch the Video Converter tool on your PC, click “Add Video” to import your source materials in .mpg format. Besides MPG, you can also load FLV, AVI, WMV, VOB, TiVo, MKV, MOV, etc. files to the program. The software supports batch conversion so that you can also add several files to convert at one time.

2. Click “Format” bar, follow “Samsung > Samsung Galaxy S III Video (*.mp4)”. The output videos could also fit on Galaxy S5. If you like, you can click “Settings” to change the video encoder, resolution, frame rate, etc. as you wish.

3. Start the conversion from MPG to MP4 video for Galaxy S5.

4. After the process, transfer the videos to your Galaxy S5. If you have no idea about Galaxy S5 transfer, check out a guide here.

So there you have it. Pretty simple! In this way, you can effortlessly play MPG videos on Galaxy S5 as you like.

More articles:

Rip and Put DVD movies to Galaxy S5 for enjoying in full screen
Make Blu ray disc and ISO file playable on Galaxy S5
Mac Tips: Transfer MKV, AVI, VOB, Tivo, MPG files to Galaxy S5 easily

Galaxy S5 Top 10 useful Tips & Tricks

2 Thoughts

The Samsung Galaxy S5 is now available on lot of countries and I am one of happy owners! As every phone it exist some hidden stuff and I have select it for you. So I am more or less sure than you didn’t know most of them! Lets go for my top 10 tips & tricks for Galaxy S5.

1- Remove Plastic on Camera
You have an amazing new phone, the Samsung Galaxy S5 and you show it to everyone but you have missed to remove the plastic protection on the camera! Don’t say that to everyone :p
2 – Quick Connect your Phone
You want to share something with a friend. No need to select settings activate bluetooth and search someone! On the status notification bar you know have to fast acess to connect your phone to another one!
3 – Double Window
You are using lot of apps and everytime you need to go to one app and turn back to an other one. For example you search something on internet and are writing a mail about that! You can use the Double Window in order to do that.
Activate it: Go to settings and search Multi Window

Use it: long press on turn button you activate or not it!
4 – Air View
Air View is an app which permit to get information about stuff without touching the screen. You are on the Gallery and you can enlarge the picture without open it thanks to Air View. Activate it from settings!
5 – Quick Settings
On the status notification bar you can go to settings and then go to quick settings. But did you know that with 2 fingers you can immediatly go to those quick settings? Just slide down the notification status bar but with 2 fingers instead of 1.
6 – Take your Pulse
The Samsung Galaxy S5 help you to take car about your health. In order to that the S5 use a sensor for your heart. You have to go on the app called:S-health and there use the pulse. Put your finger on the back of the phone just under the camera and wait some seconds.
7 – Download Booster
The Samsung Galaxy S5 use a new technology to download large files faster. In fat this technology use at the same time the LTE and the WiFi. To use it, go to settings and enable the Download Booster.
8 – Save your Day
Everyday our phone is killing the battery. Samsung use now a new application that save the battery for a longer time. You are at work and you have only 10% of battery and no cable to load your phone. No way! Use the Super battery saver mode! Go to settings and on Power saving option and use the Ultra Power saving mode.
9 – Hidden Menu Button
Did you know that the Samsung Galaxy S5 get a hidden menu button? In fact everywhere you are and where there is a menu you can made a long press on the recent app button and it open the menu!
10 – Close your app
To save your memory and the battery don’t forget to close your open apps. To do that just use the left button and close apps. Slide one to close it or you can also close all apps at the same time.
11 – Take a screenshot
Android KitKat use the same way to take a screenshot on the Samsung Galaxy S5. Just press the power button and the home button at the same time.

If you have any other tips & tricks or any question, let a comment!

Thank you

From: http://www.flow-wolf.net/2014/04/top-10-tips-tricks-samsung-galaxy-s5.html