Having Problem When importing MP4 to Windows Movie Maker

Leave a comment

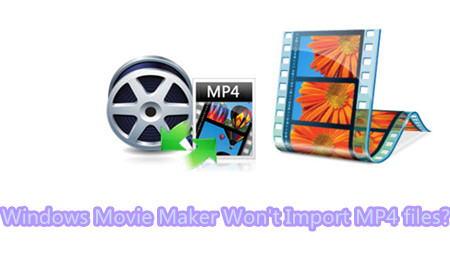
Windows Movie Maker, as a powerful video editor is widely used among Windows users. Due to its popularity and simple operation, it is favored by more and more people. Every time when you import MP4 to Windows Movie Maker or Windows Live Movie Maker, it stops working? Your Windows Movie Maker even can’t recognize your MP4 files? Sure, you will find it a painful experience to import MP4 to Windows Movie Maker and this problem has troubled many WMM users.

Hot Search: DVD to WMPTiVo to WMPiTunes to WMPYoutube to WMPMOV to WMPBlu-ray to WMP

Best Answer: 

There are some formats supported by Windows Movie Maker, such as .wmv, .asf, .avi, .mpe, .mpeg, .mpg, .m1v, .mp2, .mp2v, .mpv2, and .wm. Have you found MP4? No! It’s not supported natively. So you need to convert MP4 to Windows Movie Maker compatible format like WMV before importing.

For using Windows Movie Maker do not use the MP4 format, if you understand avi more is possible, but if not clear, please do not use. Because MP4 has many kinds of coding format , Windows Movie Maker is the Microsoft software, MP4 is also Microsoft, but MP4 “variation” format many, Windows Movie Maker is not fully compatible with.

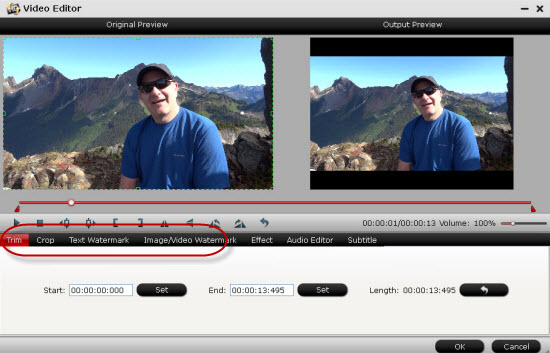
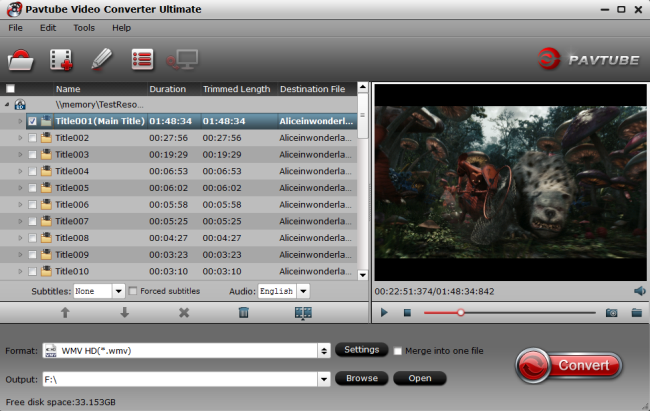
To get MP4 and Windows Movie Maker to play nicely, you need to convert MP4 to Windows Movie Maker friendly format like WMV first. Here, you’re recommended to use Pavtube Video Converter Ultimate. It supports creating high quality WMV video for your Windows Movie Maker, no matter what’s the format of your source video files. Besides converting MP4 to Windows Movie Maker compatible WMV with no loss of quality, Pavtube Best MP4 Converter can also convert between 150+ video or audio formats as well as edit video like trim, crop, rotate, merge, adjust subtitle, compress video, etc. Below is a step-by-step guide on converting MP4 video to Windows Movie Maker compatible formats. Here is review.

Note: Its Mac verison Pavtube iMedia Converter for Mac is much cheaper in Summer Holiday Coupon Page. It supports El Capitan system so you can convert MP4 to Windows Movie Maker on Mac OS X El Capitan without any issue.

Free Download MP4 to Windows Movie Maker Converter:
 

Other Download:

– Pavtube old official address: http://www.pavtube.cn/blu-ray-video-converter-ultimate/
– Cnet Download: http://download.cnet.com/Pavtube-Video-Converter-Ultimate/3000-2194_4-75938564.html

How to Use MP4 videos in Windows Movie Maker

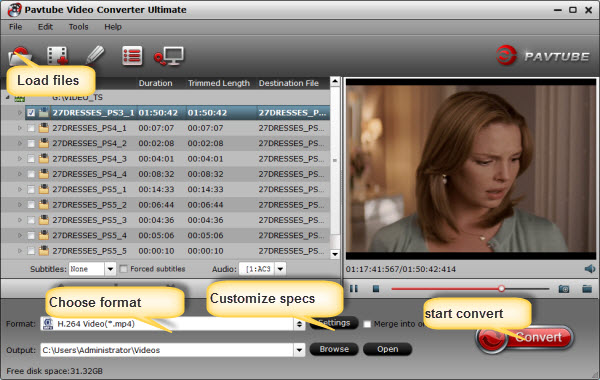
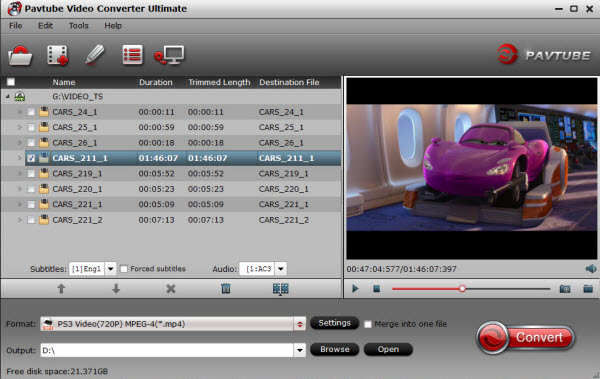
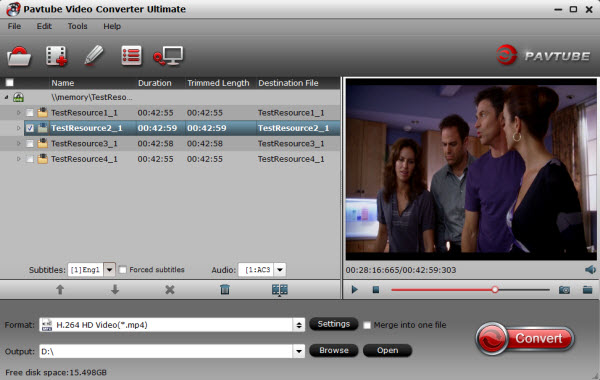
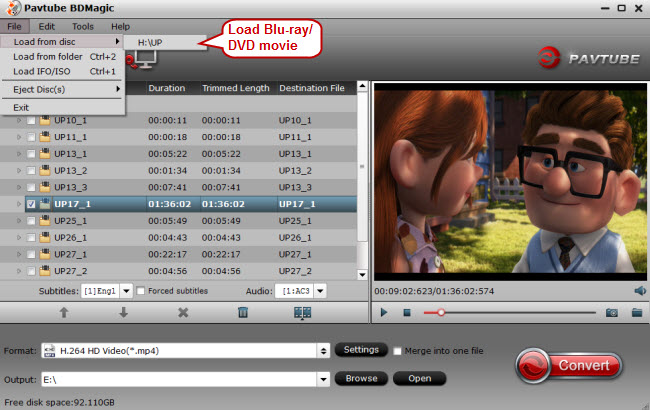
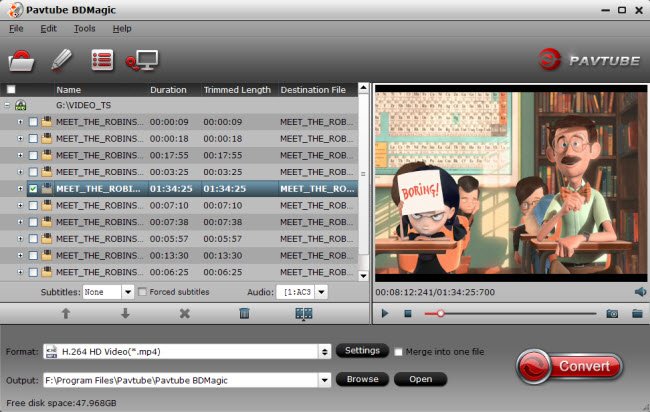
Step 1. Run the best Video Converter you downloaded just now, and click the “Add” button to load MP4 videos. (Drag&drop function is another way to import videos.)

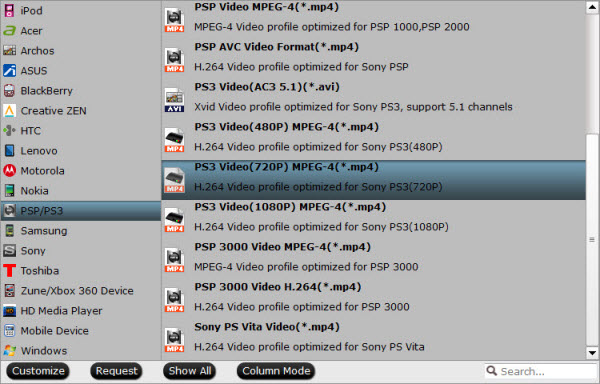
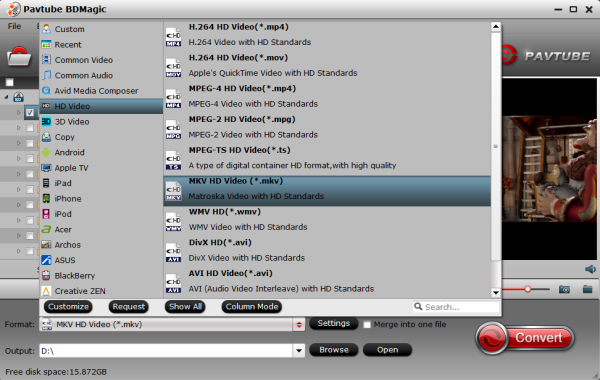
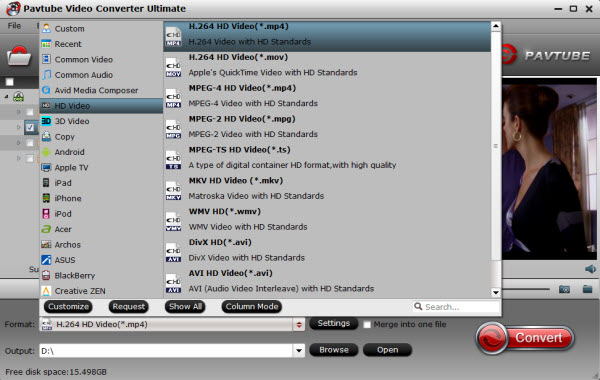
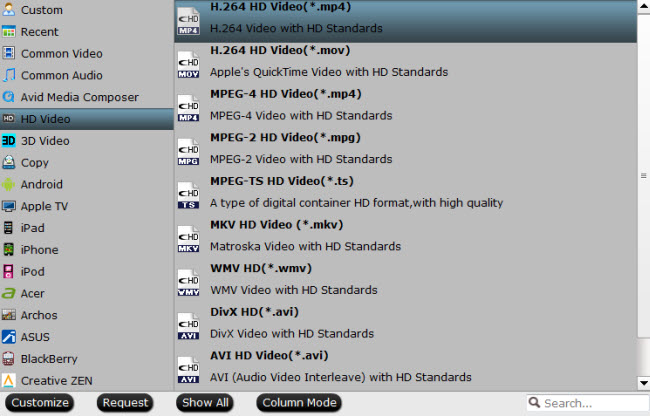
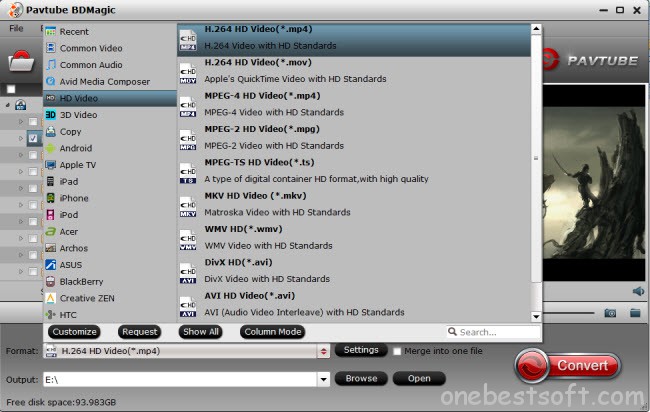
Step 2. Just go to “Format” bar to choose “WMV” format in “HD Video” or “Common Video”column. (AVI is also an editable format to Windows Movie Maker. )

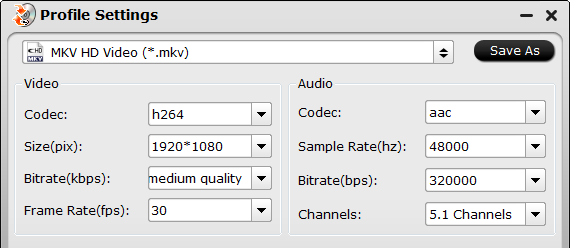
Tip: Click “Settings” icon to adjust parameters in “Profile Settings” panel including video size, bit rate, frame rate, sample rate and audio channels to meet your own demands.

Step 3. After all settings, tap “Convert” button to start transcoding MP4 to WMV for Windows Movie Maker.

Once the conversion is finished, you can get the output files effortlessly via “Open” button, and now you are able to import and edit MP4 files in Windows Movie Maker without any issue.

Step 4. Import MP4 to Windows Movie Maker. Depending on your version of Windows Movie Maker or Windows Live Movie Maker, the buttons are slightly different:

Import MP4 video to Windows Movie Maker: When the conversion complete, open Windows Movie Maker and click “Import” or “Import Video” on the left to import your video to the movie collection and drag and drop to the timeline for editing.

Import MP4 video to Windows Live Movie Maker: Start Windows Live Movie Maker and go to “Home” tab in the ribbon menu and click “Add video” in the “Add” panel to locate the converted MP4 video.

Read More:

Solved – Play .avi files through Roku 4 on TV

Leave a comment

The Roku 4 Streaming Player offers brilliant picture quality for 4K Ultra HD and standard HD TVs. This innovative device makes it easy to find what’s on, where you can watch programs or films for free and whether a subscription is needed. The player media streaming player can even tell you or how much different channels charge to rent or buy the program or film you’d like to watch. With this device you can enjoy more than 2,500 streaming channels. But from some forums, many users asked Roku 4 play AVI files. Though the Roku USB Media Player channel enables us to play personal video files on our TV, it only supports the following formats:

Best Video/Audio formats for Roku Media Player:

Video — MKV (H.264), MP4 (H.264), MOV (H.264), WMV (VC-1, firmware 3.1 only)
Audio — AAC, MP3, WMA, FLAC (firmware 5.3 and later), WAV (firmware 5.3 and later)
Photo — JPG, PNG, GIF (non-animated)

As you see, the Roku 4 does not support AVI videos. So if we try to stream AVI to Roku USB channel from computer or external USB drive, this app will not show AVI, let alone to helps us to play AVI on TV. Is there no way to play AVI on Roku? Right here. This article just aims to introduce an easy way to play AVI with the Roku USB channel on your TV.

Luckily, there is an easy workaround to make your AVI movies playable on Roku 4. You just need to encode/re-encode AVI to Roku 4 supported MP4 videos. To convert AVI to Roku friendly formats, you can use HandBrake to convert AVI videos to Roku, here Pavtube Video Converter Ultimate is highly recommended to you for better smooth and wonderful conversion. It’s a hassle-free audio and video file converter that will seamlessly make any file fully compatible with the Roku 4.

With it, you also can fast convert DVD, Blu-ray, ISO, and SD/HD/4K AVI, MKV, VOB, MPG, Youtube Videos, MOV, H.265 files to Roku 4 compatible formats while keeping the orginal video quality. The equivalent Mac version is Pavtube iMedia Converter for Mac.

Download it now and follow the step-by-step guide to encode AVI to play on Roku 4 without hassle.

How to make unsupported AVI video formats accepted by Roku 4?

1. Run this best AVI to Roku video Converter; click the “Add” button to load movie files to the program from your computer. You can also directly drag the video files into the program.

2. Hit the “Format” bar on the main interface, here we can choose the desired format. Especially for Roku, we would like to introduce you the “Common Video” or “HD Video” >> ”H.264 HD Video (*.mp4)” to you.

Tip: If you like, you can click “Settings” to change the video encoder, resolution, frame rate, etc. as you wish. Keep in mind the file size and video quality is based more on bitrate than resolution which means bitrate higher results in big file size, and lower visible quality loss, and vice versa.

3. Finally, hit the start conversion button to star converting AVI to mp4 for Roku 4 playback. After the conversion is completed, transfer the converted videos to Roku’s SD card or to a USB stick that can be attached to Roku 4 streaming player, at last stream the videos to TV via Roku.

Top Roku tricks you should try right now

Is there a more widely beloved tech product than the Roku streamer? Whether yours is a stick or box, it delivers virtually unparalleled video goodness to your TV: Netflix, Hulu, HBO and so on.

And, yet, it could be better. That onscreen keyboard? Bleh. The default interface theme? Room for improvement. Below I’ve rounded up nine ways to improve your Roku experience, from organizing channels to adding buttons (no, really) to your Roku remote.

Use your phone as your Roku keyboard

Is there anything more aggravating than using a remote to operate an onscreen keyboard? Just signing in to, say, your Netflix account can be a slow, agonizing affair, to say nothing of searching for actors or movies.

Thankfully, there’s an easy fix: Use your phone instead. As you probably know, the Roku apps (Android|iOS) can take the place of your Roku remote, but they also provide a keyboard that makes data entry significantly faster and easier.

So anytime you land at your Roku’s onscreen keyboard on your TV, whether for a search or sign-in, just run the app, tap Remote and then tap the keyboard icon near the bottom of the screen. Now you can tap-type! Or, power tip, tap the keyboard’s microphone icon and “type” your entry using your voice. Speaking of which…

Use your phone for voice search

You know what’s even faster than a keyboard? The spoken word. If you’re lucky enough to have a current-generation Roku 3 or 4, you may have discovered the joys of voice search, which you can operate via the Roku remote.

Don’t own one of those models? No problem: the Roku app now offers voice-search capabilities of its own. So instead of tapping out, say, “Leonardo DiCaprio” to find his available movies (and risk spelling it wrong), you can just tap the Search option, then Voice, and actually say “Leonardo DiCaprio.”

Stream media from your phone or tablet

Want to show everyone the photos and/or videos you took at the recent wedding, graduation, soccer game or zombie escape room? Don’t gather them around your relatively tiny phone or tablet; gather them around the TV instead. The Roku app lets you cast photos, videos and music from your mobile device to your streamer.

Just fire up the app and tap Play On Roku. Choose the kind of media you want to stream, then the specific media. Presto! Big-screen viewing from your small(er)-screen device.

Want to take this a step further? You can also mirror your smartphone or tablet to your Roku device.

Install a screensaver

Tired of that Roku logo bouncing around whenever your streamer sits idle for a while? Why not choose a screensaver that’s a little more interesting?

As with selecting a theme, you can head to the Settings menu and then choose Screensaver for a handful of other options. (If you’ve already chosen a different theme, you may see other screensaver options already. Nebula, for example, offers a digital clock in place of the bouncing Roku logo.)

And, again, you can head to the Channel Store to find lots of other screensavers: aquariums, animated fireplaces, headlines from “The Onion,” even a Nixie Clock. A handful are free; most will cost you a buck or two.

Note: Pavtube Converting tools can help your get out of all compatibility issues for Roku 4 and other latest mobiles & tablets, such as ChromecastApple TV 3, Plex, PS3, NAS, Xbox, Galaxy Tab S, iPhoneiPadGoogle Nexus 7, Nexus 9, and other devices. Read Pavtube Softwares Comparison.

Related Articles:

Watch H.265 Videos on Beelink MINI MX TV Box with MX Player

Leave a comment

Beelink MINI MX Amlogic S905 Android media player has similar features, and costs about the same as K1 Plus TV box I reviewed last week, so it would be interesting to compare both. It supports Gigabit Ethernet which could be an advantage while playing high bitrate 4K videos, as well a Bluetooth 4.0. Beelink Mini MX TV Box runs on Android 5.1 Lollipop OS which opens up your TV system to a whole new world with thousands of Android games that you can install, run and play them on your Television set.

If you’ve ever watched H.265 videos which download from online website on Beelink MINI MX TV Box Via MX Player you may come across the same problems about “how to put these H.265 videos on Beelink MINI MX TV Box?”. This guide will help you get out of the terrible situation. Actually, the best way to watching H.265 Videos on Beelink MINI MX TV Box with MX Player is that convert the H.265 Videos to Beelink MINI MX TV Box supported Video format.

>> Learn >> Beelink MINI MX TV Box supported Video format

Here, Pavtube Video Converter Ultimate a professional HEVC/H.265 converter, can convert HEVC/H.265 to any video format you need, like HEVC to H.264, HEVC to MP4, HEVC to MOV, AVI, WMV, MPEG-4, MKV, RMVB, VOB, Xvid, Divx, MTS, M2TS, MXF, ProRes, etc. By using it, you can transcode HEVC files for using in video editing software like FCP, iMovie, Adobe Premiere Pro, or playing on portable devices like smartphones and tablets. Here is review.

Note: Its Mac verison Pavtube iMedia Converter for Mac is much cheaper in Pavtube Father’s Day Coupon from Facebook. It supports El Capitan system so you can convert H.265 to Beelink MINI MX TV Box/MX Player on mac OS X El Capitan without any issue.

Free Download Top H.265 to Beelink MINI MX TV Box Converter:


Other Download:
– Pavtube old official address: http://www.pavtube.cn/blu-ray-video-converter-ultimate/
– Cnet Download: http://download.cnet.com/Pavtube-Video-Converter-Ultimate/3000-2194_4-75938564.html

Step Guide: View H.265 Videos on Beelink MINI MX TV Box Via MX Player

Step 1. Load H.265 Videos

Run the H.265 Video Converter program, go to the menu bar, select Add button to select the H.265 files you want to import. You can also directly drag the video files to the program for conversion. It supports batch conversion so you can import multiple files at a time.

Step 2. Select Output Format

Click the “Format” option, and choose MPEG4, MOV from Common Video profile list. If you want to keep 1080p resolution as source movies, you can choose HD Video -> H.264 HD Video(*.mp4) for Beelink MINI MX TV Box.

Step 3. Edit H.264 video files – Optional

There are still some popular functional items we can take around on the main interface, for example, in the ‘Edit’ button, we have offered you the ‘Trim’ to decide the video length, ‘Crop’ to remove the unwanted edges, ‘Subtitles’ to add some extra explanations? More you can have a try here.

Step 3. Start conversion

When all the settings are done, click the Convert button to start encoding H.265 files to H.264. The conversion time depends on your video size, computer performance, output settings, etc. Generally, it won’t take too long. After the conversion, you’ll get resulted H.265(HEVC) videos for Beelink MINI MX TV Box better usage.

Much wonderful software bundled with Video Converter Ultimate will provide you more amazing experience in converting videos. Go to Money Saving Software Bundles to get special offer for more software, such as ByteCopy + Video Converter Ultimate = Only $79.9, Save $27.1, Video Converter Ultimate($65) + ChewTune($29) = Only $74.9, Save $19.1 and so on.

Read More:

Do the PS4 actually support Netflix 4K streaming?

Leave a comment

If you are a video game enthusiast, you must have heard about or owned the Sony PlayStation 4, Unfortunately, while Netflix does offer 4K movie streaming for an additional monthly charge, the PlayStation 4 and Xbox One do not currently offer an option for 4K video output, whether for video games or photos and videos. Without doubt, you may have come across the same puzzle about “4K Netflix content not coming through PS4”as below:

“I really hope you can help me. I have a PS4, I have Netflix 4K subscription and I have a Panasonic TX55CX700B TV (which has HDCP2.2). If I open the Netflix App directly through the TV and play 4K content it streams beautifully and even states in top corner in netflix that its ULTRA HD 4K. However if I then switch to the PS4, open the Netflix App and select the same 4k content it plays on the TV but in top corner it simply says HD and doesnt look anywhere near as good. The issue I have is all my surround sound is coming through an Amp to which the PS4 is connected so prefer to just have everything through PS4.”

Moreover, one of the most headline-grabbing features of the PS4 is that it supports 4K movie streaming! You can stream the popular Netflix 4K videos to PS4 for nice playing. Amazing, isn’t it? However, the PS4 does not support all 4K videos due to the formats and complicated codecs. Currently, most 4K movies are MXF/RAW/XAVC/XAVC-S format, while PS4 supports .mp4 files best. That means, although you can play 4K movie with PS4, there’re not many 4K MP4 video source available for you. That’s so pity. Luckily, now we’ve got this problem fixed! You know what, Doremisoft Studio has specially developed a new app called 4K Video Converter that can perfectly convert any 4K video to PS4 accepted format with 100% the original 4K video quality kept. With its help, playing 4K movie with PS4 will be so much easier.

Here, Pavtube Video Converter Ultimate as a top 4K to PS4 Converter app. It’s a professional yet decent 4K Movie Converter for PS4, or an alternative to FFmpeg, with the built-in video editor, it’s freely for you to trim the 4K videos into multiple segments with short duration. The most important is that, it allows you to modify the video bitrate, frame rate, video size, audio channel, etc for your original 4K clips for easier streaming. With its help, playing 4K movie with PS4 or other portable devices like Windows 10 tablets/phones will be so much easier. Just download it and follow below steps to convert 4K Movies and Videos to PS4 for enjoying now.

Besides, this powerful 4K to PS4 video converter also can convert other videos like H.265/HEVCMP4DVDMKV, 4K, MOV, MXF etc and various audio like M4A/WAV/DTS/AAC/WMA/FLAC to PS4 supported formats for smooth streaming and watching. (read review)

Follow the guide below to enjoy the 4K Netflix movies on PS4:


Other Download:

– Pavtube old official address: http://www.pavtube.cn/blu-ray-video-converter-ultimate/
– Cnet Download: http://download.cnet.com/Pavtube-Video-Converter-Ultimate/3000-2194_4-75938564.html

Step-by-step-guide to Stream Netflix 4K Movies/Videos to PS4 formats for streaming and playing

Step 1: Load 4K files

Install and run the 4K video converter on your computer, install and run the program, then click the “Add File” button on the top menu to add .4K videos. Other way to do it is to directly drag-n-drop 4K file(s) on the program’s window. Other videos like MP4, MKV, AVI, Tivo, VOB, MPG, WMV, etc are also supported.

Step 2: Select the PS4 output format

Click on the dropdown menu of “Format” and then move your pointer to “PSP/PS3”. From the sub-list, you can choose “PS3 Video(720P) MPEG-4(*.mp4)”, “PS3 Video(1080P) MPEG-4(*.mp4)” that PS3 and PS4 read well there as shown below. Click on “Browse” button in the bottom-left corner of main interface (under “Format”) and the dialog opens up where you can set the name and the destination folder of resulting file.

Tip: For video experts, this 4k PS4 converter even gives you options to change the video encoding settings such as bitrate, aspect ratio, resolution, along with a slew of other settings for adjusting the audio quality. You can do this by clicking the “Settings” next to “Format”. Here I just accept the default settings, which are fine. Learn >>downsize your 4K to 1080p for PS4.

Step 3: Start 4K to PS4 conversion

After all necessary settings, you can hit the “Start conversion” to start converting 4K to MP4 with best video settings for Sony Playstation 4. Once the conversion finished, click “Open” in main interface to quick locate the converted video. Then, you can stream the converted movies to PS4 via DLNA or USB freely.

Tips: How to Transfer video to PS4 Video from PC/Mac

Media Streaming without DLNA | Via USB | Via Network

PlayStation 4 is thereby used as a host and a controller, through which you can play the HD movies on the display of computer monitor, video projector, digital television, or digital audio device with the help of HDMI or optical S/PDIF. We believe the Media Player will be a favorite new feature for PS4 owners who love to use their PS4 as the entertainment center of their living room. You can play 4K Movies and Videos on PlayStatin 4 (PS4) now.

Read More:

KMplayer vs VLC Media Player,which is the better one?

Leave a comment

Multimedia player is an essential entity in any system because almost everyone likes to watch videos on their system. For couple of years, some of such players have gained enormous popularity and have been first priority for video lovers. VLC and KM Players are two such players which are leading tools for enjoying videos. But has anyone ever thought about which one would be the best player? Well, in this article we are going to take a brief comparative look at the attributes of both these contenders.

Recently the famous software related website Winmatrix has been posted a hot poll on the best media player among VLC, KMPlayer, BS player, GOM player and more. Based on the investigation result, KMPlayer and VLC stand out from the crowd. Why these two media players can tower above their rivals? Which one is the best video music player for you?

KMPlayer VS VLC: Which One Is the Best Media Player?

KMPlayer and VLC have their pros and cons. It’s hard to say which one is the best video player, since it eventually comes down to your own needs. If you are pursuing the media player to play back as many files formats as possible (even the incomplete files included) on any platform, then VLC media player is the second-to-none choice for you. And for those friends who plan to give 3D format a spin and expect to synchronize the customized files, KMPlayer is the ideal expert in this regard.

KMPlayer VS VLC: VLC Media Player Android Alternatives

Difference Between KMPlayer and VLC Player

Main Difference:

The main difference that exist between KMPlayer and VLC Player is that KMPlayer is not portable and not open source while VLC Player has both qualities.KMPlayer VS VLC PlayerKMPlayer:

KMPlayer is a freeware and adware media player for Windows Operating System the can play various number of format. It was released on October 1, 2002 and is now available in thirty international languages. KMPlayer is supportable for Windows Operating System, iOS and Android. It supports 3D format videos with a low CPU Memory share and provides an optimized, stable playback through GPU support. For Mac OS X it is still under development.VLC Player:

VLC Player is a free and open source, cross-platform, and portable media player that was developed by the VideoLAN project. It is also a streaming media server and can stream media over computer networks and to transcode multimedia files. VLC Player is capable of playing media files in Linux, Mac OS X, BSD, Solaris, Windows Phone QNX, Haiku, Syllable, OS/2, Windows 7, Windows Vista, Windows XP, Android, and iOS.

Differences:

Following are the basic differences between KMPlayer and VLC Player.

  • KMPlayer is best for its rare 3D format playback functionality that is not available in VLC Player.
  • VLC Player is also available in portable version while KMPlayer is not available in portable version.
  • VLC Player has the capability of working as streaming media server that is lacking in KMPlayer.
  • KMPlayer is a freeware and adware media player while VLC Player is a free and open-source media player.
  • KMPlayer is available in thirty international languages while VLC Player is available in 48 international languages.
  • VLC Player can work on Linux and Mac OS X by using the libdvdcss DVD decryption. It is also supportive for Android and iOS. KMPlayer is available for Windows Operating System, iOS and Android.
  • For laptop, KMPlayer is best to use while VLC Player sound size is greater than the capacity of speakers, that’s why it can destroy the speakers.

Source:http://www.differencebtw.com/difference-between-kmplayer-and-vlc-player/

Pavtube BDMagic–A better media player alternative of VLC and KMplayer

As Blu-ray disc movies are not supported by VLC player directly, if you want to play, you will need a professional Blu-ray converter to rip Blu-ray to VLC player supported formats beforehand.

Here, Pavtube BDMagic is such a magic tool to help you roll off your Blu-ray protection and rip Blu-ray to best MKV HD for playback on VLC with perfect aspect ratio. Mac version is available here: Pavtube BDMagic for Mac, well support Mac Mavericks. Once you convert Blu-ray to VLC accepted file format, you can play Blu-ray movies without problems. (Read Top 5 Best Selling Windows/Mac Blu-ray Rippers Review)How to watch my Blu-rays on VLC player in full screen?

Surely, it’s not necessary to purposely buy a Blu-ray Player just for watching Blu-rays on VLC; as long as you havean external Blu-ray drive, we can make all this happen.

Step 1. Run Best Blu-ray to VLC Converter and import disc.

Click “Load file(s)” icon to load Blu-ray disc from ROM, or Blu-ray folder, ISO images files. DVDs are also supported.

I also noticed if you have an ISO file to import, it will recognize the ISO automatically with no need to run virtual driver and mount ISO files firstly. Good design.

Step 2. Choose VLC supported video format.

Click“Format” drop-down list and choose “HD video> MKV HD Video (*.mkv)”; it’sthe most widely used format which will be supported by your VLC Player. What’s more, it is easy to rip Blu-ray to Dune HD Media PlayerWindows Media Player and Asus O!Play Mini Plus.

Step 3. Adjust video specs or change aspect ratio (Optional)

If you are not satisfied with default specs, then click “Settings” to enter Profiles Settings windows; here you can customize video frame rate, bitrate,size and other settings freely.

If you want to trim, crop, edit audio/subtitles or adjust aspect ratio, click the pencil-like icon and switch to “Crop” tab. Choose Advanced mode, lock the “Keep Ratio” and you can free change aspect ratio. (Usually it will be set to “Original”).

Step 4. Start conversion.

Click the big red “Convert” to start converting your Blu-rays to H.264 MKV HD. After the conversion, click “Open output folder” to quick locate converted files; now add the converted Blu-ray movie in HD MKV to your VLC Player for watching in full screen.

Enjoy your Blu-ray movies in VLC with your friends and family now! Want to learn more info about How to Use BDMagic to rip Bluray for your media players, please refer to the tips here.

Note: Much wonderful software bundled with BDMagic will provide you more amazing experience in converting videos. Go to Money Saving Software Bundles to get special offer for more software, such as BDMagic($49) + DVD Creator($35) = Only $49.9, Save $28.1, BDMagic($49) + ChewTune($29)= Only $49.9, Save $28.1 and so on.

Read More:

How to Play All 3D Movies on the HTC Vive?

Leave a comment

VR is getting closer and closer! Have you already equipped your room to get the best gaming experience? If not, it is not a big deal, since soon you will be able to enjoy the same full immersion in cinemas and shopping malls. The HTC Vive is one of two major virtual reality (VR) headsets to be launching this year, but should you order it? As a new product, VR device like HTC Vive can give you different visual experience, you can use it to play games or watch movies, and it is very interesting.

Maybe you have got HTC Vive and want to play downloaded 3D Movies with HTC Vive on your computer, on HTC Vive related forums many users have need to backup 3D Movies to computer and then watch 3D Movies with HTC Vive through your devices/computer. So, you can’t deny that there is a possibility that your 3D movies are not supported by HTC Vive. In this case, you need to convert these 3D content to 3D MP4/MKV for HTC Vive.

Hot Search: ISO Movies on Gear VR | Copy (3D) Blu-ray | 3D movies on Gear VR | 3D Blu-ray on HTC Vive |

Here, Pavtube 3D Video Converter Ultimate can help you transcode the 3D movies to HTC Vive suitable MKV formats. It can easily change the original 3D movies to 3D MKV with just several clicks. And you are allowed to adjust the video and audio parameters in profile settings window. Let’s get the 3D Converter Ultimate follow the steps given below!

What’s more, it’s also a huge time saver, 6x faster speed while keeping outstanding quality. The 3D models include Anaglyph (Red/cyan), Anaglyph (Green/magenta), Anaglyph (Amber/blue), Side By Side (Full), Side by Side (Half-Width), Top and Bottom (Full), Top and Bottom (Half-Height). Or get mac version for 3D movie creating.


Other Download:

– Pavtube old official address: http://www.pavtube.cn/blu-ray-video-converter-ultimate/
– Cnet Download: http://download.cnet.com/Pavtube-Video-Converter-Ultimate/3000-2194_4-75938564.html

How to Use them to Watch 3D Movie on HTC Vive through Devices

Step 1. Load 3D Video files.

Click “File” icon to load 3D movie source to this 3D Video converter Ultimate. Or you can simply drag and drop the video into it.

Step 2. Select output profile format.

Tap on Format bane and open profile list. Find and choose the optimized video format for HTC Vive.

Note: Although there is a profile created by the application, we can always change some parameters of resolution, compression, audio, etc. An important issue that you must consider that in Samsung Gear VR resolution for each eye is not FullHD but half the QHD screen. So you can free change your target video size, bitrate, frame rate and 3D depth in “Settings”. If you want to get best video quality, pls switch them to “original”. 3D movies should be encoded “full side-by-side” with a 1:1 pixel aspect ratio. Content mastered at 1920X1080 compressed side–by–side 3D should be resampled to 1920X540 resolution full side–by–side resolution (Learn more) The developer edition has a stated resolution of 1080x1200px, split across both eyes. It’s also sporting a 90Hz refresh rate. Both specs are generally on par which what we’d expect at this stage in the device’s development>.

Step 3. Start conversion.

Click “Convert” button and start 3D movie compatible MKV format video conversion. After conversion, you can get the converted files by clicking “Open” button. Then you can watching them by HTC Vive.

Much wonderful software bundled with Video Converter Ultimate will provide you more amazing experience in converting videos. Go to Money Saving Software Bundles to get special offer for more software, such as ByteCopy + Video Converter Ultimate = Only $79.9, Save $27.1, Video Converter Ultimate($65) + ChewTune($29) = Only $74.9, Save $19.1 and so on.

Read More:

Easy Way to Watch Movies on HDTV Stored on External Hard Drive

Leave a comment

If you have an external hard drive, you probably would like to load your movies to external hard drive, then they can be viewed on your computer, PS3, WD TV, as well as your HDTV for a much better movie experience. By loading a few movies (including ones in HD) onto an external hard drive, then they can be viewed on your PC computer as well as your HDTV. Yeah, a bigger high definition display means a lot in movie fun. And this tutorial is all about how to play movies from your external hard drive on your HDTV.

Hot Search: Blu-ray to Lacie External Hard Drive | Blu-ray on Seagate Wireless | DVD to Drobo 5N Network | Movies to UnRAID Server |

But you should be aware that not every HDTV set will allow you to play video that is stored on your external hard drive, and that not all videos are supported by your HDTV. So firstly you need to find out whether or not your HDTV will support movie playback from an external hard drive. In order to check that, please read the instruction manual for your HDTV set. If you have the issues about moving videos to HDTV from External Hard Drive, you have to find a top video converter to help you.

According to our many tests, we sincerely recommend Pavtube Video Converter Ultimate to you. It is capable of convert any videos and movies like DVD, Blu-ray, H.265, etc to MP4, AVI, MKV for external hard drive storage on HDTV with no quality loss. In addition to converting Videos to HDTV formats, it can also convert among more than one hundred videos formats including AVI, MXF, MTS, MVI, FLV, MOV, WMV, MPG, MKV to Rokusupported video formats. Here is review.

Besides that, It supports to convert multiple video formats to another format for popular portable devices with fast conversion speed without any quality loss. And you can edit the videos such as merge multiple videos into one, trim, crop, add watermarks including image, text and videos and so on. For Mac users, iMedia Converter for Mac is a helpful app to encode videos for further usage. Now, just download the Video/Movie Converter and follow this step by step guide to convert Video/Movie to External Hard Drive/HDTV supported video format for playback with ease.

Free Download Top Video Converter for External Hard Drive:


Other Download:

– Pavtube old official address: http://www.pavtube.cn/blu-ray-video-converter-ultimate/
– Cnet Download: http://download.cnet.com/Pavtube-Video-Converter-Ultimate/3000-2194_4-75938564.html

How to Convert Videos to HDTV Compatible Format from External Hard Drive

Step 1. Import video files

Connect your external hard drive to your PC and drag and drop your movies to the PC Video Converter. Alternatively, you can go to the “File” menu then choose “Add Video” to add your videos.

Step 2. Choose output format

Click “Format” dropdown list to choose “MKV HD Video (*.mkv)” or “H.264 HD Video (*.mp4)” under “HD Video” option as External Hard Drive compatible video. H.264 MP4 will create high quality files and generate big file size. If you need a smaller file, “MPEG-4 HD Video (*.mp4)” is also offered.

Or Click ” HD Video” from “Format” to select an output format like MP4, MOV, AVI, MKV, etc, or directly from “TVs” choose one suitable output format.

Tip: You can click the Settings icon to adjust the video, aduio parameters including video size, bitrate, frame rate, audio smaple rate, audio channel. Please remember the file size is based more on bitrate than resolution which means bitrate higher results in bigger file size, and lower visible quality loss.

Step 3. Start conversion

Click the big green”Start Conversion” and wait for a moment. This program will help you convert videos to HDTV supported format within seconds. When the conversion is finished, you can click “Open” button to get the video files effortlessly.

If you are a Mac user, get Pavtube iMedia Converter for Mac, and the top video converter for Mac is nowcompatible with Mac OS X El Capitan.

Note: Much wonderful software bundled with Video Converter Ultimate will provide you more amazing experience in converting videos. Go to Money Saving Software Bundles to get special offer for more software, such asByteCopy + Video Converter Ultimate = Only $79.9, Save $27.1, Video Converter Ultimate($65) + ChewTune($29) = Only $74.9, Save $19.1 and so on.

Tips: How to Watch Movies on HDTV Stored on External Hard Drive

To Watch Movies on HDTV from your external hard drive isn’t difficult, but it can get frustrating if you don’t know what you’re doing. Some HDTVs and external hard drives are incompatible. If you have incompatible hardware that doesn’t work together, then you won’t get video playback easily. Read this article to find out more about playing videos from your hard drive on your HDTV.

Required Equipment

You don’t really need any special cables or hardware, but you do need a HDTV and external hard drive that are compatible with each other. The first thing you need to ensure is that your HDTV is capable of supporting an external hard drive. This is becoming more popular, but there are still many models that don’t have this functionality. You can typically find out if your HDTV is compatible or not by looking through the user manual.

You must ensure the same of the external hard drive. Most hard drives can play video once they are connected to the HDTV, but there are some that won’t. You need to read the user manual for more information, or you should consult a sales representative or the Internet for more information on this because it is a model-by-model case.

Proper Video Format

Most HDTVs have a specific list of video formats that it can play. For example, one HDTV might be able to play MP4, while another might play MKV. It is best to have a video converter to convert your existing movies to the proper format. While there are many free converters, it’s best to use a paid one. This is because most free ones have limited functionality, and they tend to leave a watermark.

Video conversion is easy. Just open the program, tell it what format you want the videos converted to and drag the videos into the program. It will do the rest for you. Then you just need to put those files on the hard drive so that you can play them on the HDTV.

Connect the Hard Drive

Connecting a hard drive to an HDTV is very simple, and typically requires a common USB cable. Just connect one end of the cable to the hard drive, the other to the HDTV and then it should start playing the movies. You might need to select the hard drive from the HDTV’s menu depending on its interface, but other HDTVs might start playing the movies as soon as you connect the hard drive.

Conclusion

Playing movies from an external hard drive is easy, and there is very little work involved. You just need to ensure that the hard drive and HDTV are compatible, convert the videos into the proper format with a video converter program and then connect the hard drive with a USB cable. This should just take you a few minutes, and then you will be able to play all the movies you want.

Source:http://www.beinggeeks.com/2012/08/watch-movies-hdtv-stored-external-hard-drive.html

Read More:

DVDFab Alternative – Copy BD ISO to Popcorn Hours for Playback

Leave a comment

Popcorn Hour is one of the few streaming players that supports 3D Blu-Ray, which, if you have a big screen HDTV, you’re going to want a stream with 3D Blu-Ray capabilities. The viewing experience is simply phenomenal! However, when you’re trying to put Blu-ray ISO/IFO file folders to Popcorn Hours, you may failed.

Commen issues as below: 

Q: “Currently I have 300ish blurays that have been copied to a home server in ISO format. I then stream them through the house using Popcorn Hours to display them on the displays. I am wanting to have a smaller file size. I have been using DVDFAB but I am become less happy with it. So, any good software you can recommendtion? Or DVDFab Alternative? Or other methods? Thanks in advance. “

As we all know, Popcorn Hour line(A-500, A-400, A-200, C-300, etc) and a smart TV like Samsung TV in parallel, although Popcorn can support ISO but HDTV does not. So, what we need to do to make the Popcorn Hour play Blu-ray ISO movies is to convert Blu-ray ISO to format like MKV, MOV or so. As Top DVDFab AlternativePavtube BDMagic will be the best ease of use with reasonable price and fast speed. Read the review.

With this program, you can decrypt Blu-rays and lossless re-encode Blu-rays to MKV, MP4 format and compress 1080p Blu-ray to compatible size for Popcorn Hours. Of course, this Blu-ray ripper can help you convert commercial Blu-ray/DVD/ISO/IFO movies to AVI, WMV, FLV, MOV, etc as well. What’s more, it can also enable you to rip Blu-ray ISO for directly playback on Android, iOS, Windows based devices. If you’re using a Mac, turn to Pavtube BDMagic for Mac, which allows you to convert Blu-ray to Popcorn Hour on Mac OS X (including El Capitan). Below will be the step-by-step guide for you.

Streaming Blu-ray ISO to Popcorn Hours Media Player

This guide uses Blu-ray Ripper for Windows (Including Windows 10) screenshots. The way to rip Blu-ray ISO to Popcorn Hours on Mac OS X El Capitan is almost the same. Just make sure you’ve downloaded the right version. We offers you top ISO to Popcorn Hours Converter:


Other Download:

– Pavtube old official address: http://www.pavtube.cn/blu-ray-ripper/
– Cnet Download: http://download.cnet.com/Pavtube-BDMagic/3000-7970_4-75922877.html

Step 1. Load ISO files.

Launch the program Run Pavtube ISO to Popcorn Hours Ripper, click “Load file” to choose Load IFO/ISO file. It will recognize the ISO image file automatically so that you will not have to run virtual drive to mount the ISO any more.

Note 1: For 300 Blu-rays, you can check the “Merge into one file” on the main interface; you will get multiple selected titles into one output file. It merges not only the chapter in to a title and file but also merges the titles in to one file.

Note 2: When playing Blu-ray ISO files, the PopCorn Hour plays the MAIN FEATURE ONLY. If you copy Blu-ray to .m2ts streams, you can copy the main feature only, leaving out menus and extras. This will save some storage for you.

Step 2. Choose MP4 format.

In the dropdown list of “Format”, there are a mass of video format. You can choose “HD Video -> H.264 HD Video (*.mp4)” directly or choose the desired portable devices which is the best streaming format via Popcorn Hour Media Player. Just choose according to your own needs.

NOTE: You are also allowed to change the video and audio parameters like codec, bitrate, channels, frame rate, etc. You can adjust it according to your demand or keep it default for output.

Step 3. Convert Blu-ray ISO to MP4.

Click the “Convert” button to start converting BD ISO to MP4 format. With the technology of CUDA acceleration it will provide you fast conversion speed. Once completed, go to “Open” the generated MP4 files. Now you can connect to an HDTV using an HDMI cable and access the Internet with either a direct connection to a router or by joining a home network like DLNA, just get your Blu-ray ISO playback on your Popcorn Hour Media Player with ease.

Learn>> Backup 50 GB Blu-ray Movies to 25 GB and Burn with Toast.

Note: Much wonderful software bundled with BDMagic will provide you more amazing experience in converting videos. Go to Money Saving Software Bundles to get special offer for more software, such as BDMagic($49) + DVD Creator($35) = Only $49.9, Save $28.1, BDMagic($49) + ChewTune($29) = Only $49.9, Save $28.1 and so on.

Read More:

Solved – Playing MP4 on my WD TV Live Streaming

Leave a comment

WD TV Live is really a gorgeous HD media player. I’ve started playing around with WD TV Live and it’s really freaking cool. As a network digital media player, it becomes one of the most commonly used media to connect between HDTVs and wireless networking – it lets you to play high-definition and common movies on a home theater system, with larger screen and powerful speakers. WD TV Live has a large compatibility in modern file format such as M2TS, WMV, AVI, VOB, WMV9, MKV, MOV, FLV, and codecs including Xvid, MPEG 1, MPEG-2, MPEG-4, h.264. The following article will explain the reason as well as provide an easy solution to successfully play all kinds of MP4 video files on WD TV Live.

Why WD TV Won’t Play MP4 Video Files?

Even the WD TV claims to supported video format if include WD TV unrecognized video or audio codec will fail to play on WD TV. For example, WD TV won’t play DV encoded AVI, WMV1 or WMV 2 encoded WMV, Motion JPEG encoded MKV, ProRes encoded MOV, H.265 encoded MP4 and etc.

To get unsupported MP4 to be played on WD TV Live, you will need a third-party video conversion program to convert unsupported MP4 to WD TV Live recognizable formats. Here, a standalone and simple to use application called Pavtube Video Converter Ultimate/Mac (support Mac OS X El Capitan) is recommended to you to complete the conversion. You can easily decode H.265 or other unsupported MP4 format to WD TV Live media player supported format with H.264 video codec and AC3 audio codec. Here is review.

Free Download and trail:


Other Download:

– Pavtube old official address: http://www.pavtube.cn/blu-ray-video-converter-ultimate/
– Cnet Download: http://download.cnet.com/Pavtube-Video-Converter-Ultimate/3000-2194_4-75938564.html

Step Guide: How to Converter MP4 files to WD TV Live Media Player

Step 1. Launch the WD TV Live Media Player Video Converter and import MP4 files.

Drag & drop MP4 Video files to the program directly. Or go to the “File” menu, choose “Add Video” to locate the MP4 files or MKV, AVI, WMV, FLV, MOV, MP4, MTS files you want to add. You can add several files to do batch conversion.

Tip: Freely select the subtitles for you MKV, AVI, WMV, FLV, MOV, MP4, MTS movies from the “Subtitles” option. Thus, you can watch MKV, AVI, WMV, FLV, MOV, MP4, MTS on WD TV Live Media Player with Subtitle.

Step 2: Set Output video format for WD TV Live Media Players.

Click the drop-down button on the right side of the “Format” to select “MP4″ from “Format > HD H.264 Vdieo (mp4)” Category, Which is suitable for WD TV Live Media Player.

Tips: Click “Settings” button, then you are able to adjust all the settings in the following window to customize the output file quality, including codec, size, bit rate, frame rate, sample rate and audio channel.

Step 3: Start converting MP4 videos to WD TV Live Media Player.

After the above steps are done, you can click “Convert” button to convert your MP4 Video to WD TV Live Media Player compaitable MP4 format. Easy operation and faster conversion speed, these two are the most outstanding points of this WD TV Live Media Player Video Converter.

Now try Pavtube multimedia tools versed in converting videos (SD/HD/4K UHD), movies (3D), TV shows(iTunes), music videos, discs (2D/3DBlu-ray/DVD/ISO) of various formats to iPad Pro, iPad Air 3, iPhone 7/6S/6S Plus/6/6 Plus, Xperia Z4, Surface Hub and other latest 4K mobile phones & tablets for watching on the go or at home. (See Pavtube Products comparison)

What’s next? Freely play the converted videos on HD TV.

One choice: You can copy the MP4 videos on your removable hard disk and then transfer them to WD TV for playing.

Another choice: Build a situation of DLNA, and then directly stream and play the converted videos restored on your PC hard drive with WD TV.

Good news! Pavtube Studio has rolled out 2016 Mother Day’s great promotion for all its customers, just join our Facebook community,you can then enjoy up to 50% OFF discounts for our high-ranked Blu-ray/DVD/Video media conversion tool!

Read More:

VLC/PowerDVD Alternative for Blu-ray/DVD Playback on Windows 10

Leave a comment

VLC and PowerDVD Crash After Windows 10 Upgrade ? “ My dad upgraded to Windows 10 a few days ago, however, now VLC and PowerDVD crash for some reason… they were working perfectly fine before the upgrade. For VLC, the video will freeze, but the audio will keep playing, but when you move the cursor to a point in the program, it just closes and crashes. However, there is no error report in the Event viewer.

Likewise, using PowerDVD 15 to play the same video, will completely freeze, both video and audio will freeze. He hasn’t tried playing an actual DVD/BD yet. He plays the video in the “Movies & TV” app and it plays fine.I’m at a loss for a solution, I’ve uninstalled VLC and reinstalled it. I use the same two programs and have had no issue.”

Many people may complain with this above cases. Then is there any solution to easily solve this problem? Actually, you need to find the best VLC and PowerDVD alternatives for help you solve this “VLC and PowerDVD Crash After Windows 10 Upgrade” problems. Here, you can find this guide from Pavtube BDMagic aims to solve this problem by giving us the ability to store our purchased physical Blu-ray/DVD discs to VLC/PowerDVD for playback. It’s professional in ripping and converting Blu-ray/DVD discs, Blu-ray/DVD ISO image, Blu-ray/DVD copies and more. Read the review. PS. Pavtube BDMagic also has Mac version: Pavtube BDMagic for Mac (Guide).

Hot Search: Blu-ray to VLC | VLC Files to MP4 | 4K Videos to VLC | 3D Movies to VLC | Blu-rays onto PowerDVD

Free Download Top Alternatives for VLC/PowerDVD:


Other Download:

– Pavtube old official address: http://www.pavtube.cn/blu-ray-ripper/
– Cnet Download: http://download.cnet.com/Pavtube-BDMagic/3000-7970_4-75922877.html

How to Convert Blu-ray/DVD to VLC/PowerDVD with Best Video Settings

Below is the detailed procedures on how to convert Blu-ray/DVD to VLC/PowerDVD supported format. And the screenshots are taken from the Windows version of Blu-ray Ripper. Please download the suitable version to your computer.

Step 1. Import your Blu-ray/DVD movies

Insert your Blu-ray disc into your BD drive, run the Blu-ray Ripper and click “BD/DVD disc” icon to load Blu-ray/DVD movies. You can also import movies files from Blu-ray folder, ISO image file.

Step 2. Choose VLC/PowerDVD preset as the output format

Select proper output video formats (e.g. MP4) for your VLC/PowerDVD media players according to the above mentioned compatible video formats by clicking the format bar to follow “HD Video” and you can see a list of HD video formats. Choose a proper one for your VLC/PowerDVD.

Note: If you want to convert Blu-ray/DVD to other video formats or portable devices, just choose the video format you need or select portable devices in the dropdown list.

Tips: Click on “Settings”, you can customize the video and audio settings if necessary.

Step 3. Start Blu-ray/DVD to VLC/PowerDVD conversion.

Click big “Convert” button to start conversion. It won’t take much time for conversion and then you will get the converted mp4 once completed. Hit “Open” button you will go to location of generated files.

It’s time to share you favorite movies to your friends. Get these Blu-ray movies for watching on VLC/PowerDVD 16 Standard or other versions which cannot support Blu-rays. Have a good day!

Read More: