Four Hidden features in iOS 7

Leave a comment

About a week ago, Apple released iOS 7 for iPhone, iPad, and iPod Touch owners.The update, which included several new features and a completely revamped interface, marked the biggest face-lift the mobile operating system has seen since its debut in 2007.

Features such as the new Command Center, revamped Camera app, added gestures, and redesigned Notification Center have seen a large amount of press. You may not have been aware, however, that Apple also added more, smaller changes to the operating system.

Here are a few important features you should know about in iOS 7:

Added security
You don’t need the fingerprint scanner in the iPhone 5S to have a secure device. It’s recommend that iPhone, iPad, and iPod Touch users utilize Apple’s Passcode feature. This can be enabled by going to Settings, followed by General, and selecting Passcode Lock.

From this window you can lock your device with a password or PIN, in addition to enabling certain actions, such as using Siri or replying to a text message, while the device is locked. There are a number of options available to you when you set up the Passcode feature; for example, you can set the device to lock immediately after the screen is shut off, or delay the feature from going into effect for up to 4 hours.

iOS_7

Continue reading »

How to get photos off of your Android phone

Leave a comment

If you’re anything like me, you probably have hundreds–if not thousands–of photos on your phone. Getting those photos off your phone isn’t always entirely obvious, but you have a number of options at your disposal.

Using USB

The traditional approach to getting stuff off your phone is to plug it into your computer using a USB cable.

On Windows: Windows treats Android phones like any other camera, so when you plug your phone into your computer, Windows will ask you what to do, just as it would if you plugged in your digital camera. You can peruse the actual files in Windows Explorer, have Windows Explorer import all the photos for you, or use another program to import the photos, like the Windows 8 Photo Viewer app.

On OS X:  If you’ve got a Mac, getting photos off your Android phone requires Google’s free Android File Transfer app, a very basic file browser app that runs on Mac OS X 10.5 or later, and works with Android phones and tablets running Android 3.0 Honeycomb or later. Once you install the app, it will automatically open whenever you attach an Android phone or tablet to your computer.

Your photos will be in one of two areas: The Pictures folder or the DCIM folder. Photos you took with your phone will likely be in your DCIM folder, while other photos or images (like screenshots) you keep on your phone will likely be in the Pictures folder. To save photos you took with your phone’s camera, double-click the DCIM folder. You may see another folder within that named “Camera.” Open this folder, and you should be able to get at your photos.

Email yourself

Android makes it easy to email photos to yourself. It’s not really an ideal option if you have more than a few photos you want to move off your phone, but it’s there if you need it.

Continue reading »

A guide to Free control your PC from your iPad

Leave a comment

There’s just one small wrinkle: Parallels Access costs $79.99 per year per computer. That’s a pretty steep price even if you have only one desktop. Fortunately, there are alternatives that give you very similar functionality for a much lower price: $0. One of them, TeamViewer, is free for personal use. And it’s available not just for iPad, but also for iPhone, Android, and Windows Phone 8. (On the desktop side, it’s compatible with Windows, Mac, and Linux.) Let’s see how you can get your iPad (or other mobile device) connected to your PC without spending a penny.

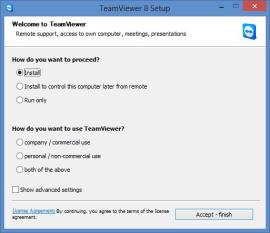
On your desktop, download and install TeamViewer. You’ll note that you have three installation options:

  • Install A full installation of the TeamViewer client, with all available options.
  • Install to control this computer later from remote If you want to be able to access your desktop remotely, without having to input a code (also known as “unattended access”), choose this option.
  • Run only The software runs, but nothing gets installed. This is a great option if you want to keep TeamViewer on, say, a flash drive. But it doesn’t allow for unattended access.

Whatever installation option you choose, be sure to choose “personal / non-commercial use” in the bottom half of the setup window.

Now install TeamViewer on your mobile device. Run the app, then enter the ID number shown in the desktop client, followed by the password. If you set up unattended access, you’ll need only the password (which you created) for future sessions.

TeamViewer_2

Once you’re connected, you’ll immediately see your desktop on your device screen. Things may look a little different if your desktop had to switch resolutions to accommodate the remote connection, but ultimately you’ve now got touch-powered control over your PC or Mac.

It’ll take a bit of practice to learn how to use your fingers in place of a mouse. For example, finger-taps work the way mouse-clicks do, but only if you’ve dragged your cursor to where you want to click. Scrolling requires two fingers, same as with a lot of laptop touchpads. Zooming is a pinch affair, same as on the iPad proper.

For help and access to TeamViewer tools, tap the little round keyboard icon in the lower-right corner of the screen. It brings up a toolbar, which on the iPad looks like this.

TeamViewer_3

TeamViewer may not “appify” your desktop programs the way Parallels Access does, but it does give you easy, cost-free remote access to your PC or Mac — great for running programs you can’t get on your phone or tablet, retrieving a file you left behind, checking your e-mail archive, and so on.

Is there another remote-access tool you like better? Talk it up in the comments.

Original

How to: Wirelessly migrate data between Samsung Galaxy devices

Leave a comment

Transferring contacts and personal data from your old phone to a new one used to be a cumbersome ordeal. These days, it’s a much simpler process and in some cases, you don’t even need cables or wires to copy your data.

On Android phones, just having a Google account takes care of your contacts, bookmarks, apps, and more. However, it won’t help you copy old SMS/MMS messages, pictures, music, and other files. For Samsung Galaxy users, there’s an easy way to get those files over to your new Galaxy device (say, Galaxy note 3). Samsung’s Smart Switch Mobile app lets you wirelessly transfer data from your old Galaxy device to your new Galaxy device. Here’s how:

Step 1: Install the Samsung Smart Switch Mobile app on both of your Galaxy devices.

Step 2: Position the two Galaxy devices within 50 cm of each other, then launch the app on both devices. Tap on the Connect button from one of them to initiate the connection.

wirelessly-samsung-1

Continue reading »

Guide: Install Android 4.3 Jelly Bean on your Nexus 7, Nexus 10, Nexus 4

Leave a comment

Jelly Bean 4.3 isn’t a big update, and you might be happy to wait for Google to make available the update to your Nexus tablet, but we’re pretty impatient. Plus, we’re itching to try out the new ability to update user profiles with content restrictions, which is ideal if young children will be using the tablet.

Here’s how to get the Android 4.3 Jelly Bean update on your Nexus 7 or Nexus 10 tablet the easy way.

Install Android 4.3 Jelly Bean on your Nexus 7, Nexus 10

Step 1. First check what version of Android your Nexus tablet is running. From the home screen, pull down from the top right of the screen and choose Settings. Scroll down to About tablet, then look under Android version. You’ll most likely find Android 4.2.2 here, or perhaps Android 4.1 if you’ve never updated your tablet.

Step 2. Next, check whether Google has already made available the Android 4.3 Jelly Bean update for your tablet. In the same menu, tap on System updates. The next screen will either inform you that an update is available, or state when the tablet was last updated. If no update is available, tap Check now.

Chances are you’ll find that still no Android 4.3 update is available. At this point you can sit back and wait a few days for the new flavour of Jelly Bean to appear, or you can force your tablet to download the update.

Android_4.3_step2_thumb

Continue reading »

Transfer data from your previous Android device to the HTC One

1 Thought

One of the most stressful parts of switching devices is the panic that sets in when you realize you have to figure out a way to transfer data. Thankfully, if you’re switching to the HTC One from another Android device, HTC has made the transfer process fairly simple.

  • The first thing you need to do is download and install the free HTC Transfer Tool from the Play Store on your old Android device.Then launch the app and pick up your shiny new HTC One.
HTC_One_Transfer_1

How to make a DVD movie with subtitle by yourself

1 Thought

There are kinds of video files in different video formats, like AVI, WMV, VOB, MKV, MTS… No matter where you got them, maybe it’s just a entire movie file you downloaded from websites. Anyway, they give you something meaningful or funny. Want to share the movie file with your relatives and friends or store the movie for ever? It’s natural to think of burning them on disc.

Meanwhile, if the movie is foreign. We need to download and attach our mother tongue subtitles, otherwise, we cannot understand any word in it. Here is a full tutorial talking about how to add subtitle to your video and burn it to DVD disc.

Part One: How to add subtitles to a movie file?

Step 1. Download and install Pavtube video converter on your PC.

http://win8-android-tablet.com/image/vc-steps.png

Step 2. Load your source movie file into the program.

Continue reading »

The way adding flash to android

3 Thoughts

While web developers are slowly moving to HTML5, we aren’t convinced that computing is truly ready for a Flash-free world just yet. If you own a Nexus 7, Nexus 10, or any other tablet or smartphone running Android Jelly Bean, by now you’ll have noticed that many of the things for which you wanted that tablet – watching catch-up TV and online video, casual gaming – just don’t work. In many cases apps are available that add the functionality, but do you really want to install individual apps for every Flash site or service that you use? Or turn on the dusty old desktop just to catch up with EastEnders on iPlayer? That’s not very convenient.

We don’t even want to think about the Flash problem: we want to continue doing what we want, when we want in our browser, and not deal with the continous headache of switching between apps to find a solution that works. This stuff should be seamless. 

The good news is that although Android Jelly Bean doesn’t officially support Flash, it’s really easy to add Flash support to the OS. Here, we show you some simple tweaks to enable the playback of catch-up TV, online video and Flash games on a Google Nexus 10 or any other tablet running Android Jelly Bean.

Add Flash to Android: A quick fix

One of the simplest ways to add Flash to Android is to install Puffin Browser. Puffin builds in support for Flash, so all you need to do to add Flash to Android is install the browser via Google Play.

You don’t have to use Puffin as your primary browser, but you may find it quickly grows on you – not only is it incredibly fast (we recorded 204.6ms in SunSpider on our Nexus 10 Android Jelly Bean tablet), it also has some neat touches such as a virtual trackpad and a gamepad, the latter allowing you to map any keyboard function to its onscreen controls.

Continue reading »

Tips to select a suitable cell phone

2 Thoughts

Three key phone shopping essentials

1. Don’t be a cell phone cheapskate

Because of the way most people buy phones in the U.S. — under a two-year contract — chances are that once you commit to a handset, you’ll probably have it for a while. Unless you’re buying an unlocked device that’s not subsidized or a basic feature phone, it makes sense to spend as much as you can. This will help your handset stay fresh for a long time.

The Samsung Galaxy S4 packs an incredible amount of features.

2. Know what phone features you want

If you understand exactly what skills and abilities you’d like to see in your new phone, it’ll help you avoid paying too much for features you don’t want or need.

Continue reading »

Tutorial: The way turning Galaxy S4 into a universal remote

Leave a comment

Powered by WatchOn (and Peel), the S4 is more than just a substitute clicker — it’s an intelligent companion that can change the way you surf channels, personalizing your experience based on your (and your friends’) interests.

At least, that’s the promise. Here’s how to set up your S4 as a universal remote that controls your home theater system and gives you personalized recommendations based on your interests.

(And, for the record, you can still just about control any TV you come across.)

Launching the app

Launch the WatchOn app, which came preinstalled on your S4. Upon opening the app for the first time, you’ll be asked to surrender a little information about yourself, like what kinds of shows you like and what sports you’re into. The app will even request your name and gender. It’s a series of questions that might be off-putting for a first acquaintance, but WatchOn needs to know these things to deliver relevant, personalized recommendations on what to watch.

If you’d rather not divulge, though, choose the option to skip. (You can always go back later via Settings.)

At the end of that process, you’ll be taken straight to the primary WatchOn interface, where the app has already begun to create a catalog of shows tailored to your tastes and based on the cable provider you indicated early on.

But, before we dive into that interface and learn about the features, you still have to pair your phone with your TV, cable box, and any other components so it can act as your universal remote.

Continue reading »