


Jelly Bean 4.3 isn’t a big update, and you might be happy to wait for Google to make available the update to your Nexus tablet, but we’re pretty impatient. Plus, we’re itching to try out the new ability to update user profiles with content restrictions, which is ideal if young children will be using the tablet.
Here’s how to get the Android 4.3 Jelly Bean update on your Nexus 7 or Nexus 10 tablet the easy way.
Install Android 4.3 Jelly Bean on your Nexus 7, Nexus 10
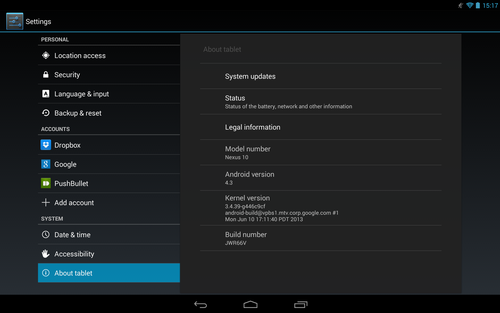
Step 1. First check what version of Android your Nexus tablet is running. From the home screen, pull down from the top right of the screen and choose Settings. Scroll down to About tablet, then look under Android version. You’ll most likely find Android 4.2.2 here, or perhaps Android 4.1 if you’ve never updated your tablet.
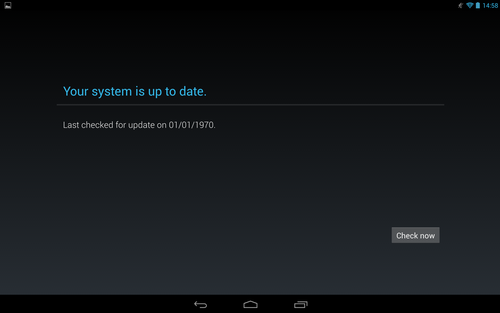
Step 2. Next, check whether Google has already made available the Android 4.3 Jelly Bean update for your tablet. In the same menu, tap on System updates. The next screen will either inform you that an update is available, or state when the tablet was last updated. If no update is available, tap Check now.
Chances are you’ll find that still no Android 4.3 update is available. At this point you can sit back and wait a few days for the new flavour of Jelly Bean to appear, or you can force your tablet to download the update.

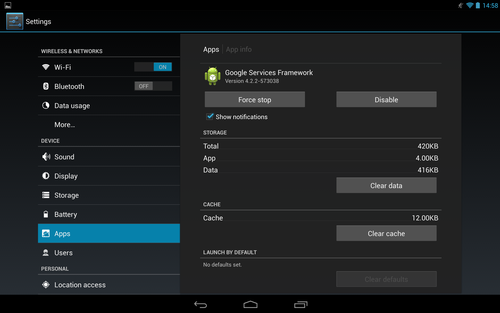
Step 3. Return to the Settings menu and choose Apps. Using the tabs above the list of apps installed on your device change the view from Downloaded apps to All apps. Scroll down to and select Google Services Framework. Tap on Clear data.
Step 4. Revisit Settings, System updates. You’ll find that your Nexus tablet thinks it was last updated in 1970, long before it even existed. Tap Check now to see whether the Android 4.3 Jelly Bean update is now available. If it isn’t, repeat step 3 until it is. We had to clear the data from the Google Services Framework five times to get this to work, but some people have reported that it worked first time.
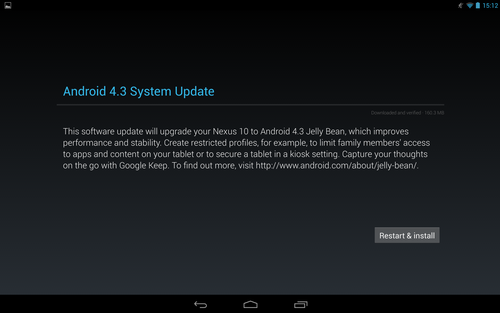
Step 5. Eventually, you’ll be greeted with an Android 4.3 System Update. Tap Restart & install to download and install the 160.3MB file.
Step 6. Your Nexus tablet will automatically restart with Android 4.3 installed. You can check this as you did in step 1, via Settings, About tablet, Android version. With that done, you can start looking forward to Android 5.0 Key Lime Pie.
Install Android 4.3 on Nexus 4, Samsung Galaxy Nexus
We’ve used a Nexus 10 tablet to demonstrate the process of installing Android 4.3 Jelly Bean in the above workshop, but it should also apply to Nexus smartphones. Look in the app menu for Settings, then choose About phone, System updates, and follow the guide above.
Install Android 4.3: Apps won’t download
If, after following the above guide, your phone or tablet refuses to update apps from Google Play, you’ll need to remove your Google account details from Settings, Accounts, then re-add them.


