Sync iTunes M4V movies to Kindle Fire HDX

Leave a comment

Summary: Why I can’t play transferred iTunes movies to Kindle Fire HDX? In this guide, I will show the easy way to iTunes M4V movies on Kindle Fire HDX with the excellent iTunes to Kindle Converter.

kindle-hdx

Question: “I have some movie like Iron Man 3, The Hobbit, Thor: The Dark World, The Wolverine and planes that I bought on iTunes and I can’t play them on Kindle Fire HDX. Many millions of people have music they’ve purchased from iTunes, we can play iTunes music and movies on iPad and iPhone, but what about Kindle Fire HDX? How can I put it on my favourite iTunes M4V movies on Kindle Fire HDX?

Answer:

“iTunes movies are to be used only on Apple devices officially. You can’t watch iTunes movies on Android tablets, without removing the DRM protection. And if you want to watch them in Kindle Fire HDX, there’s another work you need to do: converting to another format with proper video size. In your case, MP4 is most widely used.”

In fact, M4V videos purchased from iTunes store are protected by Apple’s DRM and can’t be transferred or played on non-Apple products. Well, in the case above, Kindle Fire HDX is no exception. Moreover, as the answer mentioned, M4V is not a format that Kindle appreciates.

So if you really want to watch iTunes DRM video on Kindle Fire HDX, you need to go through two steps: 1. Remove the DRM protection, 2. Convert M4V to Fonepad supported video format: MP4.

To accomplish this goal, Pavtube iTunes to Kindle Converter is highly recommended for its easy-to-use interface, straight workflow and reliable video quality. It can remove the DRM protection from iTunes downloaded video, and transfer it to various video formats including MP4 profiles for Kindle Fire HDX.

Good news for you, view Pavtube Special Offer page, you can get a big discount, such as:

ChewTune ($29) + Blu-ray Video Converter Ultimate($65) = Only $75, Save $19
ChewTune for Mac($29) + iMedia Converter for Mac($65) = Only $75, Save $19
ChewTune($29) + ByteCopy($42) = Only $54, Save $17
ChewTune for Mac($29) + ByteCopy for Mac($42) = Only $54, Save $17

Now just download this software and follow the tips below to make your iTunes movies playable on Amazon Kindle Fire HDX.


A command window will pop up during the installation to install specific audio driver, do not shut down and let it running until the installation completed.

How to convert iTunes DRM video to MP4 for Amazon Kindle Fire HDX?
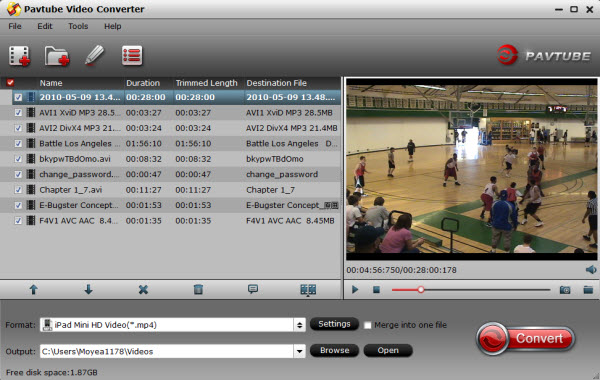
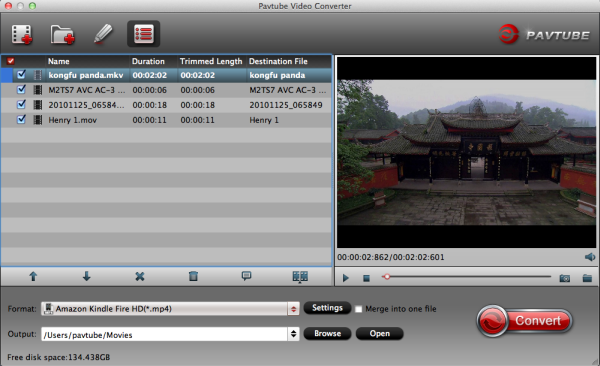
Step 1. Add video and choose target format.
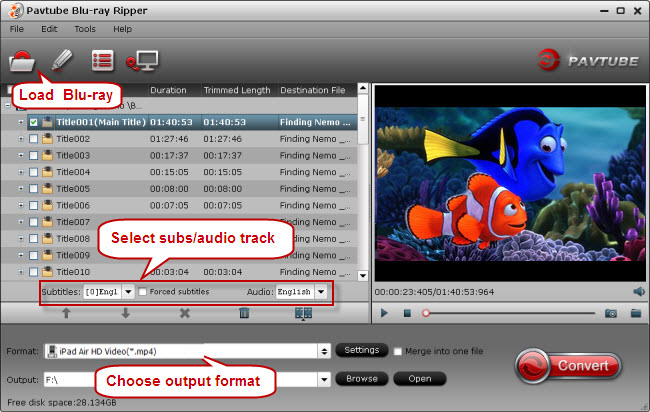
Drag and drop your videos to it directly, or you can click icon to import them as below.

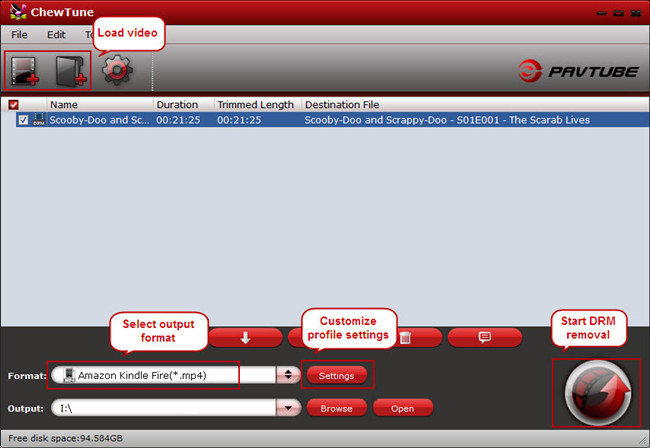
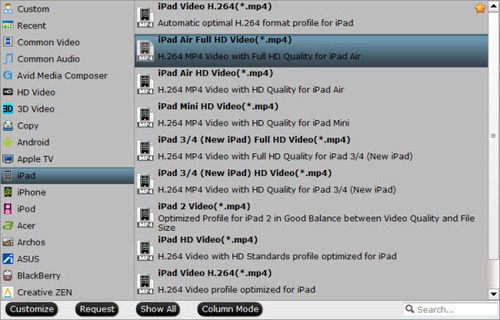
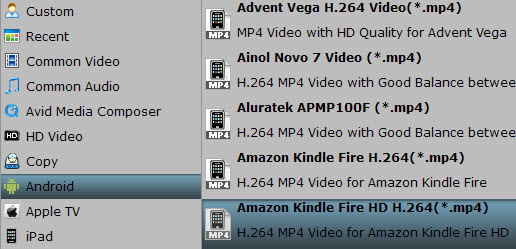
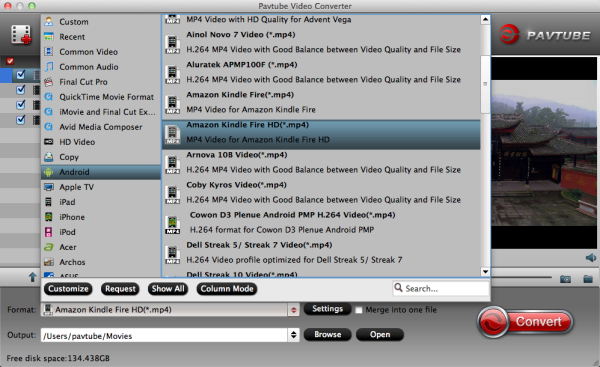
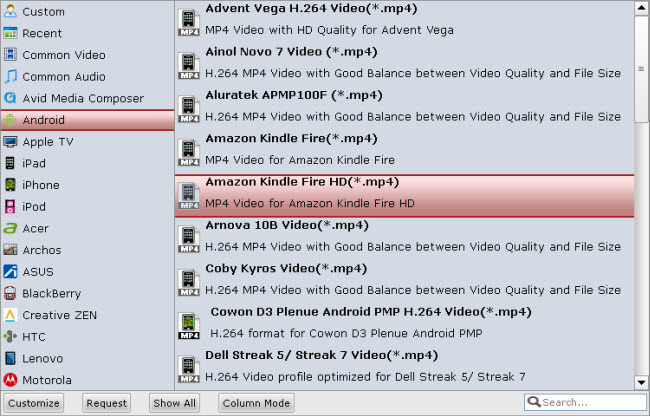
Let’s click the drop-down-list besides “Format” and move to “Android” column and choose “Amazon Kindle Fire HD(*.mp4)” as output format for your Kindle Fire HDX.

Step 2. Customize target video specs.

Click “Settings” to enter Profile Settings window, you can find settings for video size, codec, bitrate and frame rate. For Kindle Fire HDX playback, you are suggested to set the Size to 1280*800; and bitrate will be fine from 1500 to 2500 kb/s.

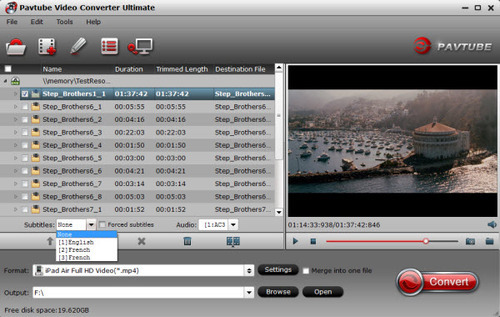
Step 3. Start conversion.
Now click the big red icon to start converting iTunes M4V videos to Amazon Kindle Fire HDX in batch; this converter will activate your media player automatically and start to play this video. The player windows cannot be removed or closed.

In the meanwhile, it will start to record this video in MP4 real-time. The conversion time is equal to the video length itself; you can do other tasks during the converting the process.

Note: the system volume could turn off temporally during this period; no worries, do not touch it to get perfect DRM removed video.
After the conversion, click “Open output folder” to quick locate the converted video.

Tips:

1. The DRM removing process may mislead your anti-virus software to falsely report virus/worm. Please ignore the report to keep on ripping.

2. This product cannot convert unplayable video (damaged, unauthorized, etc).

To know detail Kindle Fire HDX media transfer, view the article here.

Convert DVD to iPad Mini 2 playable video with subtitles

1 Thought

Summary: To solve the movie playback issue how to viewing DVD movies on iPad Mini 2 with subtitles, you can get the best DVD Converter for iPad Mini 2 to convert DVD to iPad Mini 2 supported video format.

Apple has unveiled its second-generation iPad mini, now called iPad mini with Retina display thanks to its new high-resolution screen. Here, we bring you the latest information about the iPad mini 2, including UK price, release date and specifications. The second-generation iPad mini has a 7.9in Retina display at 2048 by 1536 pixels. That’s the same number as the iPad Air, Apple’s fifth-generation iPad. This means that the iPad mini 2 has a resolution of 326 pixels per inch. The iPad mini 2 is powered by a 64-bit A7 chip like the iPhone 5S and iPad Air. This means the new iPad mini has significantly improved performance. It’s up to four times faster at CPU tasks than the original iPad mini, and up to eight times faster at graphics tasks.

With the higher resolution and the retina display, we can enjoy more movies with better visual quality on iPad Mini 2. If you have some DVD movie collections and want to pur the DVD movies on iPad Mini 2 for watching, you may have to convert DVD to iPad Mini 2 supported H.264 or MPEG4 first since the iPad Mini 2 doesn’t have DVD drive.

This tutorial is about how to rip DVD to iPad Mini 2 highly compatible videos format so that you can play DVD movies on iPad Mini 2. To get the work done, a DVD ripping software is needed. Here Pavtube iPad Mini 2 DVD Ripper (Alternative Mac version) (now you can get both with 30% off) highly recommended to help you get movies off DVD discs and onto your iPad Mini 2 for playback.

To be honest, the program provides an easy way to rip, convert and enjoy my huge DVD collection of movies and concerts with outstanding video quality. What’s more, some DVD contains the unknown language like Avatar and you cannot understand it without subtitles. So to keep the subtitles for unknown language is necessary for full enjoyment. now with Pavtube DVD Ripper, you can choose the desired subtitle for output and select forced subtitles for some unknown languages. I’ve had success using the program to convert DVD yet DVD ISO/IFO to iPad 3Mini 2 playable format. I’ve found the quality to be excellent, and see no difference when compared to playing the discs themselves. The audio/video synchronization is very good, the size of the subtitles too. Just download it and follow the steps below to download and put DVD movies on iPad Mini 2 for smoothly playing!

How to Convert, Transfer DVD movie to iPad Mini 2 with subtitles

The quick start guide below uses DVD Ripper Windows screenshots. The way to rip DVD movies to iPad on Mac is almost the same.

1. Launch the best DVD to iPad Mini 2 Converter, click the “DVD disc” icon to navigate the videos. You can also add ISO file, IFO file or DVD folder. Press the selected main title you can preview the whole Blu-ray movies on the preview window on the right, which works like a media player.

2. Check forced subtitles for output. Because DVD always contains multiple subtitle and audio tracks, you can go to choose the desired subtitle and audio on the interface for output. Beside subtitles option, “Forced subtitle” is optional and uncheck by default. Go to check “Forced subtitles” for output. Take note that it will output forced subtitles only if it is checked.

3. Set output options for iPad Mini 2. Click “Format” bar, you can get optimized videos for iPad Mini 2 under “iPad > iPad Mini HD Video(*.mp4)”.

Tips:

a. For some advances users, you can go to adjust video and audio parameters like bitrate, resolution, channels, etc. Click “Settings” button you can go to check and change them as you like. Remember the file size is based more on bitrate than resolution which means bitrate higher results in big file size, and lower visible quality loss.

b. It has powerful edit functions such as trim video for your needed length, crop video to get rid of annoying black edges, join multiple video clips into one, add text/image watermark and add subtitles. For example, if the original DVD movie has no subtitle or the subtitles you need, you can download it from website and then add it into the output videos for full enjoyment with this software.

4. Click the Convert button to start to rip DVD to MP4 videos for iPad Mini 2 with subtitles.

5. When the conversion complets, you can transfer the result videos to new iPad Mini 2 via iTunes, here’s the way to go:

1) Launch the iTunes and connect iPad Mini 2 to PC.
2) Choose “File – > Add File to Library…”
3) Drag the .mp4 file you want to the iPad icon.

So there you have it. Now you are free to watch DVD movies on new iPad Mini 2 with subtitles anytime and everywhere as you like. Enjoy.

Sync MKV/AVI/VOB/Tivo/MPG/WMV/FLV to iPad Mini 2 for playback

Leave a comment

According to rumors this second generation of iPad mini will be equipped with much improved Retina display with resolution of 2048 x 1536 that works awesome. Not only is that it also expected that it will feature Apple’s dual core and A6x processor as well. With a stunning 7.9-inch display, the iPad Mini 2 is great for you to watch videos. May be you have have download many HD movies in different video formats (MKV/AVI/VOB/Tivo/MPG/WMV/FLV) from websites, how to watch these movies easily on iPad Mini 2 with ease?


First, you can have a look at the iPad mini video format supported:

H.264 video up to 1080p, 30 frames per second, High Profile level 4.1 with AAC-LC audio up to 160 Kbps, 48kHz, stereo audio in .m4v, .mp4, and .mov file formats;

MPEG-4 video up to 2.5 Mbps, 640 by 480 pixels, 30 frames per second, Simple Profile with AAC-LC audio up to 160 Kbps per channel, 48kHz, stereo audio in .m4v, .mp4, and .mov file formats;

Motion JPEG (M-JPEG) up to 35 Mbps, 1280 by 720 pixels, 30 frames per second, audio in ulaw, PCM stereo audio in .avi file format

Because of iPad mini 2 limited formats support, the new iPad mini 2 users cannot play MKV/AVI/VOB/Tivo/MPG/WMV/FLV files on iPad mini 2. For this problem, I have got a solution, that is converting 720p/1080p video files to iPad mini 2 formats that compatible with it. Below is a brief guide for you better to put and play HD videos in MKV/AVI/VOB/Tivo/MPG/WMV/FLV format on iPad Mini 2 without the limitation of the video format, just follow it.

Requirements

Before anything else, you have to download an app that you are going to use later. You are required to download and install:

For Win: Pavtube Video Converter

For Mac: Pavtube Video Converter for Mac

Tip: Both are 20% off before Dec.10,2013, never miss!
Instructions

This program provides an easy way to convert 1080p/720p HD videos in various formats of MKV, AVI, VOB, Tivo, MPG, WMV,FLV etc. The audio/video synchronization is very good, the size of the subtitles too. The time it takes to convert in this software is almost half that in other.

Step-by-step on how to play MKV/AVI/VOB/Tivo/MPG/WMV/FLV video files to iPad mini 2

Step 1: Add 720p/1080P video.

Click “Add Files” button to add the MKV/AVI/VOB/Tivo/MPG/WMV/FLV video which you want to play on iPad mini 2.

Step 2: Set iPad mini 2 compatible format.

Click “Format” menu to get the output video format list. A mass of formats are listed. Go to choose “iPad Mini HD Video(*mp4)” from “iPad” option as iPad mini 2 best supported format.

Step 3: You can set the output parameters as you want, like set the resolution as 1920*1080.

Step 4: Convert MKV/AVI/VOB/Tivo/MPG/WMV/FLV video to iPad mini 2.

Click “Start” button to finish converting the various videos to iPad mini 2 supported file formats.

After MKV/AVI/VOB/Tivo/MPG/WMV/FLV to iPad mini  2 conversion,you can transfer the video to iPad mini 2. It is so just easy to manage and sync MKV/AVI/VOB/Tivo/MPG/WMV/FLV video files on iPad mini 2!  Have a try now!

Convert MKV with AC3 audio to iPad Air for enjoyment

2 Thoughts

iPad Air is just released by Apple, the iPad Air weighs in at just 453g and 7.5 mm thick, it is a significant step up from its predecessor, the decrease in thickness and weight in the new iPad Air is very welcome. As this iPad Air is so easy to take, you can enjoy movies when your travel, or use it to kill time when you on train, bus or plane.

More and more mkv movies are encoded in Dolby AC3 codecs, including the recent released Back to the Future: 25th Anniversary Trilogy, Inception, he Mummy Trilogy, Life, etc. If you own any of them and would like to put on the new iPad Air for playback on the go, you may need to convert these mkv movies to iPad Air playable format for playback. The following article shows you how to rip MKV with AC3 audio to iPad Air with a Top mkv to iPad Air Converter.

Pavtube Video Converter Ultimate is a powerful video tool which can help you to convert MKV with AC3 audio to MP4 AC3 and keep its 5.1 channels with high quality and super fast speed. It integrates many presets for iPad, iPad 2, the new iPad, iPad 4, iPad Air as well as iPad mini and the upcoming iPad mini with retina display; many other presets waiting for you to pick up. Besides that, it can output 3D (Side-by-Side, Top-Bottom, Anaglyph) in MKV/MP4/AVI/MOV/WMV formats.

Tips:

1. Download profile patch for your new iPad Air.
2. Reach the Mac version here: Video to iPad Air Converter for Mac.

Related Articles:

How to view DVD movies on iPad Air with highest quality?
How to watch Blu-ray movies on iPad Air
How to Put/Play Blu-ray ISO files on Apple iPad Air

Tutorials: Converting MKV videos with AC3 audio to iPad Air friendly format

Step 1: Load mkv AC3 video files to this Video to iPad Air Converter

Download the Pavtube  mkv to iPad Air Converter on your computer, install and run the program, add videos.

You can choose to import videos or the entire folder by clicking the top left two icons.

Step 2. Choose a proper format for iPad Air.

Click “Format” drop-down list and choose “iPad>iPad Air Full HD Video(*.mp4)” as the compatible MP4 preset with best video quality. Or you can choose other presets if you don’t need full size videos.

Step 3. Customize video specs for iPad Air (Optional).

You could also click the “Settings” to adjust the video and audio parameters of output files.

In the Video Settings, you can select Encoder, Frame Rate, Resolution (you could define it yourself according to your iPad Air tablet) and Bitrate for your movie.

In the Audio Settings, you can select Encoder, Channels, Bitrate and Sample Rate for your movie.

Step 4. Start mkv Videos with AC3 audio to iPad Air Conversion.

You can hit the big red “Convert” to start converting MKV to MP4 with best video settings for iPad Air. After the conversion, click “Open output folder” in the conversion window, or “Open” in main interface to quick locate the converted video.

You will get your converted MP4 AC3 files with 5.1 channels and the audio/video synch correctly and perfectly. Have a download and conversion. And enjoy MKV with AC3 audio on iPad Air! Have a nice time!

Stream Blu-ray ISO to iPad Air for smoothly playback

Leave a comment

Apple iPad Air will sport an improved iSight camera for better photos and videos. Showing off a beautiful 9.7 inch Retina, Air will come with an A7 processor and 64-bit support – debuted in iPhone 5S. This new iPad Air with its lightweight, beautiful screen, iOS7 and, battery optimizations will be a staple for those who prefer doing business on tablets, ditching laptops completely.

Question: “I have a large Blu-ray collection and most of the discs have been backed up as ISO files on NAS. I was wondering if I got a iPad Air , is there any way to enjoy Blu-ray ISO movies on it?”

While, like most smartphones on the market, iPad Air cannot handle Blu-ray ISO image files as well. To watch Blu-ray ISO file on iPad Air, you’d better convert your Blu-ray ISO files to iPad Air compatible format with a Top Blu-ray ISO to iPad Air Ripper (now is 30% off).

* Top Blu-ray Ripper Review for Android, Apple and Windows 8 devices

Part One. How to convert Blu-ray ISO image files to iPad Air?

Step 1. Get Top Blu-ray to iPad Air Converter and Load Blu-ray ISO image file.

Download, install and launch the Best Blu-ray ISO to iPad Air Converter on your PC.

Click the “Load IFO/ISO” button to import your source Blu-ray ISO image file.
bluray to iPad air Rip/Stream Blu ray movies to Apple iPad Air

Step 2. Choose audio track and subtitles for output.

On Blu-ray ISO to iPad Air Ripper main UI, set your wanted subtitles and audio track from the drop-down box of “Subtitles” and “Audio” tab.

Step 3. Select iPad Air suitable profile and adjust profile presets (optional).

Pavtube Blu-ray Ripper offers users dozens of profiles under “Format” menu so you would always get an optimized profile for your portable device.

In order to convert Blu-ray ISO to the new iPad Air with 1080p image quality, you are suggested to choose iPad Air HD Video(*.mp4)” format for output. To get iPad Air preset, you need to downlaod a patch here.

Tips: If you’d prefer higher quality, click on “Settings” and set video bitrate to 2000kbps or above, this will bring better image quality and also bigger file size.

Step 4. Start ripping Blu-ray ISO to iPad Air.

Now you are ready to hit the “Convert” icon to start ripping. After it completes, click the “Open” button on program interface to locate the created MP4 file, and transfer the converted Blu-ray ISO image file to your new iPad Air with iTunes.

Part Two. Manually Sync video/music/movie files to iPad Air via iTunes 11

To put videos, music and photos to Apple iPad Air, iTunes 11 is a must. You can download iTunes 11 and follow the steps below to put Video, DVD, Blu-ray movie to iPad Air. If you use manual syncing, you can sync items from more than one iTunes library to your iPad Air. Follow the instructions below to manually sync movies to iPad Air in iTunes 11.

1. Open iTunes 11, and press “File” -> “Add File to Library” to add movies to iTunes Library. Or just switch to Movie library, and drag the file to iTunes. (How to add local contents on your computer to iTunes)

2. Connect iPad Air with your PC using the cable that came with your device.

3. Click the Summary button and select “Manually manage music and videos” (below Options).

4. Click the On This Device (your iPad Air name) button.

5. Click Add To on the right side of the iTunes window.

6. Switch to Movies Drag items from the left side of the iTunes window to the pane on the right.

In this way you can sync Blu-ray ISO image files to iPad Airas you like. The Pavtube Blu-ray Ripper supports latest released Blu-ray movies and rip Blu-ray/Blu-ray ISO to various video formats and codecs (MKV, AVI, MP4, WMV, M2TS, TS, Tivo, VOB, MPG, etc.) for playing, editing, burning, sharing, etc.

Tips: For Mac users, please download and try Blu-ray to iPad Air Ripper for Mac.

Related Articles:

Rip/Stream Blu-ray movies to Apple iPad Air
Top IOS Device- iPad Air vs iPad 4 vs iPad 2: specs comparison
iPhone 5C Review & Video Tips: convert DVD to iPhone 5C
How to view MKV with DTS audio on iPhone 5C with iTunes
Add DVD ISO/IFO image file to iPhone 5S/5C on Mac

How To Play DVD ISO Movies on Amazon Kindle Fire HDX

1 Thought

Kindle Fire HDX is perfect for work or play, with the fastest processor on a 7″/8.9” tablet, the latest graphics engine, world-class Dolby audio, and a highly portable form factor.

  • Improved Battery LifeWith advanced power management technology, Kindle Fire HDX delivers an uncompromised 11 hours of reading, surfing the web on Wi-Fi, watching video, or listening to music.
  • Breakthrough HDX Display

    Kindle Fire HDX 7 has a high resolution display (1920×1200) and high pixel density (323 ppi) and the 8.9 inch one has 2560 x 1600 (339 ppi) for an incredible multimedia experience. The display features over 2 million pixels for vivid, lifelike images that go beyond standard HD.
  • Perfect Color

    Both the 7″ and 8.9″ Kindle Fire HDX displays feature perfect color (100% sRGB), displaying images and videos as the photographer or videographer intended.
  • Better Viewing Indoors and OutThe HDX display features dynamic image contrast, a unique feature that automatically optimizes the color of each pixel based on the amount of light in your surroundings. This makes images and videos even easier to see in any lighting conditions, including outdoors.

It is known to us that ISO image is an archive file of an optical disc, and it is composed of the data contents of every written sector of an optical dis. But, you may have a quick glance of Amazon Kindle Fire HDX video format list. In fact, Fire HDX can fully support MP4 video, but not the ISO files or IFO files. In other words, if I want to play DVD ISO/IFO on Kindle Fire HDX, you need to convert them in advance. Now, I’ve a big success converting DVD ISO/IFO movies to Kindle Fire HDX optimized MP4 format by using Pavtube DVD Ripper.

This program is specialized in ripping DVD including commercial DVD with protections like BD+, region code. What’s more, you do not need to worry about the ripping and converting speed. It is excellent for it and it supports CUDA acceleration technology, which will provide you 6 x faster speeds. Apart from it, it will provide the high quality output files for Galaxy Tab 3.8.0 and many other videos formats. Go to get it and freely enjoy your favorite DVD movies on Kindle Fire HDX 7/8.9. If you are a Mac user, please turn to Pavtube DVD Ripper for Mac (now is 30% off on Pavtube Halloween Crazy Discount).

Note: If you still have a variety of Blu-ray movies waiting for transferring to Kindle Fire HDX for playback, you’d better turn to Pavtube Blu-ray Ripper(now is 30% off too). It can rip and convert both DVD and blu-ray disc.

Read more:

Syncing iTunes with Kindle Fire HDX 7
Download Digital Copy to Kindle Fire HDX 7/8.9
Enjoy/Play 1080p videos on Kindle Fire HDX 7
Convert and Play DVD on Kindle Fire HDX 7/8.9

Play DVD ISO on Kindle Fire HDX 7/8.9

Step 1. Download this 30% OFF DVD ISO to Kindle Fire HDX Converter; import DVD ISO file.

It’s the most recommended DVD ISO converting tool with strong capability of rolling off protection and transcoding to MP4 format in most suitable video resolution on Kindle Fire HDX 7/8.9.

Click the disc-folder icon to load your ISO file directly (No need to run virtual driver any more).

Step 2. Choose format.

Click Format drop-down-list and choose “Android>Amazon Kindle Fire HD(*.mp4)” which works beautifully on Kindle Fire HDX 7/8.9.

Step 3. Customize video specs (Optional).

Click “Settings” to enter Profile Settings interface. Here you can free choose video size, bitrate, frame rate and other settings, all at your needs.

Step 4. Start Conversion.

Now hit the big red “Convert” to start converting DVD ISO to MP4 format for Kindle Fire HDX 7/8.9. After conversion, you can click “Open output folder” to quick locate the converted video.

By the way, hurry up to get more Halloween Special Offers at Pavtube:

Install Flash Player on Surface RT/Pro, Surface 2, Surface Pro 2

1 Thought

About four weeks ago, Monday Microsoft announced new versions of its RT and Windows 8 Pro devices and, according to the tech giant, these new models are doing much better, with pre-order stock of the Surface 2 (64GB) and Surface Pro 2 (256 GB and 512GB) “close to selling out”.  If you have already downloaded loads of Flash videos from video sharing websites like YouTube or somewhere else, and intend to play those videos on your Surface tablet, you may meet the problem as below:

My Surface RT no longer allows me to view websites with Flash, including BBC iPlayer. Two weeks ago I did not have this problem. Going onto the Adobe Flash Player site, I cannot see the Flash images designed to test whether Flash is installed, but it will not let me install Flash – I get the error message that Windows 8 already has Flash enabled when I try to do so. Any help gratefully received.

In theory, end users ought to acquire no trouble in playing Flash on Windows RT/Windows 8-powered Surface subsequently after IE 10 has added accessibility to Adobe Flash. But, this is certainly not the case here. In fact, The software giant has turned taking advantage of flash video files together with Windows-powered Surface Tablet freely a tough endeavor. On the one hand, Surface RT/Pro, Surface 2, Surface Pro 2 are actually reluctant to put all-aspect support to the weak Flash Player; the other point is, Microsoft simply allows end users to get pleasure from Flash movies on creditworthy websites using Surface Tablet. Thus, for end users who wish to play Flash on such websites unable to win the trust coming from Microsoft on Surface, they must obtain some other techniques.

In fact you can find no less than two techniques to aid buyers enjoy Flash video using Surface RT/Pro, Surface 2, Surface Pro 2 not having Adobe Flash Player involved. One is definitely to set up Adobe Flash Player substitute on Surface and also the other happens to be to transfer Flash file for Surface RT/Pro, Surface 2, Surface Pro 2. Hence, the two articles on watching Flash movie on Surface will be shown here.

The First Method: Mount Silverlight on Windows-powered Surface

As early as 2007, Microsoft company had decided to focus on an app that is able to function just as the same as Adobe Flash Player titled Silverlight. Created as an Adobe Flash Player alternative, Silverlight allows buyers to enjoy virtually all flash video files on Surface. Moreover, seeing as a Microsoft program, Silverlight may not simply entirely accessible for Surface but additionally pleasantly coordinate with Surface RT/Pro, Surface 2, Surface Pro 2. Yet, this option to play Flash movie on Surface Tablets will not work faultlessly.

In fact, seeing as an immature product, you can find too many faults in Silverlight. Furthermore, the software giant’s option to give up Silverlight in the new web browser has meant that the app will not do better in aiding end users to observe Flash together with Surface than Adobe Flash can. On those grounds, different tactics to get pleasure from Flash file with Surface tend to be wanted.

Method Two: Convert FLV/F4V flash videos to Surface RT/Pro friendly MP4 format.

(In other words, that is to change the file extension from flash “.flv” or “.f4v” to “.mp4″ for watching flash on Microsoft Surface Tablets)

Requirements

Before anything else, you have to download an app that you are going to use later. You are required to download and install:

Pavtube Video Converter Ultimate (available for Windows or for Mac users). Get the Windows version here, and the Mac version here.

Instructions

Support for multithreading and batch conversion, this Microsoft Surface Video Converter works perfectly on converting standard video formats (AVI, MPEG, WMV, MP4, MOV, 3GP, FLV, etc.) and HD video formats ( HD MKV, HD H.264/MPEG-4 AVC, HD MPEG-2, etc.) to Microsoft Surface Tablet acceptable video format. The audio/video synchronization is very good, the size of the subtitles too. The time it takes to convert in this software is almost half that in other. If you want to play  flash on Surface RT/Pro, Surface 2, Surface Pro 2, just take the program to help you.

1. Import Flash Videos into the program by clicking “Add video” icon to browse and load source flash files stored on your hard disk drive.

2. Click on “Format” menu, and choose “Microsoft Surface Windows RT/Pro H.264 Video (*.mp4)” as target format from “Windows” profile option.

3. In the mean time, you can click “Settings” button to custom video and audio settings for well playback performance on your Surface tablet. Actually, the default settings can generate files that basically satisfy your general watching needs, so this step is optional.

4. Start the conversion.

Once the conversion is done, you can click “Open” button to get generated MP4 files for viewing on Surface.

P.S. If you have no idea about Surface file transfer, you can check out the post ‘The Ways Transferring Files to Your Surface‘ to learn more. You can also click ‘here’ to get known the basic tips for watching movies on Microsoft Surface RT.

Download/Transfer TiVo shows to Amazon Kindle Fire HDX 7/8.9

4 Thoughts

Amazon’s Jeff Bezos announced the new fall 2013 line-up of new Kindle Fires, now called the Kindle Fire HDX. The new HDX, like the previous models, will come in both 7- and 8.9-inch sizes and HD displays with resolutions of 1920 x 1200 (323ppi) and 2560 x 1600 (339ppi) respectively. Aside from the size differences, both models will be powered by the ultra-powerful Snapdragon 800 Quad-Core processor, clocked at 2.2 GHz. Both will be available in 16GB, 32GB and 64GB storage options, as well as either WiFi-only or LTE equipped (through AT&T and Verizon). There is one small cosmetic/functional difference, the 7-inch HDX doesn’t feature a rear camera, while the 8.9-inch model features an 8-megapixel camera. Both feature a front facing camera for video chat, but don’t look to take pictures while you’re out and about with the smaller of the two.

kindle-file-hd-video-format

Well, anyhow this Amazon new tablet becomes much better for movie playback. And in this article, I mainly show you the tutorial how to view Tivo movies on Kindle Fire HDX 7/8.9.

If you want to get Tivo shows playable on Kindle Fire HDX 7/8.9 on Mac, you will need a Mac Tivo Converter first, as Amazon tablet doesn’t recognize Tivo format directly. As far as I know, Fire HDX can only recognize videos in several common formats e.g. MP4. So,  transferring TV shows from TiVo to PC and then converting Tivo videos to Kindle Fire HDX best video format MP4 is the best and easiest solution. Along with some help from third-party software, this can be done effortlessly.

The best program I can recommend for encode/re-encode tivo videos for Kindle Fire HDX 7/8.9 is Pavtube Video Converter for Mac, a quite fast yet powerful high-quality video converter, player and editor. If you’re getting Tivo video playback errors with Kindle Fire HDX 7/8.9, download it it and follow the guide below.

Get your TiVo shows Ready

Before the process, you’d make sure the TiVo shows have been transferred to your Mac . If not, you can follow a simple tutorial as following:

Convert TiVo Shows to Kindle Fire HDX 7/8.9 friendly MP4 videos

After transferring to computer the TV shows are saved as .tivo files. See below how to convert TiVo shows to Kindle Fire HDX 7/8.9 playable videos.

Step 1. Download and install Pavtube Video Converter for Mac. Launch it and press “Option” button. Switch to “TiVo” tab in Option window, and enter TiVo Media Access Key.

Tip: How to find your Media Access Key on TiVo: Go to “TiVo Central” menu >> “Messages and Set Up” “Account and System Information”, and your Media Access Key would be there.

Step 2. Drag and drop TiVo shows to the main interface for converting.

tivo-to-kindle-converter-for-mac

Step 3: Click “Format” bar, you can easily find the optimized videos for the Kindle Fire HDX 7/8.9 under “Android > Amazon Kindle Fire HD(*.mp4)” The preset is specially designed for Kindle Fire HD, but can could fit on the Kindle Fire HDX 7/8.9 perfectly.

Step 3. After above settings, you can start the TiVo shows to Kindle Fire HDX 7/8.9 MP4 conversion. Once the process completes, locate the files and transfer and copy the converted MP4 videos to your device.

If you have no idea about Kindle Fire HDX 7/8.9 file transfer, learn How to Transfer Media Contents to Your Kindle Fire HD.

If you have any problem when enjoying videos on Kindle Fire HDX 7/8.9, just check out Kindle Fire HD Column to learn more.

Tips: If you like, you can click “Settings” to change the video encoder, resolution, frame rate, etc. as you wish. According to my experience, the file size and video quality is based more on bitrate than resolution which means bitrate higher results in big file size, and lower visible quality loss, and vice versa. For watching videos on Kindle Fire HDX 7/8.9, 720p with 1500~2000kbps is just all right.

PS. The process is based on Mac screenshots, the way encoding tivo shows to Kindle Fire HDX 7/8.9 on Windows is almost the same.

Not an Kindle Fire HD user? Converter also supports “common” video formats like MOV, M4V, and MP4, so you should be able to create files compatible with your iPad Mini, the new iPad, iPhone, Microsoft Surface RT, Samsung Galaxy Note 10.1, Nexus 4, Nexus 7, Kindle Fire HD, Galaxy Tab 2, Nook HD tablet,Asus Transformer Prime and other devices.

Convert iTunes DRM M4V Videos for Surface Pro Playing

Leave a comment

You may be used to using Apple’s iTunes program to manage, download, purchase music and movies. Now if you got a Microsoft Surface with Windows RT or Windows 8 Pro, you may consider to watch the iTunes movies Microsoft Surface RT or Surface Pro. Unfortunately, Media contents which are sold on iTunes store have DRM protections which prevent you from copying or transferring the DRM protected contents to other devices except Apple’s devices like iPad, iPod, iPhone, etc. So when you are troubled to play iTunes movie on Surface RT and Surface Pro, you need to remove DRM protection from iTunes movies and convert M4V to Surface. To ahieve your goal smoothly, below is a simple tutorial for you, guaranteed to get iTunes movies and Microsoft Surface RT and Surface Pro to play nicely.

convert-itunes-to-surface

Here I will take the popular iTunes movie DRM decoder entitled ChewTune  for instance to show you the DRM removal process. This application features DRM Removal and Media File Conversion. With it, you can easily convert the DRMed iTunes video and audio files to the plain, Surface-playable file formats such as mp4 format

Download the App

Firs Instructions:

Here are few tips before starting the  iTunes video to Surface Conversion:

1. Make sure that your computer is authorized for source videos, that is to say you can play the source iTunes movies in iTunes.

2. Allow the audio driver installed during the Pavtube ChewTune installation.

3. Close iTunes before running the Pavtube DRM Removal Converter when converting iTunes M4V movies.

4. It would take as long as the source movie length for the whole DRM video to Surface RT/Pro conversion process since Pavtube ChewTune records source DRM videos in 1:1 video and audio quality.

The Steps (based on Windows Screenshots):

Step 1: Add iTunes movies to the software. After installing, Launch ChewTune and import your iTunes files (including the copy-protected music, movies, TV shows) to the program. Batch conversion is supported so that you can add multiple files to convert at a time.

Step 2: Select output format. Click “Format” bar and move mouse to “Windows” column, you can easily find the profile of “Microsoft Surface Windows RT H.264 Video (*.mp4)”. The output videos could fit on Surface RT tablet perfectly. If you like, you can click “Settings” to change the video encoder, resolution, frame rate, etc. as you wish.

Step 3: Start the conversion. After above steps, just hit the “Convert” icon to start converting iTunes M4V videos to MP4 videos for Surface RT and Surface Pro. Once the process completes, just copy and transfer the DRM-free MP4 videos to your Surface and enjoy the movies/TV shows with ease.

Check out ‘The Ways Transferring Files to Your Surface‘ if you have no idea about Surface RT file transfer.

Surface RT DVD Ripper- How to load DVD movies to Surface RT Tablet

Leave a comment

The Microsoft Surface RT is incredibly flexible in terms of media you can put on the device and users have a whole slew of problems when it comes to watching videos on Surface RT. However, just like other tablet PCs, the Surface tablet doesn’t have a DVD-ROM for playing DVD movies. To get your favorite DVD movies into Surface RT for amusement, you need to convert DVD to Surface RT supported video format first and then transfer the result videos to the Windows RT tablet. The article here mainly shows you how to download and put DVD movies on Surface RT for smooth playing while keeping the best HD video quality.

As a versatile Surface RT DVD converting program, Pavtube DVD Ripper could meet your needs. It’s a powerful Surface RT DVD Ripper which can convert DVD videos to Surface RT supported video formats for watching. It is easy to use for editing and conversion and makes great quality copies of my DVDs. To be honest, the program can help you rip DVD to Surface RT highly supported MP4 video files with high output video quality and fast ripping speed. The audio/video synchronization is very good, the size of the subtitles too. The equivalent Mac version is Pavtube DVD Ripper Mac, which can rip and convert DVD movies to Surface RT on Mac OS X . Just download it now and follow the steps below to copy DVD movies to Surface RT for smoothly playing in just a few mouse clicks!

Step 1. Launch the the best DVD Ripper for Surface RT, install this program, and load your DVD movies into it.

Step 3. Choose Microsoft Surface RT video formats.

Just follow “Windows > Microsoft Surface Windows RT H.264 Video (*.mp4)” which is the best video format for Surface RT playback. Also will give you full screen effect.

Tips:

If you like, you can click “Settings” to change the video encoder, resolution, frame rate, etc. as you wish. (Optional)

Remember the file size and video quality is based more on bitrate than resolution which means itrate higher results in big file size, and lower visible quality loss.

Step 4. Start the DVD to Surface RT Tablet mp4 conversion by click on “Convert” button.

By now, you have grasped all the information you need to operate this DVD to Surface RT Tablet Converter.

Enjoy yourself.  Now you can easily rip and transfer DVD movies onto Surface RT tablet for freely watching. Hope this guide helps!