


Benefits of digitize DVD disc for DVD player viewing
By hooking your DVD player to your TCL Smart TV, you can then enjoy all of your favorite old DVD movie on your large screen TV. However, it is well known that the physical DVD disc are prone to damage or scratch due to frequent or wrong usage. In addition, it would be very time consuming to rifle through your whole collection to find one specific DVD movie. To get a permanent backup of your favorite DVD movies and also quickly find what you want to watch, it would be a good option to digitize DVD movies into plain digital file formats so that you store all the movies in one place such as an external hard drive or USB flash drive for viewing on your TCL Smart TV via DVD player USB port without touch the original disc media.
How to digitize DVD disc for TCL Playing via DVD Player?
DVD player supported file formats
Before make digital copy from DVD movies, you should first be clear of what digital file formats can be played on DVD player from USB. Generally speaking, a lot of DVD player may only support to play very limited file formats such as MPEG-1 or MPEG-2. And most DVD player can not read AVI, RM, RMVB…, etc. Therefore, to successfully play digital video on DVD player from USB, you will need to digital DVD into DVD player readable MPEG-2 or MPEG-2 file formats.
Best tool to digitize DVD disc for DVD player USB playback
To create digital copy from commercial DVD disc, you will need a specific program to first bypass the copy protection on DVD disc, and then rip the non copy protected date on DVD disc to DVD player readable MPEG-2 file format. It would be a great hassle to download one program to remove the copy protection and another program to perform the DVD to digital format conversion process. Here, a combo function of DVD disc decrypter and DVD Ripper program called Pavtube BDMagic is highly recommended to you. The program features a built-in decrypter that can powerfully bypass all DVD copy protection and region code including Region code, RCE, key2Audio, UOP, CSS, Macrovision, FluxDVD, Protect, ARccOS, AACS, BD+, ROM Mark, BD-Live, etc in the background without any third-party application, you can then directly convert DVD to DVD player supported MPEG-2 on the same interface of the program. Besides encoding DVD to MPEG-2 codec, the program also supports to produce DVD player readable VOB format optimized both for television system NTSC or PAL.
Set DVD subtitles in ripping process
To better understand and follow the DVD movies, you can make good advantage of the subtitle functions in the program. You can select your desired subtitle from original DVD movies. If you don’t want the whole movie to have subtitles, you can enable “Forced Subtitle” option to disable the traditional subtitles while still preserving the subtitles that translate foreign language speaking parts periodically throughout the film to help you understand what they are saying. If the foreign language DVD movie does not contain any language subtitles you understand, you can download a SRT subtitle file in your first language of the DVD movie from a safe and reliable subtitle download site (such as opensubtitles.org) and add subtitles to DVD movies.
For your convenience, the program is available on both Windows and Mac platform. For Mac users, please feel free to download Pavtube BDMagic for Mac to complete the job on macOS Sierra 10.12. The program is pretty simple to use, anyone can learn to use it in minutes. In addition, the results produced by the program are pretty high quality, you can’t tell the difference between the converted video and the original DVD disc.
Free download Windows version


Free download Mac version


How to Digitize DVD to TCL Smart TV Playback via DVD Player?
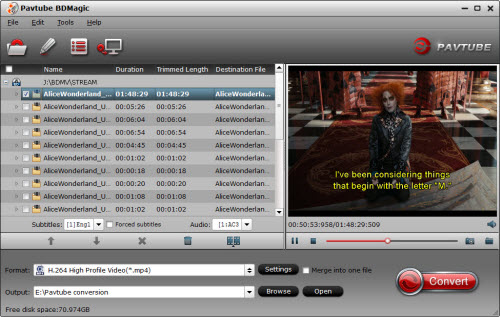
Step 1: Load DVD disc.
Download, install and run this DVD ripper. You can load DVD by clicking “File” > “Load from disc”. Or load DVD Folder by clicking “File” > “Load from folder” or load DVD IFO/ISO image by clicking “File” > “Load IFO/ISO”.
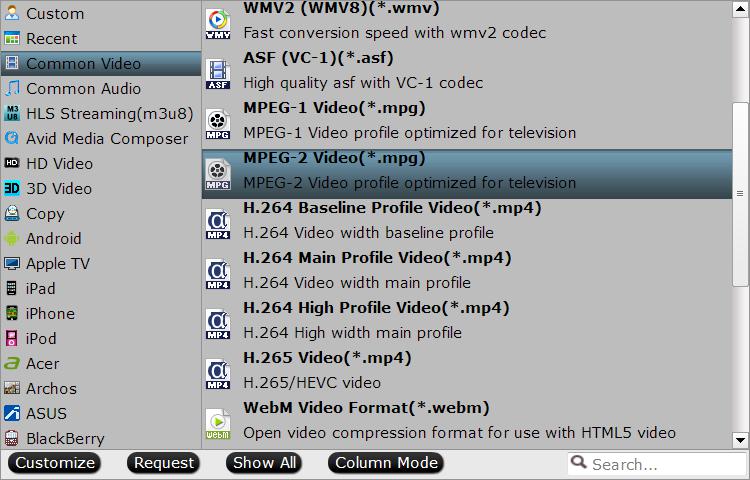
Step 2: Output DVD player supported digital format.
Clicking the Format bar, from its drop-down list, choose one of DVD player supported file formats such as “MPEG-2 Video(*.mpg)” under “Common Video” main category.
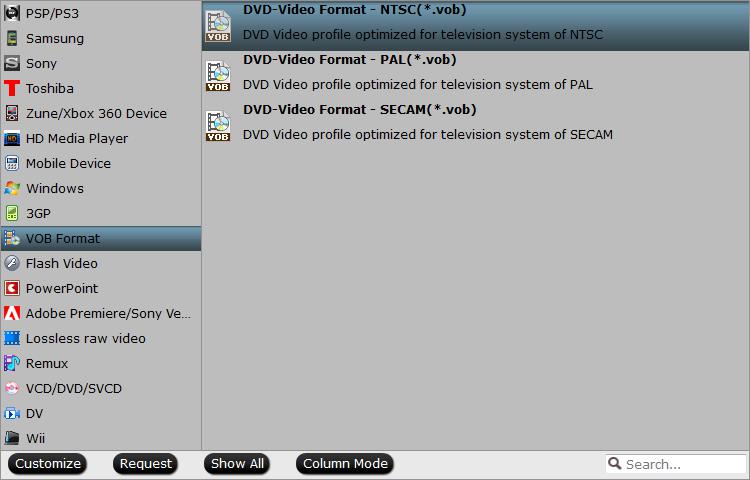
Tips: You can also choose to output DVD player readable DVD video VOB format such as “DVD-Video Format – NTSC(*.vob)” or “DVD-Video Format – PAL(*.vob)” under “VOB Format” main category.
Tips: Click “Settings” on the main interface to open “Profile Settings” window, here, you can flexibly choose or specify exactly the parameters including video codec, resolution, bit rate, frame rate, audio codec, bit rate, sample rate, channels, etc as you like to get better output video and audio quality.
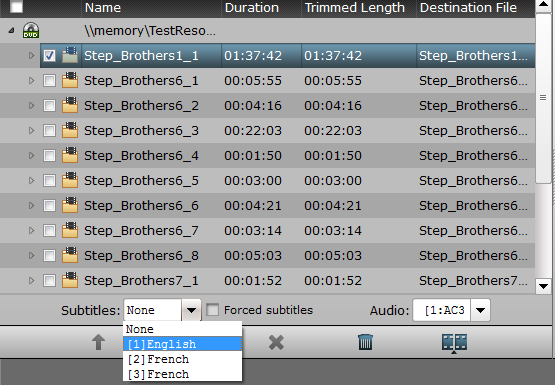
Step 3: Set DVD subtitles.
Select desired subtitles
Check the movie titles you want to rip. Click the drop-down list of Subtitles, then all the subtitles info in the DVD movie will be shown clearly, so you can select your needed language as your subtitles freely.
Enable forced subtitles
Tick off “Forced subtitles” option, you will see subtitles only when actors are speaking a language that are different from the subtitles that you have specified before. For instance, if you specify English (your mother tongue) as your subtitles, and meanwhile tick off “Forced subtitles” option, then when actors are speaking English, no subtitles will show up, but when they are talking with each other in French, the English subtitles will appear accompanying with the French.

Add external subtitles
Open “Video Editor” window, switch to the “Subtitle” tab, check enable, then you will be able to load external SRT/ASS/SSA subtitles to your movies.

Addition information: How to Connect DVD player to TV?
There are three ways you can connect a DVD player to a TV. Component video gives the best picture quality, but requires 3 cables for the video signal alone. S-video needs only 1 cable but it isn’t as good as component video. Composite video is the easiest connection to make, but gives the lowest picture quality.
Component Video Connection
Step 1
Get a component video cable. This cable has 3 sets of connectors, one each for the red, blue and green color signals.
Step 2
Match the connectors to the appropriate video output jacks on the DVD player. Component video outputs will normally be labeled Cr/Cb/Cy. The Cy output jack is matched to green, Cr to red and Cb to blue.
Step 3
Run the cable from DVD player to the TV. Most TV connections are made from the back panel, but this may vary.
Step 4
Match the connectors to the appropriate video input jacks on the TV.
S-Video Connection
Step 5
Get an S-video cable. This cable has a single round connector with 4 pins.
Step 6
Attach one end of the S-video cable to the S-video output jack on the DVD player.
Step 7
Attach the other end to the S-video input jack on the TV.
Composite Video Connection
Step 8
Get a composite video cable. These types of cables are frequently bundled with two-channel audio cables. Composite video cables are tipped with yellow plugs.
Step 9
Plug one end of the composite video cable into the composite video output jack on your DVD player.
Step 10
Plug the other end into the composite video input jack on your TV.


