Benefits of including forced subtitles in Blu-ray movies
Forced subtitles appear in many movies and only provide subtitles when the characters speak a foreign or fictitious language, or a sign, flag, or other text in a scene is not translated in the localization and dubbing process. For those people who plan to archive your own HD or 3D Blu-ray movies as a backup or convenience of having all the video files on a media center, be sure to include the forced subtitles for movies that have them since including forced subtitles in archived Blu-ray movies is not only a quality control issue, but is in consideration of capturing the movie in its completeness for future enjoyment.
What is forced subtitles on Blu-ray movies?
Unlike DVD, on Blu-ray, each subtitle item has an attribute that specified whether particular subtitle appearance should be forced. Forced subtitles are shown regardless of current player setting, typically when movie contains a foreign language scene. The “forced” attribute is assigned per individual subtitle image, so entire subtitle track must be scanned to determine if forced subtitles are present.
The best way to rip HD/3D Blu-ray movies with forced subtitles
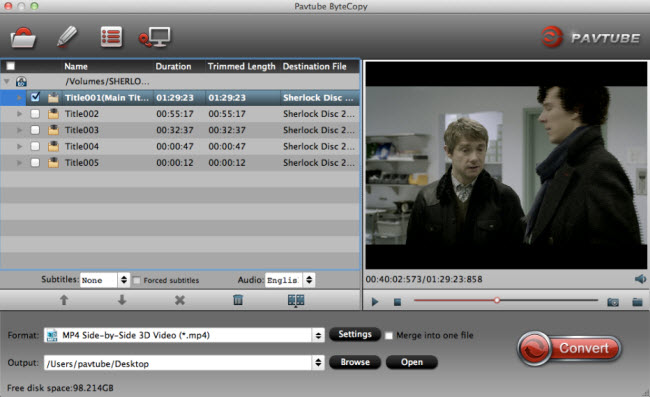
Although there are many Mac Blu-ray Ripper tools on the market, however, very few of them helps to include the forced subtitles when perform the Blu-ray to digital format conversion process. Fortunately, here comes Pavtube ByteCopy for Mac. A powerful yet simple to use application which has full support for both 2D/3D Blu-ray disc, BDMV folder and ISO image file. You can easily get Blu-ray movies ripped to your desired digital video with forced subtitles preserved to better follow the movie especially when the characters are speaking their native language that you don’t understand.
Besides ripping Blu-ray movies with forced subtitles, you can also use the program to select desired internal subtitles from original HD/3D Blu-ray movies, add external online downloaded SRT/ASS/SSA subtitles to Blu-ray movies if the original HD/3D Blu-ray movies don’t contain any language subtitles you understand.
Pavtube ByteCopy for Mac is available on macOS Sierra 10.12, Mac OS X El Capitan 10.11, Mac OS X Yostemite 10.10, etc, it is also accompanied by an up-to-date Windows version – Pavtube ByteCopy to assist you to rip Blu-ray with forced subtitles on Windows 10/8.1/8/7. The program is very safe and clean since it doesn’t feature any ads or bundled adware. In addition, the results produced by the program are pretty high quality, you can’t tell the difference between the ripped video and the original Blu-ray movies.
How to Rip HD/3D Blu-ray Movies with Forced Subtitles on Mac?
Step 1: Load HD or 3D Blu-ray disc.
Insert the HD or 3D Blu-ray disc into your computer’s Blu-ray drive. If your computer doesn’t ship with a drive, you will need to purchase an external USB Blu-ray drive to read on the data on Blu-ray disc. Then press “File” > “Load from disc” option on the main interface, alternatively, you can also import Blu-ray folder or Blu-ray ISO files with the program.

Step 2: Select desired internal subtitles and enable forced subtitles.
Select desired subtitles
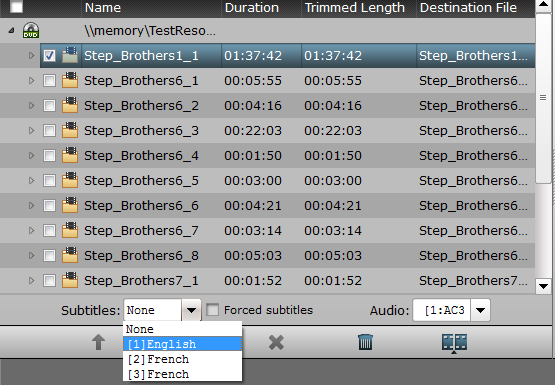
Check the movie titles you want to rip. Click the drop-down list of Subtitles, then all the subtitles info in the Blu-ray will be shown clearly, so you can select your needed language as your subtitles freely.

Enable forced subtitles
Tick off “Forced subtitles” option, you will see subtitles only when actors are speaking a language that are different from the subtitles that your specified before.

Step 3:Define the output format.
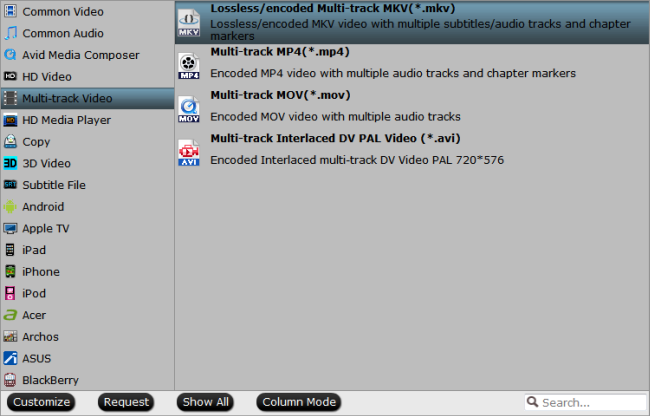
Clicking the Format bar, from its drop-down list, select one of your desired format to convert to. If you wish to preserver all the subtitle in original HD or 3D Blu-ray movies, it would be ideal for you to choose the “Lossless/Encoded Multi-track MKV (*.mkv)” under “Multi-rack Video” main category, which will output a regular subtitle track with all subtitles and the forced track will contain only those with forced flag. If entire original track is forced then both tracks will be identical. If no forced subtitles were in original track, the resulting “forced” track will be empty and will not be present in MKV at all.

Step 3: Add external subtitle to Blu-ray movies.
Open “Video Editor” window, switch to the “Subtitle” tab, check “Enable”, then you will be able to load external SRT/ASS/SSA subtitles to Blu-ray movies.

Step 4: Start the Blu-ray subtitle ripping process.
After all setting is completed, hit the “Convert” button at the right bottom of the main interface to begin to rip HD/3D Blu-ray on Mac with forced subtitles including process.
When the conversion is finished, click “Open Output Folder” icon on the main interface to open the folder with generated files. Then you will be able to disable the traditional subtitles while still preserving the subtitles that translate foreign language speaking parts periodically throughout the film to help you understand what they are saying.


