Many movie fans who have gathered a house of Blu-ray collections would like to backup and burn their Blu-rays for protection and space saving. While movies listed as 50 GB cannot fit on a 25 GB disc without losing quality. So many people ask the way to shrink 50GB Blu-ray to 25GB:
"I am trying to figure out how to “shrink” down a regular Blu-Ray movie, so that I can burn it to a single layer 25gb BD-R disc for playback as BD50 is too expensive. How can we shrink BD50 to BD25 keeping all features?"

I happened to get some experiences that when ripping from a BD50 to a BD25, a typical movie will fit onto a BD25 without actually re-encoding the video at all. So I maybe can give an answer to the help seeker. There is no software on the market that can fulfill backing up Blu-ray and burning video to Blu-ray at the same time. So to compress a BD 50 to BD 25, you have to use two software to achieve these two parts: Part one: Backup 50 GB Blu-ray to 25GB video without quality loss; Part two. Burn copied Blu-ray into 25 GB Blu-ray disc
Part I: Compress a 50GB Blu-ray into a video under 25GB
Is there a way to compress a 50gb movie to fit on a 25 gb disc without losing detail on Mac? No matter how powerful it is while decrypting of protected Blu-ray movies, when it comes to compress file size of Blu-ray movies, AnyDVD HD can do nothing with it.
Luckily we found Pavtube BDMagic for Mac which is a magic tool to cut down your 50GB bluray movies to video under 25GB below which can fully meet users’ further needs. With its clean interface, fast converting speed and good video quality, compressing Blu-rays/DVD to playable format for various purposes will be simply finished within a few clicks. Now, let’s together have a look at how to compress file size of Blu-ray movies via Pavtube BDMagic for Mac.
The app is also available for Mac OS – Get Pavtube BDMagic for Mac if you work with OS X 10.5/10.6/10.7/10.8/10.9/10.10/10.11/10.12.
FYI: If you want to rip BD/DVD with keeping all the audio tracks (language) and soft subtitles, here’s another choice for you: Pavtube ByteCopy/ByteCopy for Mac.
Note: A BD drive is needed for Blu-ray compressing and ripping.
Step 1: Load Blu-ray disc
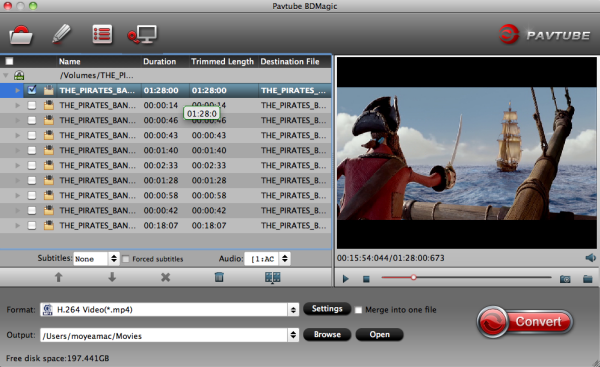
Run the best Blu-ray Ripper for Mac, click this “Load Disc” icon to import your inserted Blu-ray Disc

Step 2: Select output format and set destination folder
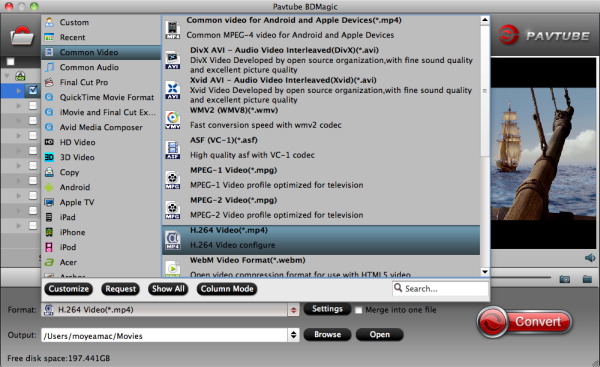
Click the drop-down list of “Format” to specify an output format according to your end use of the output files. Meanwhile, you are able to click the folder icon at the end of “Output” to browse and set a save path to store the ripped Blu-ray files.
Step 3: Compress file size of Blu-ray movies
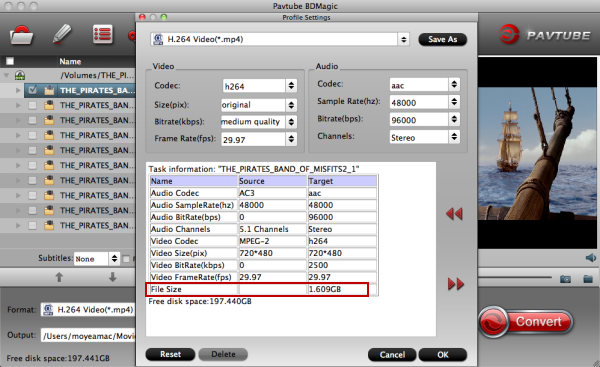
This is the key point of the entire procedures, click “Settings” button, and then the following interface will show up, on which you are able to adjust bit rate, frame rate, sample rate, aspect ratio, etc. to make control of the output file size and quality.

To compress the file size into video under 25GB, what you should do is changing the figures of these options to be smaller only. Look at the target file size, keep it under 25GB. One more thing you must be sure that there will be some quality loss if you compress them to be a much smaller size, which means you’d better make a balance between the size and image quality. At least the output video quality should be acceptable by yourselves.
Step 4: Start compression and conversion
As long as the former three steps are set well, then you can click “Convert” button to start Blu-ray ripping, at the same time, the compression task of Blu-ray file size is underway as well. Once finished, you can find out the output files via clicking “Open” button. After that you can do whatever you like with the compressed Blu-ray files.
Part II: Burn converted MP4 movie to Blu-ray using Roxio Toast
Launch Toast 11 and drag the converted mp4 file into this window, or select it from your file browser using the Select button. Choose BD-R from the Space Remaining bar graph at the bottom of the screen, and choose your BluRay burner from the Destination menu. Choose the number of copies you want to burn – each time a disc is complete; you will be prompted by Toast to insert another disc. Hit the big red Copy button, and the disc burning will begin!
- See details at Burn yor HD Movie to Blu-ray Disc using Toast.
Now insert this Blu-ray to your BD player and star enjoying!
Related Articles:


