


Comparing with smaller USB Sticks, SSDs have more capacity than them. The significant speed increases of SSDs make them an overall better, cost-effective choice for the data organization. So if you want to take your Blu-ray collection with you and plan to backup Blu-ray to USB Stick, now you can change your mind and start to copy Blu-ray to SSD.
Why Do We Put Blu-ray to SSD?
Watching Blu-ray movies at home with home theatre system like Blu-ray player or Xbox One S is great fun with family members and friends. However, it will be weird for us to carry a hardware Blu-ray player or a device with Blu-ray drive around if we plan for a long train journey and would like to watch Blu-ray movies on the train. Meanwhile, there are other occasions in which your source Blu-ray discs might get lost or broken. In such conditions, copying Blu-ray to SSD would be of great help. Below content shows you where you may need a SSD rather than a Blu-ray disc.
Best Blu-ray to SSD Ripper
It is not difficult to rip, copy or backup Blu-ray to SSD. First of all, the data on a commercial Blu ray movie is encrypted, you are not allowed to copy Blu-ray files to a SSD directly. Hence, we need Pavtube ByteCopy to rip and digitize Blu-ray to a common video for adding to SSD. Besides, if you convert Blu-ray to H.264 and H.265 video to SSD, you can rip Blu-ray to SSD with NVIDIA GPU acceleration. Because Pavtube ByteCopy has recently upgraded to version 4.9.1.0 with supporting the newest NVIDIA CUDA and NVIDIA NVENC technology in video encoding by H.264 and H.265 codec to improve performance and ensure users much faster conversion speed than ever before when coping/ripping/converting DVD/Blu-ray, since more CPU resources are spared because of NVIDIA CUDA’s harnessing the power of GPU. So if you choose to convert DVD and Blu-ray to H.265 or H.264 video, you can get up to 30x times ripping speed. If you want to save much time when ripping DVD to SSD, you can rip DVD to SSD in H.265 format with NVIDIA CUDA acceleration following the below steps.
Steps to Backup Blu-ray to SSD with NVIDIA GPU Acceleration
1: Add Blu-ray movies
Launch the top Blu-ray ripping tool. Then click disc icon to select and import the Blu-ray files you want to rip to this program. Loaded files can be previewed in the right viewing window and you can take snapshots of your favorite movie scenes.

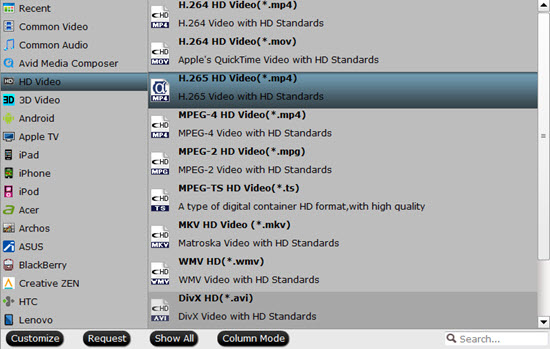
2. Choose output format
SSD supports storing almost all kinds of video formats. However, when linked to a device for playing, the video file should of the format accepted by the device, for example, a smart TV, a computer and a desktop. So you are required to figure out the exact input video formats supported by the device you are to play the Blu-ray files with. Generally, MP4 is recommended since it has wide acceptance, good video quality and small file size.
Tip: With the right settings you can retain the quality of the original Blu-ray while also saving space. Simply click Settings bar and you can tweak the video size, bitrate, frame rate, etc.
3: Utilizing Nvidia GPU Hardware Acceleration In ByteCopy
Now, move your cursor to “Tools” button on the top of the main interface to choose “Options”. Then you can enable GPU Encode acceleration. You need to check if your graphic card supports CUDA acceleration from here. .

4. Start ripping Blu-ray to SSD
Click convert button to start converting Blu-ray movies for SSD. After conversion completes, press “Open output folder” to locate resulted files.
Now, you can play Blu-ray contents through SSD without any troubles. Enjoy.
Related Articles:
- Rip 4K Blu-ray with Dolby TrueHD/DTS-HD MA
- Blu-ray VC-1 to H.264 MKV with Dolby TrueHD/DTS-HD Master Audio
- How to Rip 4K Blu-ray to H.265 MKV Utilizing CUDA on Windows?
- ByteCopy Joined H.265 NVIDIA to 30X Realtime 4K H.265 Encoding
- How to Rip 4K Blu-ray to H.265 MP4 Utilizing NVIDIA GPU Acceleration?


