From ultrabooks to netbooks, computers are shedding their optical drives. If you still use an occasional CD or DVD, you don’t have to buy an external optical drive – you can share another computer’s optical drive over the network.
The two computers must be on the same local network to share an optical drive. This requires using the Advanced Sharing settings in Windows – there’s no easy, HomeGroup-style way of doing this.
Sharing a Drive
First, open the Computer window (click Start and select Computer) on the computer with the optical drive.

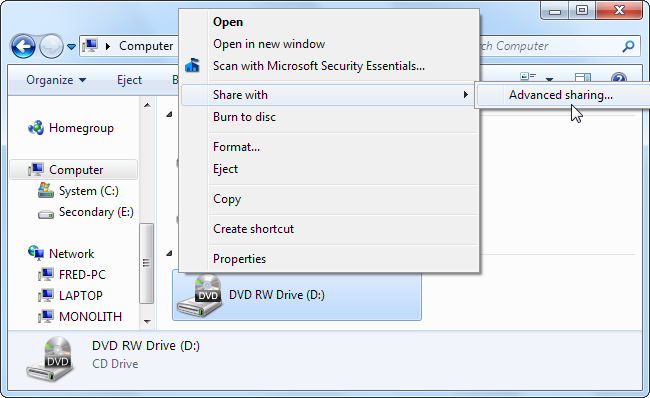
Right-click the drive you want to share, point to Share with and select Advanced Sharing
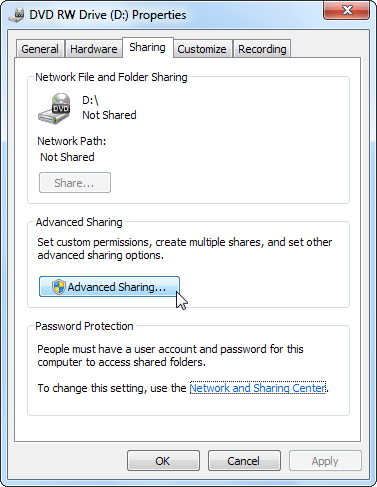
Click the Advanced Sharing button in the properties window that appears.
In the next window, enable the Share this folder checkbox. Type a descriptive name – such as “CD Drive” – for the share, and then click the Permissions button.

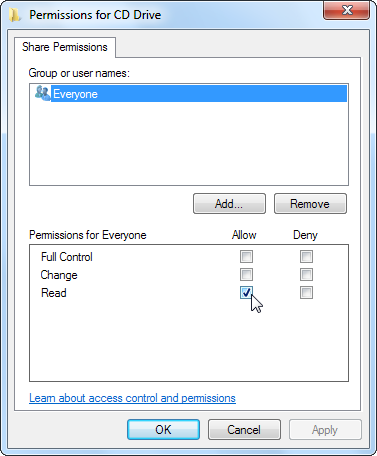
Ensure that the Everyone group has Read access to the drive. If you require additional security – for example, if you’re not using a home network — you can restrict access to specific users. Click OK to save your changes after configuring the permissions.
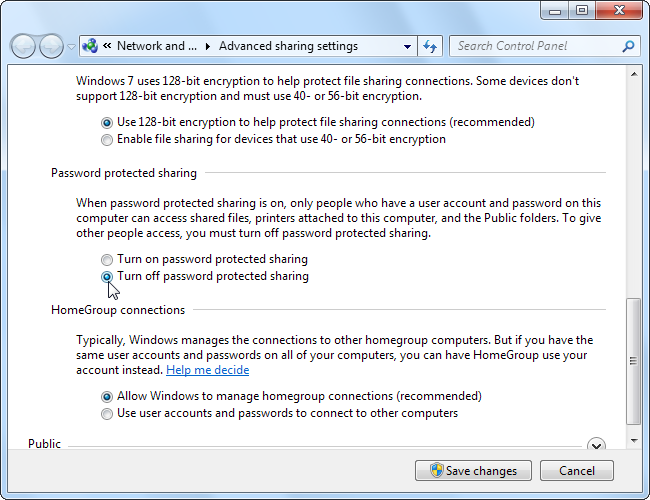
You may want to disable password-protected sharing to make this easier, assuming you’re on a secure home network. To do so, click the Network and Sharing Center link under Password Protection.

Click the Home or Work header, scroll down, and select Turn off password protected sharing to disable it. Click the Save changes button after you’re done.
After you click the OK button, your drive will be shared on the network. You’ll see its address under Network Path in the properties window.
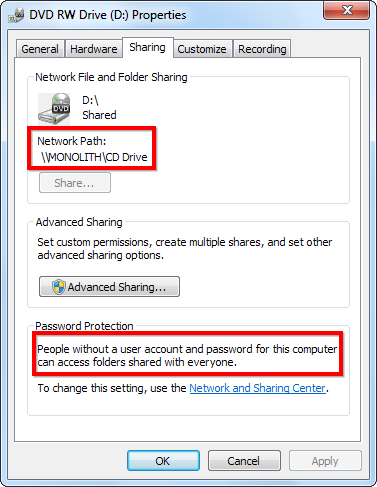
An icon over the drive indicates that it’s shared. To stop sharing the drive later, go back into its Advanced Sharing window and uncheck the Share this folder checkbox.

Mapping a Drive
On your other computer, open Windows Explorer and click the Network option to view your network.
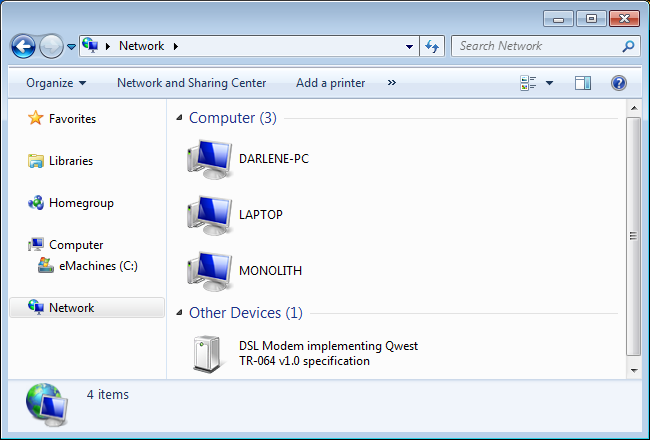
Browse to the share you created, then right-click it and select Map network drive.
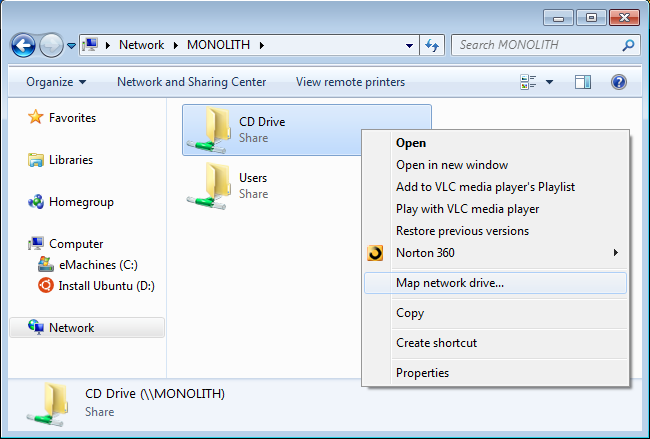
You can specify a drive letter for the shared optical drive and have it automatically become mapped each time you log in.

The mapped drive will appear as its own drive letter in the My Computer window. Double-click the drive, or navigate to it in any application, to access its contents over the network.

Src: http://www.howtogeek.com/114254/how-to-share-cd-dvd-drives-over-the-network-on-windows/
Share DVD Movies to Devices/PC Over Network with One DVD Drive
You also can copy DVD to hard drive on PC with DVD Drive and DVD Ripper. Then put the DVD backup onto sharing folder of Plex or NAS, Cloud Storage. Afterwards, you can play DVD movies on your PC, Tablet, Laptop, Netbook, NoteBook, iPad, iPhone, Samsung Galaxy Note 7, PS4, Xbox One S, PS4 Pro, etc.
Now saying copy DVDs to hard drive, using DVD rip software is the best way to put DVDs to computer. Then we need to think about the question – how to rip DVDs to hard drive with DVD ripping software? Here we’d like to take – Pavtube BDMagic for example to introduce the steps.
Pavtube BDMagic is a top-ranked DVD ripping software that facilitates ripping the content of a DVD to computer hard drive and converting to other popular video formats, such as rip DVD to MP4, AVI, WMV, FLV, MOV, MPEG1/2, etc.
It offers powerful yet easy-to-use functions, excellent video/audio quality, and fast ripping speed. This DVD ripping software also has the ability to decrypt DVDs, remove copy preventions, and make disks unrestricted and region-free.
HOT Search: DVD to Android, DVD to USB, DVD to iPad, DVD to TV, DVD to Media Player,
How to Copy DVD to Hard Drive with Pavtube BDMagic?
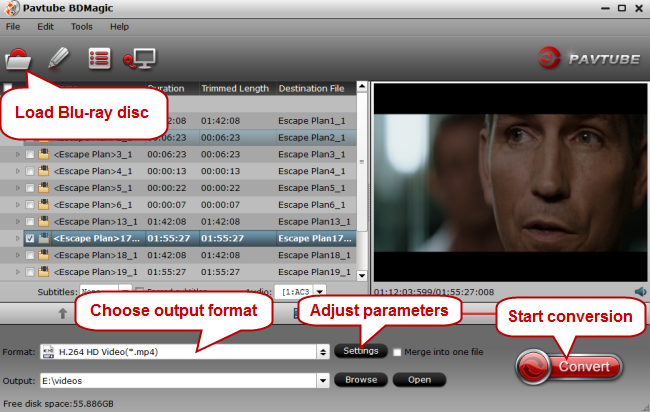
1. Insert DVD disc into DVD drive or get DVD folder/ISO file ready. Launch Pavtube BDMagic and then click the “Files” button to import source DVD movies.
2. Click the drop-down box of “Format” button and then select option to set a profile as output format. You could edit output profile as you player.
3.Click the big “Convert” button and then set output directory to save final converted DVD files. After that, click the bottom “Convert” button to start converting.
After the conversion, you can put the DVD rips onto Plex sharing folder or save DVD on NAS to share your DVD movies over Network.
Related Articles:
- Integrate All Movies to MP4 for Plex Around House Streaming
- Copy Netflix DVDs to Movie Collections on Mac (macOS Sierra/El Capitan)
- Backup Blu-ray/DVD to Windows Home Server for Viewing via iPad
- Rip Blu-Ray To Plex With Dolby TrueHD Audio
- How to Rip DVD Movies for QuickTime playback on Mac OS X El Capitan?


