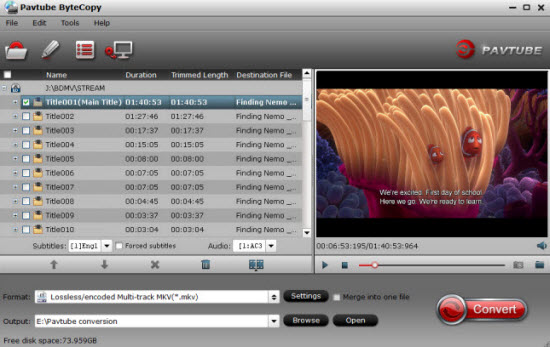
Have all of your favorite movies on Blu-ray disc and wish to put them in a network enabled devices so that you can conveniently access them in the home. As a matter of fact, what you need to do is digitizing your Blu-ray and then store it on the NAS devices in appropriate folders. To use your NAS devices as a home media server, you will still need to install the Plex Media Server on the NAS. Make sure that your NAS you are using is included in Plex supported NAS devices list.
Digitize Blu-ray to NAS devices
Although Blu-ray to digital files is very time-consuming, also keep in mind copyright and legal implications. Some people suggest to rip Blu-ray to digital with MakeMKV, which will produce a lossless MKV file with preserved high quality soundtracks. However, the problem is that the generate MKV file with MakeMKV is very large with around 30GB in size, in addition, the MKV file isn’t as widely supported as MP4 or AVI files, to streaming them to other devices, you will still need to rely on Plex Media Server to transcode the file for specific devices. However, transcoding a media file with Plex Media Server can be very CPU intensive, if your computer CPU is not faster enough, you won’t get a good performance.
Related article: ISO to MP4 via QNAP NAS | Rip DVD to NAS for Roku | DVD to MKV for NAS
For those people who wish to achieve a smooth Plex streaming experience, it would be much ideal for you to directly rip Blu-ray to device compatible file formats. Here, you can complete the job by downloading Pavtube ByteCopy. The program not only assists you to powerfully and automatically bypass all the Blu-ray copy protection and region code in the background with the built-in disc decrypter but also facilitates you to direct rip Blu-ray to various popular digital file formats such as H.264, MP4, AVI, WMV, etc that’s are widely supported by various devices or directly output hot devices preset profile formats with the optimal playback settings.
Pavtube ByteCopy is available for Windows 10/8.1/8/7, it is also accompanied by an up-to-date Mac version – Pavtube ByteCopy for Mac for macOS High Sierra, macOS Sierra, Mac OS X El Capitan, Mac OS X Yosemite and Mac OS X Mavericks, etc.
Step by Step to Rip Blu-ray for Plex Streaming from NAS with Pavtube ByteCopy
Step 1: Load Blu-ray disc.
Insert the Blu-ray disc into your computer’s Blu-ray drive. If your computer doesn’t ship with a drive, you will need to purchase an external USB Blu-ray drive to read the data on Blu-ray disc. Then press “File” > “Load from disc” option on the main interface, alternatively, you can also import Blu-ray folder or Blu-ray ISO files with the program.

Step 2: Define the output format.
Clicking the Format bar, from its drop-down list, select one of devices supported digital file formats such as “H.264 HD Video(*.mp4)” under “HD Video” main category, you can also choose device preset profile formats according to your own needs.

Step 3: Customize output profile settings.
Click “Settings” on the main interface to open “Profile Settings” window, here, you can flexibly choose or specify exactly the profile parameters including video codec, resolution, bit rate, frame rate, audio codec, bit rate, sample rate, channels, etc as you like to get better output video and audio quality.

Step 4: Begin the conversion process.
After all setting is completed, hit the “Convert” button at the right bottom of the main interface to begin the conversion process from Blu-ray to your desired digital file formats conversion process.
When the conversion is finished, click “Open Output Folder” icon on the main interface to open the folder with generated files. Then feel free to add ripped Blu-ray files to NAS devices for streaming via Plex to smartphone, tablets, game consoles, TVs, etc.


