Windows Media Center, with short form of WMC, is a digital video recorder and media player developed by Microsoft. Besides, it’s very powerful application except it cannot play Blu-Ray disc movies or Blu-Ray folder or Blu-Ray ISO. When you have problems of playing Blu-rays in Windows Media Center, check if your Blu-Ray disc or contains Blu-Ray movies. Windows Media Center can’t natively support Blu-ray is always a headache problem for many people. If you have the same questions, just Follow this article to learn how to play Blu-ray in Windows Media Center.
How can we play Blu-Ray movies on computer if Windows Media Center won’t play Blu-Ray disc movies? This article introduces two solutions to play Blu-Ray in Windows Media Center. One common question that I get from my readers is how to get the Blu-ray movie playback working on their media center PC. So, I decided to go deeper in this subject by testing with three operating systems (Windows, Mac OSX and Linux) to find out how easy it is to get Blu-ray movie playback working with the popular media center software.
In this article you will learn to:
- Get a Blu-ray drive, if you don’t already have it
- Play Blu-ray discs with Windows Media Center
- Rip Blu-ray discs with MakeMKV
- Enable GPU hardware acceleration in XBMC
- Set up movie library in XBMC
The computers used in this test:
- Mac Mini – Mac OSX
- Mac Mini – Windows Vista Bootcamp
- Asrock ION 330 – OpenELEC Linux
The media centers used in this test:
- XBMC (Windows Vista, Mac OSX and Linux)
- Boxee (Windows Vista, Mac OSX and Linux)
- Plex (Max OSX)
- Windows Media Center (Windows Vista)
Hot Search: Windows 10 VS Windows 8 Comparison | Alternatives for Windows Media Center | DVD to Windows Media Center |
Get a Blu-Ray Drive, If You Don’t Already Have It
As I did not have Blu-ray drives on the test computers, I purchased Samsung SE-506 external USB Blu-ray drive. The great thing about this drive is that it is compatible with Windows and Mac OSX operating systems. See the full list of best sellers in Blu-ray drive category here.
Play Blu-ray Discs with Windows Media Center
The easiest way to watch Blu-ray movies is with PowerDVD 11 in Windows. All you need to do is to get the free 30 trial of PowerDVD 11 and install it to your computer. It automatically installs a plugin for Windows Media Center, too.

Once you launch WMC, simply select Cyberlink PowerDVD 11 and select “Play Blu-ray Disc”. PowerDVD will open in the background and start playing the movie integrated inside the WMC.
However, if you do not use Windows Media Center, it’ll be a bit more difficult to watch Blu-ray movies with your HTPC. Continue reading on how you can watch movies with XBMC media center software.
Ripping Blu-Ray Discs with Pavtube BDMagic for Windows Media Center
Here, there is another way that you need to download a Blu-ray to Windows Media Center Converter – Pavtube BDMagic. It has been optimized and upgraded in order to read and rip Blu-ray movies with latest encryptions and convert them to playable video formats like WMV while still keeping the high video and audio quality. (More reasons to choose BDMagic).
P.S. If you are a Mac user, go to get BDMagic for Mac. Free download it now. Once having installed it, follow below instructions to rip Blu-ray to Windows Media Center.
Other Download:
– Pavtube old official address: http://www.pavtube.cn/blu-ray-ripper/
– Cnet Download: http://download.cnet.com/Pavtube-BDMagic/3000-7970_4-75922877.html
Step 1. Load Blu-ray to the Best Blu-ray to Windows Media Center Ripper. You are allowed to load Blu-ray discs, load Blu-ray files or load from blu-ray folder.
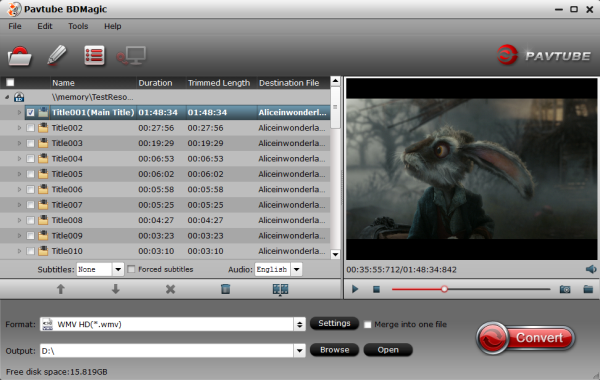
Step 2. Select video format for Windows Media Center. Click “Format” menu to choose the output format. Here you can choose “DivX HD(*.avi)” from “HD Video” option, or you can choose “WMV HD(*.wmv)” which works for Windows Media Center natively.
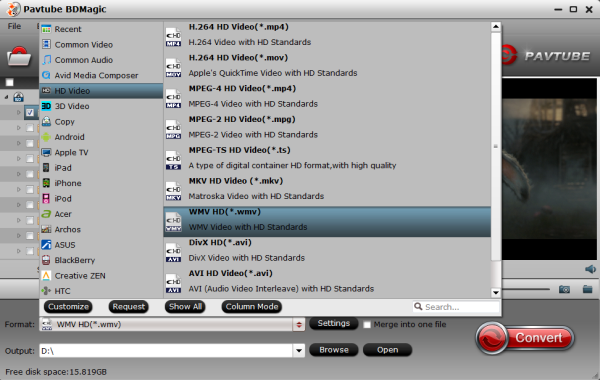
Step 3. Convert Blu-ray to Windows Media Center.
Click big “Convert” button to start ripping Blu-ray to AVI/WMV for Windows Media Center and then click “Open” button to get generated videos for Windows Media Center when completed. Open Windows Media Player and then add items to the Windows Media Player Library for playback.
Do Media Centers Support MKV Files Out of the Box?
To test the MKV playback on Mac Mini and Asrock ION 330, I streamed the MKV file from my NAS server to the computer. The results showed that most tested media centers except Windows Media Center were able to play MKV files out of the box.
MKV playback supported by default:
- Boxee: Yes
- XBMC: Yes
- Plex: Yes
- Windows Media Center: No
As Windows Media Center does not support MKV files out of the box, you will need to install suitable video codecs first. Shark007 Codec Pack worked well for me to get MKV playback working on Windows. Shark007 codecs enable hardware acceleration by default, so the video playback was smooth.
The Importance of the Hardware Acceleration
I tested XBMC on Windows, Mac OSX and Linux and noticed that I got much better video smoothness on Linux with Asrock ION 330 compared to Mac Mini on Mac OSX. Windows Vista’s playback got smooth after enabling the DXVA2 hardware acceleration.
Mac OSX – Hardware Acceleration Enabled – Fail
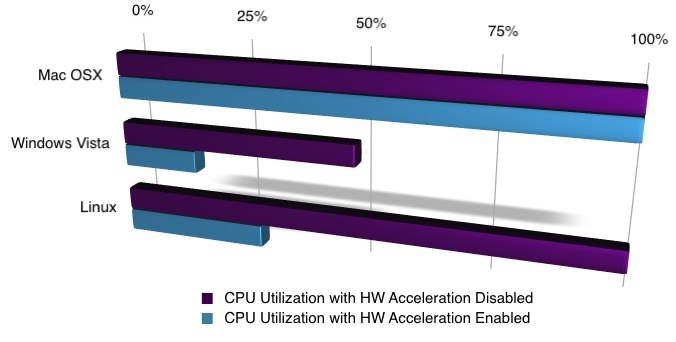
As can be seen from the screenshot below, Mac Mini’s CPU utilization on Mac OSX was around 80%-100% during the movie playback. Even when I had the hardware acceleration enabled, it really did not seem to have any effect.
Windows Vista – Hardware Acceleration Disabled – Fail
Mac Mini’s CPU utilization on Windows Vista without hardware acceleration was around 40%-80%.
Linux – Hardware Acceleration Disabled – Fail
Asrock ION 330’s CPU utilization on Linux without hardware acceleration was around 100% all the time and the video playback was slow and choppy.
Windows Vista – Hardware Acceleration Enabled – Pass
However, after enabling the DXVA2 hardware acceleration on Windows Vista, the CPU utilization dropped to 10%-30% level. The main reason why Windows playback performance improved with DXVA2 (DirectX Video Acceleration version 2.0) is that it allows video decoding to be hardware accelerated.
Linux – Hardware Acceleration Enabled – Pass
With Linux hardware acceleration enabled, I got similar results as with DXVA2 acceleration on Windows. As shown in the screenshot below Asrock ION 330 with hardware acceleration on Linux was using 10%-30% of the CPU.
The key reason for smooth video playback on Linux is that my Asrock ION 330 is using VDPAU (Video Decode and Presentation API for Unix) in Linux which allows XBMC to offload portions of the video decoding to the GPU video-hardware.
Note: if you are using Intel Core-i3, make sure that you have enabled VAAPI (Video Acceleration API) hardware acceleration in the XBMC system settings to utilize Intel hardware-accelerated media decoding on Linux.
The chart below summarizes the findings. As you can see both Windows Vista and Linux were able to use GPU hardware acceleration properly while Mac OSX was not able to utilize hardware acceleration.
Enable Hardware Acceleration in XBMC
As a conclusion from the previous section, make sure that you have enabled GPU hardware acceleration in your media center.
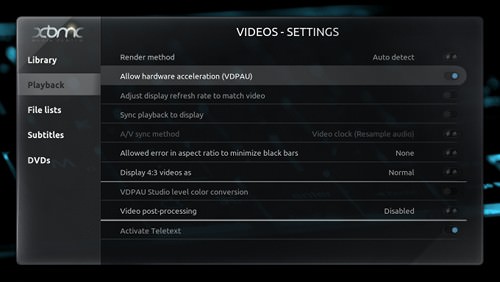
In XBMC, you can enable it here: System – Video – Playback – Allow hardware acceleration
Setting Up Movie Library in XBMC
Once you have ripped your movie to the hard drive, it is time to add it to your movie library. I’m using XBMC as an example on how to setup the movie library. The process is very similar e.g. with Boxee.
1. Check folder naming convention
Make sure that you name the folder for each movie with the real name of the movie. Here is an example path for the movie used in this test:
\Movies\HD\Full Movie Name\movie_blu_ray.mkv
2. Set content
First, go to Videos in the home menu and press “C” on the folder that contains your movie collection. Select “Set Content” and set “this directory contains” as Movies.
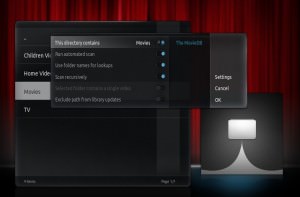
You should also set automatic scanning on and use folder names for lookups. Now, hit OK. Answer “Yes” to the question do you want to refresh info for all items within this path.
3. Enable library mode
Now, you can enable the library mode by pressing the left arrow and select “Library Mode”.
Conclusion
The easiest way to play BD discs on your Windows Media Center is with PowerDVD 11.
The alternative method with Pavtube BDMagic is not the most convenient as you are not able to play movies directly from optical drive with most media centers. However, with this method you are able to play Blu-ray movies with Mac OS X and Linux operating systems that do not support BD discs by default.
In addition, I found out that both Windows and Linux have an excellent hardware acceleration support for many popular graphics chips including NVIDIA ION and Intel HD graphics. However, I was not able to get smooth video playback on Mac OSX.
The key finding in this test was that CPU performance does not matter that much when watching Blu-ray movies if you have a decent hardware acceleration enabled graphics chip (either embedded on the CPU or separate graphics card).
Read More:


