Play DVD movies on Surface Book with DVD Drive
The lightweight, portable and large display screen (15″ or 13.5″), together with the long battery life (up to 17 hours) makes the new Surface Book 2 a good partner for those people who are often travelling a lot. For DVD movie collectors, you may come the idea to enjoy your favorite DVD movies on Surface Book 2 when you are on the road. Is it possible to direct watch DVD disc on Surface Book 2?
The fact is that it is impossible to direct view DVD movies on Surface Book 2. The main reason is that just like its predecessor – Surface Book, the new Surface Book 2 also lacks the built-in DVD drive to read the data on your DVD disc. Even though you can purchase an external DVD drive and attache it to our Surface Book 2, however, it would be very convenient for you to carry so many bulky disc with you especially when you out for a trip. The good news is that you can choose to rip DVD movies into Surface Book 2 compatible digital file formats for viewing with the built-in video player app offered by Surface Book 2.
Rip DVD movies for Surface Book 2 playing
Here, you can get the job easily done with a DVD Ripping tool. When you are searching on the Internet, you may find that there are many options out there, have no idea which one to choose. Never mind, just have a review of our best DVD Ripper Review. After that, you will finally settle on Pavtube DVDAid. The program can powerfully bypass all DVD copy protection including RCE, key2Audio, UOP, CSS, Macrovision, FluxDVD, Protect, ARccOS, AACS, BD+, ROM Mark, BD-Live, etc and region code. Besides that, it also keeps constant update with perfect support for the new encryption used on many recently released DVD movies.
When the protection is successfully removed, you can then freely copy the movies stored on DVD disc without any limitation. The biggest merits of this program lies in that it not only assists you to rip DVD to Surface Book 2 playable digital file formats, but also allows you to direct output Surface Book 2 preset profile formats if you have no idea how to adjust to produce the best playback settings such as video codec, resolution, bit rate, frame rate and audio codec, bit rate, sample rate, channels, etc for Surface Book 2.
Related article: Play Flash Video on Surface | Surface Video Formats | Blu-ray/DVD ISO to Surface Book
Adjust output video aspect ratio for Surface Book
The Surface Book 2 uses an aspect ratio of 3:2, while the DVD movies mainly adopts the aspect ratio of 4:3 or 16:9, when you play the DVD movies with incompatible aspect ratio on Surface Book 2, there will be black borders around the video frame. The good news is that you can easily fix that by changing output video aspect ratio as 3:2 in the video cropping window.
For Mac users, please go to download Pavtube DVDAid for Mac to complete the conversion on macOS High Sierra, macOS Sierra, Mac OS X El Capitan, Mac OS X Yosemite, Mac OS X Mavericks, etc.
Step by Step to Rip DVD Movies for Surface Book 2 Playback
Step 1: Import DVD Movies.
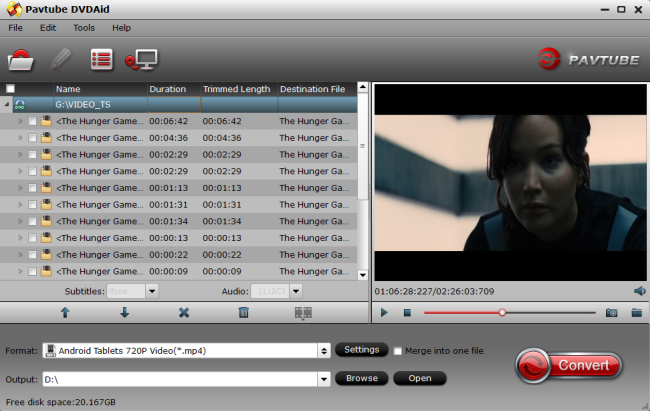
Download, install and run this DVD ripper. You can load DVD by clicking “File” > “Load from disc”. Or load DVD Folder by clicking “File” > “Load from folder” or load DVD IFO/ISO image by clicking “File” > “Load IFO/ISO”.

Step 2: Choose output file format.
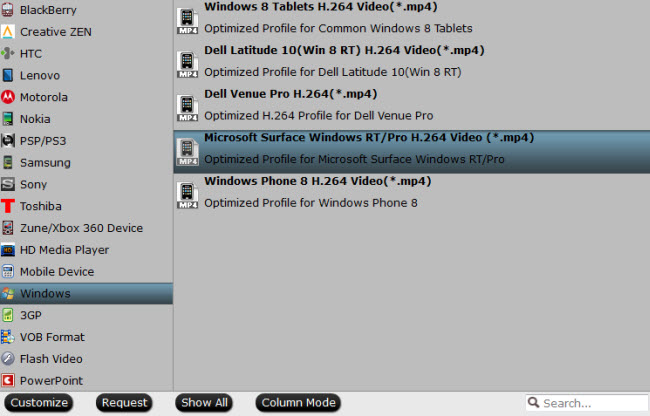
Here, you can select to choose Surface Book 2 compatible digital file formats and then tweak other playback settings in the “Profile Settings” window or directly output Surface Book 2 preset profile formats “Microsoft Surface Windows RT/Pro H.264 Video(*.mp4)” under “Windows” main category which also works on Surface Book 2.

Step 3: Adjust output video aspect ratio.
Click the “Crop” tab in the “Video Editor” Window, switch to the “Advanced Mode. To change output video aspect ratio, there are several aspect ratios for you to choose from, including 16:10, 16:9, 5:4, 4:3, 3:2, and 2:1, you can choose Surface Book 2 accepted aspect ratio 3:2. Once you select a “Display aspect ratio”, the “green crop frame” will keep this ratio to crop video and you are able to preview the final effect in real time. If you want to keep the same aspect ratio in your final output files, do remember to set the Video “Size (pix)” in “Settings” section as the same ratio as display aspect ratio.

Step 4. Start DVD to Surface Book 2 ripping process.
Set an output folder to save the converted DVD movie and then hit the “Convert” button to start conversion from DVD to Surface Book 2.
Step 5. Copy DVD to Surface Book 2.
There are multiple ways for you to put the converted DVD movie to Microsoft Surface Book 2.
a. OneDrive (formerly called SkyDrive, Microsoft cloud service)
b. Connect to a network computer
c. Use USB flash drive or memory card


