


Have some Blu-ray disc movies and wish to stream and play them on Raspberry Pi 3 with the Kodi media player. The following article will walk you through the detailed steps to get the job completed.
Rip Blu-ray for Kodi Playing on Raspberry Pi 3 running LibreELEC 8.0.1
Obviously, you can not directly play the Blu-ray disc on Raspberry Pi 3 with Kodi, you will need to rip Blu-ray to both Kodi and Raspberry Pi 3 supported file formats. Due to the complicated copy protection and region code used on Blu-ray disc, it is essential for you to find a powerful Blu-ray ripping program. After a lot of site comparison and testing, we finally settle on Pavtube ByteCopy (review), the program can powerful and automatically bypass all the encryption used on commercial Blu-ray disc with its built-in disc decrypter, you can them make a digital copy from the data on the non protected disc. The program can facilitate you to output both Kodi and Raspberry Pi 3 playable file formats listed below:
Kodi supported file formats
Container formats: AVI, MPEG, WMV, ASF, FLV, MKV/MKA (Matroska), QuickTime, MP4, M4A, AAC, Ogg, OGM, RealMedia RAM/RM/RV/RA/RMVB, 3gp
Video formats: MPEG-1, MPEG-2, H.263, MPEG-4 SP and ASP, MPEG-4 AVC (H.264), H.265 (as from Kodi 14) HuffYUV, MJPEG, RealVideo, RMVB, WMV
Audio formats: MIDI, AIFF, WAV/WAVE, AIFF, MP2, MP3, AAC, DTS, ALAC, AMR, FLAC, RealAudio, WMA
3D video formats: Passive 3D video formats such as SBS, TAB, anaglyph or interlaced
Raspberry Pi 3 supported file formats
– H.264 (up to High Profile) encoded videos are supported up to 1080P using hardware video decoding. Note: Hi10P will not work.
– MPEG-4 encoded videos are supported up to 1080P using hardware video decoding. This includes XviD and recent versions on DivX (but not the older 3.xx DivX).
– The Raspberry Pi Foundation offers additional video codec licenses for a few dollars. At the moment you can purchase MPEG-2 and VC1, both with support up to 1080P.
– MJPEG, VP6, VP8 and OGG Theora are supported as GPU accelerated software decoders. These are limited to DVD resolutions.
– Codecs without gpu support like DivX 3, msmpeg and sorenson spark will be decoded by dvdplayer on the ARM. Should work for SD resolutions.
– DVD ISOs with menus should work fine (using dvdplayer).
– Software DTS audio decode works well in recent builds. TrueHD audio is CPU intensive and may require overclocking.
From above lists, we can see that the best solution is to rip Blu-ray to H.264 HD video format. Besides Blu-ray, you can also use the program to rip DVD for Raspberry Pi playing via Kodi.
Adjust output profile settings
Click “Settings” on the main interface to open “Profile Settings” window, here, you can flexibly choose or specify exactly the parameters including video codec, resolution, bit rate, frame rate, audio codec, bit rate, sample rate, channels, etc as you like to get better output video and audio quality.


Step by Step to Rip Blu-ray for Kodi Playback on Raspberry Pi 3?
Step 1: Load Blu-ray disc.
Insert the Blu-ray disc into your computer’s Blu-ray drive. If your computer doesn’t ship with a drive, you will need to purchase an external USB Blu-ray drive to read on the data on Blu-ray disc. Then press “File” > “Load from disc” option on the main interface, alternatively, you can also import Blu-ray folder or Blu-ray ISO files with the program.

Step 2: Define the output format.
Clicking the Format bar, from its drop-down list, select both Kodi and Raspberry Pi 3 compatible file formats such as “H.264 HD Video(*.mp4)” under “HD Video” main category.

Tips: Click “Settings” on the main interface to open “Profile Settings” window, here, you can flexibly choose or specify exactly the parameters including video codec, resolution, bit rate, frame rate, audio codec, bit rate, sample rate, channels, etc as you like to get better output video and audio playback quality for Kodi.

Step 3: Begin the conversion process.
After all setting is completed, hit the “Convert” button at the right bottom of the main interface to begin to rip Blu-ray into Kodi and Raspberry Pi 3 playable file formats.
When the conversion is finished, click “Open Output Folder” icon on the main interface to open the folder with generated files. Then follow the steps below to install LibreELEC 8.0.1 Kodi on Raspberry Pi 3 for enjoying the converted media types.
Install LibreELEC 8.0.1 on Raspberry Pi 3
No matter what media types you wish to view on Raspberry Pi 3 via Kodi, you will first need to install Kodi on Raspberry Pi 3, however, before you do this job, you will still need to install a dedicated distribution for Kodi which is optimized for Raspberry Pi 3. LibreELEC, which is described as‘Just enough OS’ for Kodi, is a Linux distribution built to run Kodi on popular media center hardware like Raspberry Pi 3. The following part will show you how to install the new LibreELEC 8.0.1 on Raspberry Pi 3.
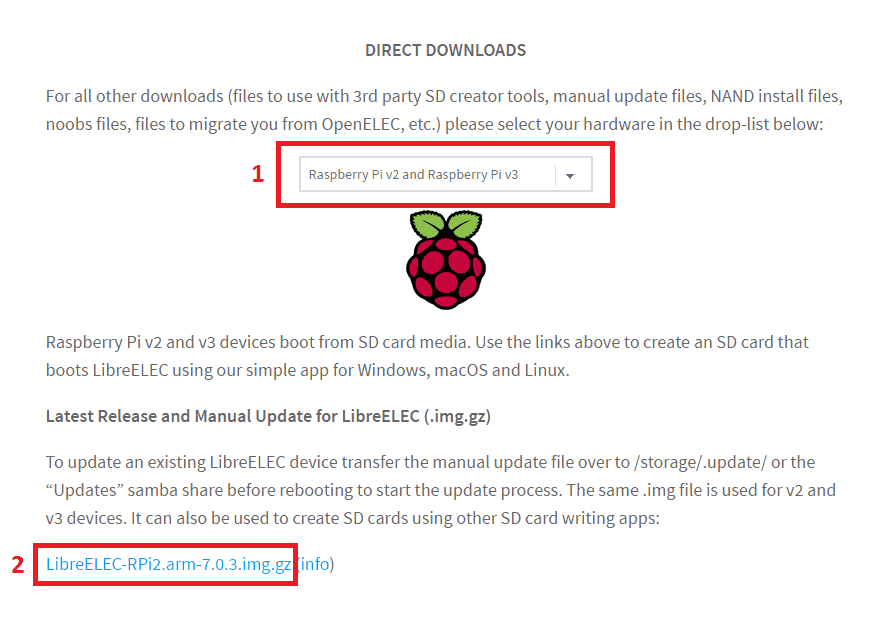
1. Download LibreELEC Image for RPi3
In order to install LibreELEC on Raspberry Pi3, we first need to visit the download section in the LibreELEC website. Scroll down until the you reach the DIRECT DOWNLOADS section, select Raspberry Pi v2 and Raspberry Pi v3, and click on the LibreELEC-RPi3.arm-8.0.1.img.gz (latest available version) link to download the image.
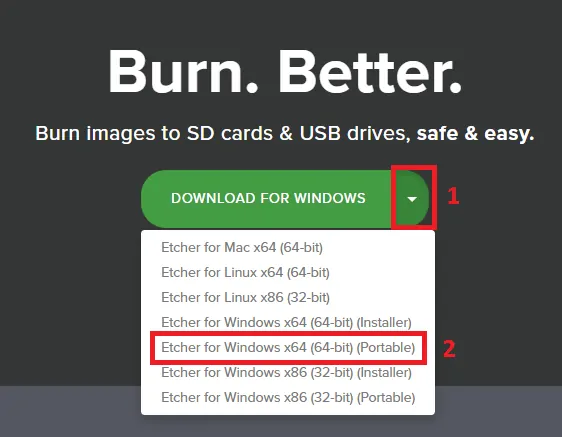
2. Download Etcher – For writing LibreELEC image to SD card
While the LibreELEC image is downloading, we need to download an app for writing the image to the SD Card. I am using Etcher because it also performs validation after writing the .img file and it has a really easy to use interface. In order to download it, just go on etcher.io site then click on the arrow next to the Download for Windows button, then select the portable version for Windows.
3. Install LibreELEC on Raspberry Pi3
After downloading both archives make sure you extract them so you have the LibreELEC .img file and the folder for Etcher like in the screenshot below and proceed with the Raspberry Pi LibreELEC installation.
Next, plug in the SD Card in the computer, go to the extracted Etcher folder, and double click on Etcher.exeto open it. When Etcher is open, first, select the LibreELEC image, next select the SD Card you previously inserted, and click Finish to start writing the image, as shown in the picture below.
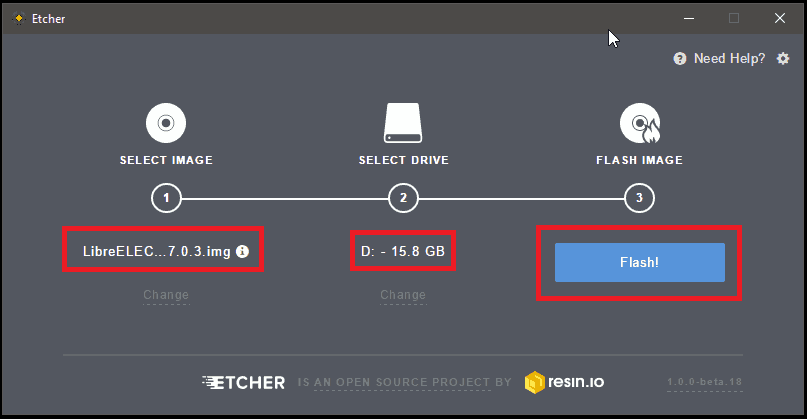
Wait until you get the “Flash Complete!” confirmation that the image has been flashed successfully then take your SD card out and plug it into your Raspberry Pi3.
Next, connect the power cable to the Raspberrry Pi and the LibreELEC boot process will begin. Now all you need to do is wait for LibreELEC to boot and go trough the basic configuration. The first boot sequence usually takes about 5 minutes, but after the first boot, the next restarts will be faster.
Congratulations! You managed to go through all of the steps required for the Raspberry Pi LibreELEC installation. Now you can enjoy all your media on your Raspberry Pi3.
Original source:
https://www.htpcbeginner.com/install-libreelec-on-raspberry-pi3/


