Pavtube Cyber Monday Crazy Deals! Get 50% OFF multi-track DVD/Blu-ray for ripping and copying Blu-rays/DVDs

Leave a comment

After Black Friday crazy shopping, More and more people look forward to Cyber Monday. Are you looking for some software promo about Blu-ray/DVD video converter? Do you regret that you you haven’t buy the Pavtube ByteCopy or other Pavtueb BD/DVD/Video Tools with 50% OFF discount on Black Friday 2016? Luckily, Pavtube ByteCopy (for Windows or Mac), Video Converter Ultimate (for Windows or Mac), BDMagic (for Windows or Mac), DVDAid (for Windows or Mac) crazy 50% off promotion in the continuing. From Nov.25 2016 to Nov 30 2016, Pavtube all products have 50% off discount on the official website and Pavtube Facebook. And you just pay $21, Pavtube ByteCopy (for Windows or Mac) will follow you forever. After this month, the whole Pavtube products will restore the original price, including the $9.9 special offer.

Pavtube Cyber Monday 2016 Sales

Part 1. Pavtube ByteCopy Overall Introduction

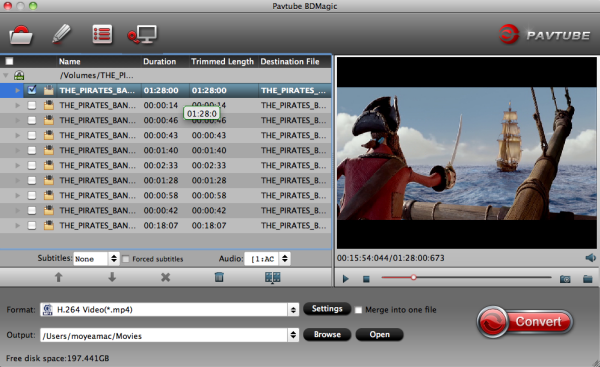
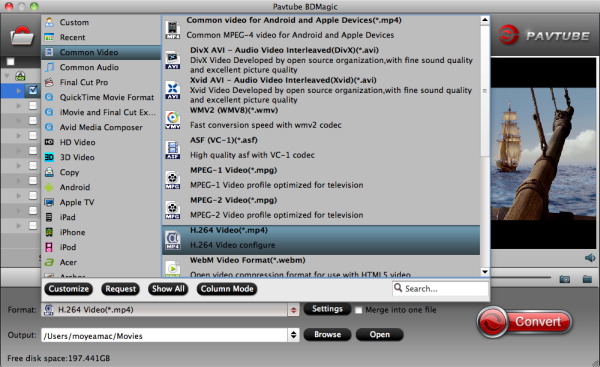
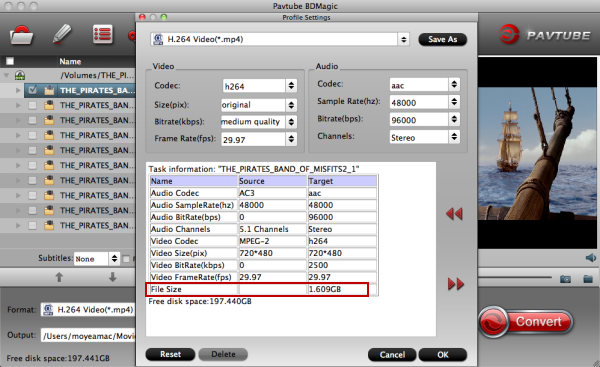
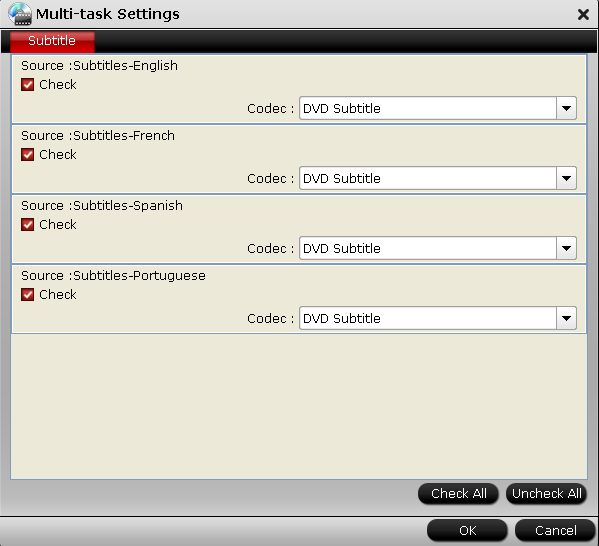
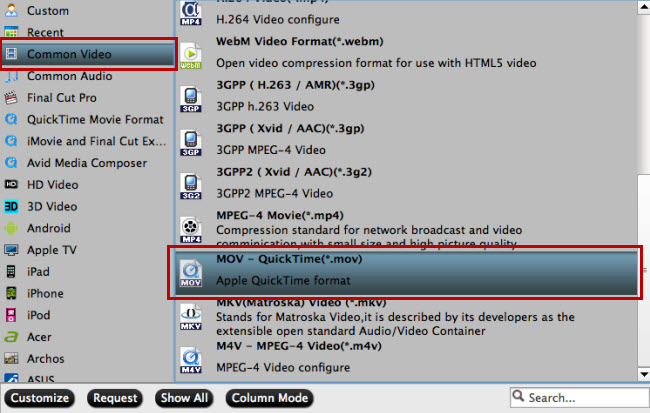
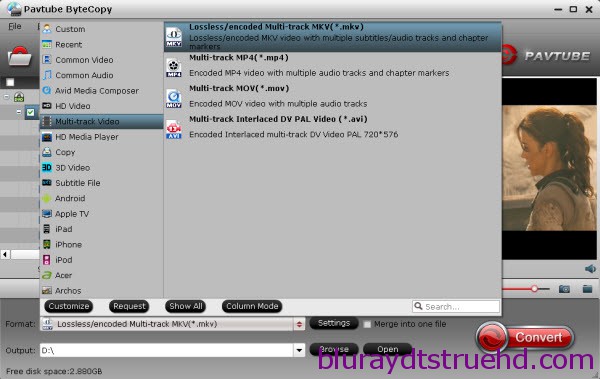
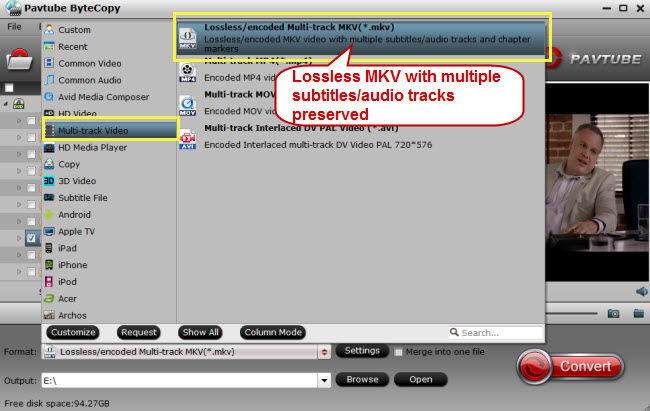
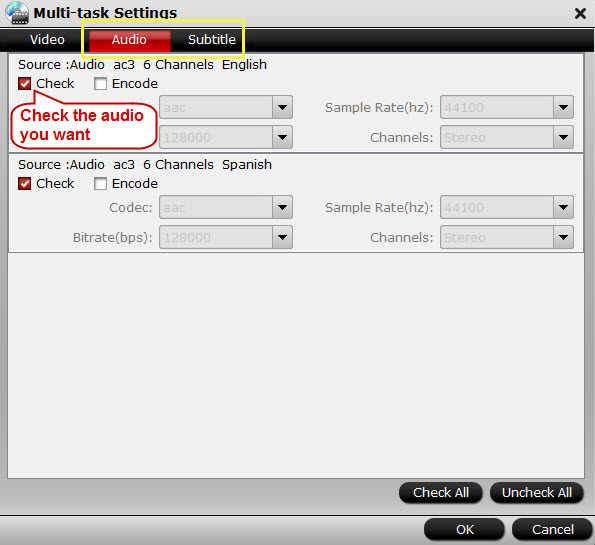
Pavtube ByteCopy (for Window or Mac) – The Efficient, Safe, Fast, Easy-to-use Blu-ray DVD converter and it can rip/backup/copy/convert blu-ray and DVD movies and convert movies to MKV/MP4/MOV/WMV with multiple audio tracks & subtitles. Besides, Pavtube ByteCopy for Mac support multi-track output for Apple Prores MOV with multi audio tracks for Final Cut Pro (X). Click here to learn more features

Part 2. Pavtube Other Blu-ray/DVD/Video Converters Black friday Crazy Promotions

50% OFF at Ultimate Products (Convert DVD/Blu-ray/Video) 
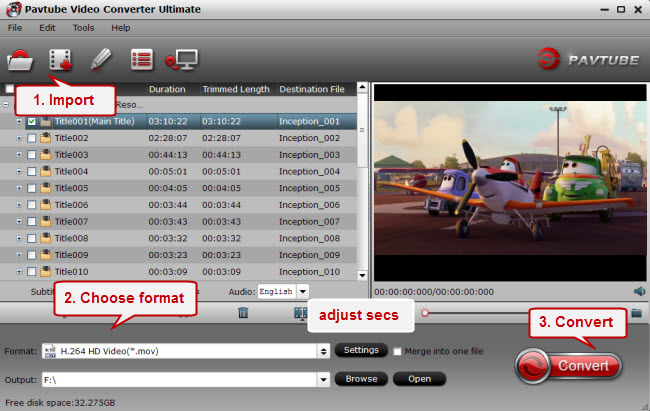
1. Pavtube Video Converter UltimateBuy now 
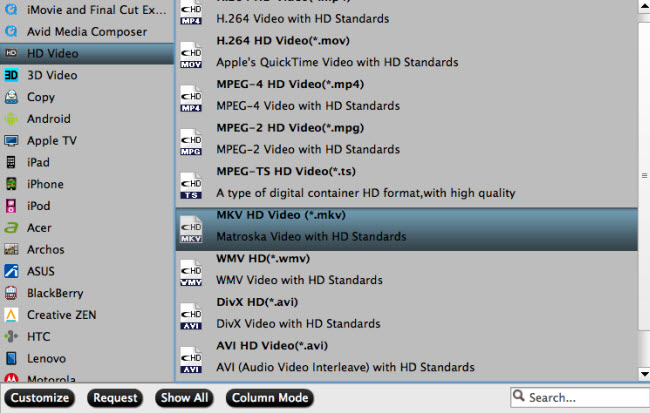
2. Pavtube iMedia Converter for Mac: Buy now

50% OFF at Blu-ray/DVD Products (Rip/Copy DVD/Blu-ray) 
1. Pavtube BDMagic for WindowsBuy Now 
2. Pavtube BDMagic for MacBuy Now 
3. Pavtube DVDAidBuy Windows | Buy Mac

Only $9.9 – all Video Converters for Windows and Mac 
1. Pavtube Video Converter: Buy Now
2. Pavtube Video Converter for Mac: Buy Now
3. Pavtube HD Video Converter: Buy Now
4. Pavtube HD Video Converter for Mac: Buy Now 
5. Pavtube MXF Converter: Buy Now
6. Pavtube MXF Converter for mac: Buy Now
7. Pavtube MTS/M2TS Converter: Buy Now
8. Pavtube MTS/M2TS for mac: Buy Now
9. Pavtube MXF Multimixer: Buy Now
10. Pavtube iMixMXF: Buy Now

More Pavtube products hot deals for Cyber Monday 2016 on Facebook: 
https://www.facebook.com/pavtubefans/app/198826126804423/

Emphasis: 50% OFF promo will continue to the Cyber Monday 2016 (From Nov.25 to Nov.30) Time-limited! Crazy to buy!

Pavtube Black Friday Promo Offer 50% OFF ByteCopy for Mac/Windows

Leave a comment

Black Friday is coming this week. Pavtube Studio takes out the sincerity to share you much discounts. Are you ready to catch the unexpected piece of good fortune. The same promotion as other Pavtube software products, Pavtube ByteCopy for Mac (Review) has a hot heal activity. Anyone who buy Pavtube Bytecopy for Mac this Black Friday holiday will get 50% OFF discount. $21 can take ByteCopy for Mac home. Only at this hot Black Friday deal party time (from Nov.23 to Nov.30). Go Past No Mistake Past! If miss, see you next year.

Get 50% OFF ByteCopy for Windows at here (Review)

Pavtube Black Friday Promotion

Pay $21 to get Pavtube ByteCopy for Mac

  1. To be your Blu-ray/DVD movies’s security guard that no virus can hit your movies during converting. Easy to operate, just useing your fingers to click can finish all converting work. Powerful function help you paly well in aspects of Blu-ray/DVD.
  2. Watch 3D Blu-ray movies with your family at home with 5.1/7.1 channels for free. Avatar will come to your living room from Mac, smart TV, Apple TV or smart phone.
  3. Lossless Backup Blu-ray and DVD movies to MKV with multiple audio/subtitle tracks, rip Blu-ray and DVD movies to Multi-track MP4, MOV, AVI, Apple ProRes for 200+ multimedia devices. Few software can do it. We can!
  4. Backup 3D Blu-ray in original 3D Effect on your Mac.
  5. Preserve a 100% Blu-ray main title in M2TS format without extras on Mac.
  6. Preserve a 100% DVD main title in VOB format without extras on Mac.
  7. “Full Disc Copy” Blu-ray or DVD content with retaining chapter markers on Mac.
  8. Save the 1:1 original movie quality. Say no to fuzzy state.
  9. Copy your idols’ Blu-ray/DVD for commemoration. Precious image data will be collected forever.
  10. Ripping Blu-ray/DVD and ISO files to SD, HD, 3D, 4K video formats for different uses, such as Mobile Devices, VR Headsets, Smart TVs, Game Consoles, HD Media Players, Media Servers, Storages and so on.
  11. Extract audio files from Blu-ray/DVD disc to lossless FLAC, MP3, AAC, AC3, M4A, MKA, WMA, DTS, MP4 and more.
  12. Export single SRT subtitle file
  13. With the built-in video editor, you are able to create personal movie by trimming part of whole movie, cropping black bars, inserting SRT subtitles, adding watermarks and special video effects.
  14. Support the latest macOS Sierra, El Capitan, Yosemite, and more
  15. Include any other Blu-ray/DVD Rippers/Copiers’ basis functions.

Pavtube Black Friday Promotion Pavtube Black Friday Promotion

In the field of Blu-ray and DVD, Pavtube ByteCopy for Mac always has a function to bring you surprise! Just Pay $21, then you will benefit by Pavtube ByteCopy for Mac lifelong. The software will update regularly for free after you pay $21 to buy. So many advantages you can enjoy. Why not take it home?

Emphasis: 50% OFF only at Black Friday Holiday 2016 (From Nov.23 to Nov.30)

More instructions on the Pavtube official website: 
http://www.multipelife.com/bytecopy-mac

More Pavtube products hot deals for Black Friday 2016 on Facebook: 
https://www.facebook.com/pavtubefans/app/198826126804423/

Time-limited! Crazy to buy!

Happy Thanksgiving, Black Friday and Cyber Monday 2016! — From Pavtube Studio

Top 4 Best 4K Converter for macOS Sierra/El Capitan 

Leave a comment

Are you looking for the best 4K video converter for macOS Sierra/El Capitan that supports all 8K, 4K, 2K, 1080p and 720p videos? Or you just need a free 4K video converter that’ll let you fully convert a 4K video clip to 1080p and Mac without it crashing? We’ve put together a list of 2016 top 4 4K video converters for macOS Sierra/El Capitan. Here are the best and the free. 

Top 4 Best 4K Converter for macOS Sierra/El Capitan 

Top 1: Pavtube iMedia Converter for Mac 


Pavtube iMedia Converter for Mac is more than just a converter. It comprises a video converter, blu-ray ripper and dvd ripper to process Blu-ray, DVD and videos. This feature-rick Mac video converter toolbox can not only copy 2D BD, 3D BD and standard DVD with original structure, and convert all BD/DVD collection to virtually any video and audio format for iPhone, iPad, Apple TV, Android, Windows Phones, PSP, PS3, and other devices. 

Top 2: iFastime Video Converter Ultimate for Mac 


iFastime Video Converter Ultimate for Mac is best all in one comprehensive toolkit to assist you easily handle all 4K video file formats, decode and encode H.265 video, 4K videos, transcode Sony XAVC videos, create 3D movies from 2D resources on Mac OS X El Capitan. 

Top 3: HD Video Converter for Mac


HD Video Converter for Mac is an all-in-one program integrating conversion and editing. It can convert 1080p/720p MKV, MOV, MXF, MTS, M2TS, M2T, TS, M4V, MP4, AVI, MPG, VOB, WMV, 3GP, FLV videos to any video format for multiple purposes (e.g. free playback, editing, uploading, burning). HD footages generated by Sony, Canon, Nikon, Panasonic, and JVC can also be handled easily by Pavtube HD Video Converter for Mac. 

Top 4: Video Converter for Mac 


For your convenience, this program has both Windows and Mac version. As an an omnipotent 4K video converter, the program can transcode different file formats 4K video (3840 x 2160 or 4096 x 2160 4k resolution) such as YouTube, Netflix download 4K video, Sony/Panasonic/Canon/Samsung captured 4K video with the format or codec of H.265/HEVC, MXF, MP4, XAVC/XAVC S, Prores, etc to various different file formats or device preset profile formats for playing on portable devices or working with professional video editing apps.

Related Articles:


Shrink Blu-ray from 50GB to 25GB

Leave a comment

Many movie fans who have gathered a house of Blu-ray collections would like to backup and burn their Blu-rays for protection and space saving. While movies listed as 50 GB cannot fit on a 25 GB disc without losing quality. So many people ask the way to shrink 50GB Blu-ray to 25GB:

"I am trying to figure out how to “shrink” down a regular Blu-Ray movie, so that I can burn it to a single layer 25gb BD-R disc for playback as BD50 is too expensive. How can we shrink BD50 to BD25 keeping all features?"

compress blu-ray

I happened to get some experiences that when ripping from a BD50 to a BD25, a typical movie will fit onto a BD25 without actually re-encoding the video at all. So I maybe can give an answer to the help seeker. There is no software on the market that can fulfill backing up Blu-ray and burning video to Blu-ray at the same time. So to compress a BD 50 to BD 25, you have to use two software to achieve these two parts: Part one: Backup 50 GB Blu-ray to 25GB video without quality loss; Part two. Burn copied Blu-ray into 25 GB Blu-ray disc 

Part I: Compress a 50GB Blu-ray into a video under 25GB

Is there a way to compress a 50gb movie to fit on a 25 gb disc without losing detail on Mac? No matter how powerful it is while decrypting of protected Blu-ray movies, when it comes to compress file size of Blu-ray movies, AnyDVD HD can do nothing with it.

Luckily we found Pavtube BDMagic for Mac which is a magic tool to cut down your 50GB bluray movies to video under 25GB below which can fully meet users’ further needs. With its clean interface, fast converting speed and good video quality, compressing Blu-rays/DVD to playable format for various purposes will be simply finished within a few clicks. Now, let’s together have a look at how to compress file size of Blu-ray movies via Pavtube BDMagic for Mac.

The app is also available for Mac OS – Get Pavtube BDMagic for Mac if you work with OS X 10.5/10.6/10.7/10.8/10.9/10.10/10.11/10.12.

FYI: If you want to rip BD/DVD with keeping all the audio tracks (language) and soft subtitles, here’s another choice for you: Pavtube ByteCopy/ByteCopy for Mac.

Note: A BD drive is needed for Blu-ray compressing and ripping.

Step 1: Load Blu-ray disc

Run the best Blu-ray Ripper for Mac, click this “Load Disc” icon to import your inserted Blu-ray Disc

blu-ray to mp4

Step 2: Select output format and set destination folder

Click the drop-down list of “Format” to specify an output format according to your end use of the output files. Meanwhile, you are able to click the folder icon at the end of “Output” to browse and set a save path to store the ripped Blu-ray files.

output mp4 format

Step 3: Compress file size of Blu-ray movies

This is the key point of the entire procedures, click “Settings” button, and then the following interface will show up, on which you are able to adjust bit rate, frame rate, sample rate, aspect ratio, etc. to make control of the output file size and quality.

mp4 format settings

To compress the file size into video under 25GB, what you should do is changing the figures of these options to be smaller only. Look at the target file size, keep it under 25GB. One more thing you must be sure that there will be some quality loss if you compress them to be a much smaller size, which means you’d better make a balance between the size and image quality. At least the output video quality should be acceptable by yourselves.

Step 4: Start compression and conversion

As long as the former three steps are set well, then you can click “Convert” button to start Blu-ray ripping, at the same time, the compression task of Blu-ray file size is underway as well. Once finished, you can find out the output files via clicking “Open” button. After that you can do whatever you like with the compressed Blu-ray files.

Part II: Burn converted MP4 movie to Blu-ray using Roxio Toast

Launch Toast 11 and drag the converted mp4 file into this window, or select it from your file browser using the Select button. Choose BD-R from the Space Remaining bar graph at the bottom of the screen, and choose your BluRay burner from the Destination menu. Choose the number of copies you want to burn – each time a disc is complete; you will be prompted by Toast to insert another disc. Hit the big red Copy button, and the disc burning will begin!

Now insert this Blu-ray to your BD player and star enjoying!

Related Articles:

Thanksgiving Crazy Discount: Up to 50% OFF DVD/Blu-ray/4K Video Converter

Leave a comment

2016 Thanksgiving Day is coming. Some of you are probably planning the Thanksgiving menus for your family while some are ready for selecting the best Thanksgiving present for their parents. With great blessing and best wishes, Pavtube Studio also prepared a big gift for their consumer – Thanksgiving Promotion 2016 to celebrate Thanksgiving Day with our friends. Focusing on product quality and customer needs, Pavtube offers up to 50% discount for hot products to reward our customers. Now,let’s see the promotion in detail.

Pavtube 2016 Thanksgiving Day Promotion

Index of Pavtube 2016 Thanksgiving Day Promotional Notices

BD/DVD/Video Package Tools | 50% off Video Tools | Bundle Software Big Deal

Pavtube Promote BD/DVD/Video Package Tools in 2016 Thanksgiving Day


  Pavtube Video Converter Ultimate for Windows /Mac Pavtube DVD Video Converter Ultimate Pavtube BDMagic for Windows /Mac Pavtube DVDAid for Windows /Mac
Discount
HomePage
Reviews
How To
Purchase


Pavtube 50% off Video Tools in 2016 Thanksgiving Day


Pavtube MXF MultiMixer

– Preserve MXF multi tracks and channels

– Export MXF to MKV/MOV/MP4 with multi tracks

– Transcode MXF for Non-linear Editing Software

– Trim/Crop/Merge/Watermark/Deinterlace MXF video

Original Price: $45 Now: $22.5

Free Trial Buy Now

Pavtube Media Magician for Windows /Mac

– Import/Backup/Manage camcorder video

– Lossless output AVCHD MTS to MTS or MKV

– Frame by frame edit Video on timeline

– Output Different formats from same source

– Directly Upload Video to YouTube

Original Price: $45 Now: $22.5

Buy Windows Buy Mac

Pavtube MKV Converter for Windows /Mac

– Convert MKV with desired subtitle and tracks

– Bundled streaming server app

– Ouput MKV to popular video and audio formats

– Split/Merge/Crop/Watermark MKV

– 6X faster conversion speed

Original Price: $29 Now: $14.5

Buy Windows Buy Mac

Pavtube FLV/F4V Converter for Windows/Mac

– Convert FLV/F4V for Device playback

– Design FLV/F4V video with editing tools

– Bundled streaming server app

– Perfect video audio sync technology

– 6X faster conversion speed

Original Price: $29 Now: $14.5

Buy Windows Buy Mac

Pavtube 2016 Thanksgiving Day Promotion Software Bundles


ByteCopy + Video Converter Ultimate

Original Price: $107

Now: $79.9

Video Converter Ultimate + ChewTune

Original Price: $94

Now: $74.9

ByteCopy + ChewTune

Original Price: $71

Now: $54.9

Video Converter Ultimate + DVD Creator

Original Price: $100

Now: $64.9

BDMagic + DVD Creator

Original Price: $84

Now: $49.9

ByteCopy + DVD Creator

Original Price: $77

Now: $44.9

Src: http://i-loveshare.com/pavtube-2016-thanksgiving-coupon/


Convert Blu-ray to MKV with original video and audio quality

Leave a comment

Blu-ray gives people high resolution video quality and excellent DTS, Dolby Digital audio enjoyment. But Blu-ray streaming replies on heavy Blu-ray Player, which drive many people to rip Blu-ray to digital files. In Blu-ray ripping, many people want to keep original video and audio quality. To get Blu-ray rips with lossless quality, uncompressed MKV is the best choice.

MKV file without any compression will contains all audio tracks, subtitle streaming and lossless video quality of Blu-ray discs. Then you can play MKV in Kodi or stream MKV files with Roku without needing BLu-ray discs and Blu-ray Player. You also can transfer Blu-ray MKV files to NAS for TV streaming or put Blu-ray backups to external hard drive to take with you anywhere. Now, let’s learn how to rip Blu-ray to lossless/uncompressed MKV with original video and audio quality.

Software Download:  Pavtube ByteCopy

Steps to Rip Blu-ray to MKV with original video and audio quality

Step 1. Run Pavtube ByteCopy software, put source Blu-ray into Blu-ray drive, Click “Load Disc”  to import movie titles from Blu-ray. The software decrypts Blu-rays of all regions. Learn also >> rip DVD to MKV with original video and audio quality

Step 2. Choose MKV format as output, here “Format > Multi-track Video > Lossless/encoded Multi-track MKV (*.mkv)” is recomended for you.

Click "Settings" to open a new window where you can adjust audio, video codec, bitrate, etc and choose subtitle streaming. All subtitle streaming tracks will be checked by default. If you don’t need preserve all subtitle streaming, you can uncheck the subtitle streaming. In addition, Blu-ray subtitle is PGS subtitle format, which can’t be played on many media players. So you can choose subtitle codec to DVD Subtitle. Then in Blu-ray to MKV conversion, the PGS subtitle will be converted to DVDSub. You also can convert PGS subtitle to SRT subtitle when ripping blu-ray with ByteCopy.

subtitle settings

Step 3. Click the “Convert” button to copy Blu-ray movie to MKV with original video, audio and mutiple subtitles. The process takes about 10mins.  When it completes, click “Open Output Folder" to find generated MKV file with Dolby Digital 5.1 audio and multiple subtitles included.

Now, you can play your Blu-ray MKV files on WD TV Live Player, Plex, Panasonic TV and other devices and media players that support MKV.

Why Choose Pavtube ByteCopy to convert Blu-ray to MKV?

Decrypt all the latest copy protection – Pavtube ByteCopy which has recently upgrade with support for MKB62, gives you the chance to break all the latest protection from Blu-ray disc movies.

Excellent output quality – Pavtube ByteCopy offers no quality loss after the ripping process and a converted video is of similarly high quality,

Various output presets – Pavtube ByteCopy supports converting BD/DVD to virtually any popular video and audio format so that you can freely watch movies on Apple iOS devices, Android OS devices, HDTV, 3D TVs, PSP, PS4, PS3, Plex, WDTV Live, Roku 4 and more devices. In recent update, ByteCopy can support ripping Blu-ray/DVD movie to H.265/HEVC MP4 with better video quality compared to H.264 MP4 in same profile presets

Additional editing functions – This multi-track Blu-ray/DVD converter can be considered as a user-friendly movie editing tool with the professional functions to trim, crop, merge, insert subtitles, export srt/ass/ssa subtitles, add video effects in the target movie.

Lossless/uncompressed MKV option and multiple soft audio tracks & subtitles – ByteCopy offers a lossless MKV option in output list, which means you’ll get a real uncompressed MKV file without any quality loss on big screen. It also offers multi-track MP4/MOV/AVI presets with multiple audio streams and removable subtitles, so you can free switch, turn on/off during playback.

Related Articles:

Step-by-Step to Convert Tivo to Quicktime

Leave a comment

Many people like to record TV Shows using Tivo. But Tivo is an unfriendly video file format that many media players can’t play it, such as the Mac default media player- QuickTime.

"So I have been seraching for over an hour and haven’t been able to find a solid post on this: How do I convert .Tivo files to something I can watch it with QuickTime on MacBook Pro? So is there any program or a method for conversion?"

"I converted a .tivo to MPEG using TVHarmony Autopilot. When I try to view the MPEG in Quicktime I hear all the audio but the video freezes on the first frame. I am using Quicktime 7.7.9 with the MPEG playback component installed."

Before solve the problem, you should know that what video and audio files QuickTime can play:

Media Type

File Formats

Codecs

Video

QuickTime Movie (.mov), MPEG-4(.mp4, .m4v), MPEG-2 (OS X Lion or later), MPEG-1, 3GPP, 3GPP2, AVCHD (OS X Mountain Lion or later), AVI (Motion JPEG only), DV

MPEG-2 (OS X Lion or later), MPEG-4 (Part 2), H.264, H.263, H.261

Audio

iTunes Audio (.m4a, .m4b, .m4p), MP3, Core Audio (.caf), AIFF, AU, SD2, WAV, SND, AMR 

AAC (MPEG-4 Audio), HE-AAC, Apple Lossless, MP3

So, it is obviously that TiVo files are not compatible with QuickTime. If you got some TiVo recordings and want to play TiVo in QuickTime on Mac, it is required to convert TiVo to MOV or other decent file types. Here Pavtube iMedia Converter for Mac is the optimal solution for you.
It enables you batch convert TiVo files to MOV video on Mac(macOS Sierra included) without quality loss. Moreover, this TiVo Converter can also help you quickly convert TiVo to AVI, WMV, MOV, MP4, MPG, H.265, etc popular format. If you are planning to encoding TiVo to WMP on Windows, please get the equivalent Windows version Pavtube Video Converter Ultimate.

Download the right version and follow the step-by-step guide below to play your TiVo movies in QuickTime with ease.

Windows Download      Mac Download

Step-by-Step to Convert Tivo to Quicktime

1. Launch the Tivo Converter and import Tivo.

Drag & drop TiVo files to the program directly. Or go to the “File” menu, choose “Add Video” to locate the TiVo files you want to add. You can add several files to do batch conversion.

Tip: When first loading, this TiVo Converter will ask you to input your Media Access Key. Simply enter your Media Access Key, and click “OK” to confirm.

2. Choose QuickTime format

Hit the drop-down list of “Format” to choose “Common Video -> MOV – QuickTime (*.mov)” as the target format. This MP4 to QT MOV Converter also offers the QuickTime Movie Format for you. Just choose it. 


Tips – Set advanced settings 

By clicking the Settings icon, you can adjust video and audio parameters like codec, bit rate, frame rate, sample rate, etc., in that way, you can take charge of the size and quality of the output MOV files. In principle, the larger input values, the better output quality, but the corresponding larger file size. 

3. Start converting TiVo to QuickTime

Press the big “Convert” button to start the Tivo video process. After the conversion, you can add your Tivo videos in QuickTime playlist.

Now, you can play Tivo on QuickTime. In addition, Pavtube iMeda Converter for Mac and Pavtube Video Converter Ultimate also can convert Blu-ray to QuickTime, DVD to QuickTime, ISO to QuickTime, H.265 to QuickTime, MKV to QuickTime, AVI to QuickTime, etc.

Related Articles:

Handbrake Alternative for DTS-HD Master Audio

Leave a comment

DTS-HD Master Audio or just DTS-HD in many descriptions is a lossless audio codec by Digital Theater System. It replaces the old DTS audio (actually it extends it) and its main goal is to allow a bit-to-bit representation of the original movie’s studio master soundtrack. When ripping Blu-ray, many people want to keep the DTS-HD Master audio. However, if you choose to use Handbrake to rip Blu-ray with DTS-HD Master Audio, it will be not easy cause firstly, you need to install libdvdcss in Handbrake to decrypt Blu-ray and then feedbacks unveiled that many people can’t preserve DTS-HD Master Audio when ripping Blu-ray with Handbrake.

There are many Handbrake alternatives that can rip Blu-ray with DTS-HD Master Audio.

Alternative 1: Staxrip can get both streams if you select the DTS-HD option or otherwise rips just the Core if you select DTS. Using the Just Remux option you get the original DTS-HD or DTS Core streams in your mkv file and you can also convert to AC3. 

Alternative 2: If you want to keep all the audio track, MakeMKV can remove protection from the Blu-ray source and allows you to repackage it unmolested back into an mkv container with DTS-HD Master Audio.

Alternative 3: Pavtube ByteCopy is highly recommended to replace Handbrake to rip Blu-ray keeping DTS-HD Master Audio. The Handbrake alternative is able to read TureHD audio and DTS-HD Master Audio in Blu-ray. It supports convert Bluy-ray to a common video with DTS-HD Master audio passthrough as you want and even lossless Blu-ray to MKV conversion keeping the original audio tracks, chapter info and subtitles without to do any parameter settings. Mac version is here. Below we take the example how to using the alternative to Handbrake to convert Blu-ray with DTS-HD Master Audio audio.

Rip Blu-ray with Handbrake Alternative for DTS-HD Master Audio

Step 1. Add Blu-ray movies

Insert Blu-ray Disc into your external or internal BD drive and launch the Blu-ray Ripping program. Click “disc” button to import Blu-ray movies for converting/copying.

Encoding Blu-ray to TrueHD 7.1 MKV

Step 2. Choose output format keeping DTS-HD Master Audio

Select the whole disc, and you are allowed to choose output format via clicking the Format bar. To get DTS-HD Master Audio track be copied and packed into generated MKV file without transcoding, select “Lossless/encoded multi-track MKV (* mkv)” from “Multi-track Video”.

lossless mkv format

Step 3. Start ripping Blu-ray to MKV with DTS-HD Master Audio

Before start conversion, select subtitles you want keep with the output video from the option. Then, hit the big Convert button, it will start converting Blu-ray movies to lossless MKV videos with the original DTS-HD Master Audio saved.

That’s it! Your Blu-ray video will now be encoded and a few hours later you will have a great high definition video file with preferred audio and subtitles using Handbrake alternative with No Error.

Note: Pavtube ByteCopy also can rip DVD to MKV in lossless quality or convert DVD to multi-track MP4/MOV for Plex,

Related Articles:

Rip DVD to Plex in Lossless/Uncompressed MKV Format

Leave a comment

Plex is popular for its powerful media organization and sharing function. Due to this advantage, many people tend to copy DVD collections to Plex then they can stream DVD movies on HD TV via Plex without bothering DVD discs and DVD Player again. But in the DVD ripping process, it is likely to lose the original video quality, therefore, many people searched on the google for the way to copy DVD to Plex with lossless/uncompressed files:

"
Just wondering what the easiest, quickest way would be to get 800-900 DVD’s ripped and put into some format so I can share  them into plex? I am running a MAC and PC , Which file extension am I aiming for? Avi? MKV?"

"My buddy lets me connect to his Plex server, and even added me to his Home on the Plex Pass, because of this, I want to help him out. He has a vast (about 1700 titles) DVD collection that I want to start helping him archive. For lots of the newer ones, we can find excellent digital copies elsewhere, but he has several obscure DVD titles that aren’t available anywhere else, so we would need to rip them from his collection manually.

My question is this: What is the best way to get uncompressed (he has a 4x16TB setup so size isn’t an issue… yet) DVD rip that is compatible with Plex? He wants the best quality possible without worrying about size so when streams to somewhere outside his network (and I stream to mine) it doesn’t make it too bad."

Actually, MKV is the best choise to rip DVD to Plex cause MKV is such a flexible container format that supports various codes, including H.264, VC-1, AC3, DTS, etc. Almost all DVD movies are saved as H.264/MPEG-2 encoded .VOB files with AC3 or DTS audio, in that case MKV is mostly compatible with DVD movies and it is possible to keep original H.264 video codec when converting DVD clips to MKV container without en-decoding, lossless video quality is retained. So how to rip DVD to lossless/uncompressed MKV?

What you need is a software that could kick the copy protection of DVD to one side and remux DVD into MKV without quality loss to play on Plex server. Here is how come Pavtube ByteCopy, an efficient DVD Ripper, which is specially designed for users who want to rip BD/DVD ISO images files to lossless/uncompressed MKV with multiple audio tracks and subtitles. Pavtube ByteCopy can remove DVD encryption including CSS, region code, RCE, Sony ArccOS, UOPs, Disney x-project DRM and Blu-ray AACS, BD+, UOP, Region codes, MKB v61, MKB v62 then convert DVD and Blu-ray to Plex in lossless/uncompressed MKV container. Read: ByteCopy VS. MakeMKV VS. DVDfab

Windows Download      Mac Download

How to Lossless Convert DVD to Lossless MKV for Plex?

Step 1. Load DVD Movies

Free download Pavtube ByteCopy to your computer, install and launch it. Insert DVD into disc drive which is well connected with the computer, click the “Load from disc” button in ByteCopy and browse to disc drive for importing.

BD DVD ISO to Plex

Step 2. Choose lossless MKV as target format

Click the format bar to follow “Multi-track Video” and “Lossless/encoded Multi-track MKV (*.mkv)” because it will contain chapter markers in the output video.

Choose lossless MKV as output format

Step 3. Adjust V/A settings

Click “Settings” to enter Multi-track video profile window; switch to “Video” and find the “Encode” box which is unchecked by default, so if you want a lossless MKV copy, do not touch it.

Multiple audio tracks subtitles

Step 4. Start ripping DVD to MKV

Click the big “Convert” to start DVD to lossless MKV conversion. The conversion speed also depends on your computer configuration. Since the movies are remixed to MKV directly without transcoding, the conversion should complete in a short time. After conversion, click “Open” or “Open output folder” to quick locate converted files.

Ok now the lossless MKV files are prepared; transfer them to your hard drive or NAS to stream it to Plex Media Server, now you can watch your DVD movies on TV with exactly the same quality as original!

Related Articles:

How to Rip Blu-ray M2TS to H. 264 MKV?

Leave a comment

The M2TS is a filename extension used for the BDAV MPEG-2 Transport Stream container file format, which is used for multiplexing audio, video and other streams. This container format is commonly used for high definition video on Blu-ray Disc. When people directly backup Blu-ray to hard drive, media often is save in .m2ts extension. However, M2TS is not a firendly file for many media players so that many people want to convert Blu-ray M2TS to H.264 MKV for wide streaming and playback on PC, TV and other multimedia devices.

To convert M2TS to MKV, there are many video tools you can use. Now, let’s see the methods to transcode M2TS to H.264 MKV in lossless quality.

Method 1: Use Handbrake to Convert M2TS to MKV

As a much-favored free video converter available for Mac OS X, Linux and Windows, Handbrake performs well in converting your MTS/M2TS videos to MP4 or MKV (Handbrake only supports the two formats). The smart video converter freeware also has preset output video formats for iPhone, iPod, Apple TV, Android Tablet and more.

Handbrake download | Handbrake review | Handbrake Alternative

Method 2: Use MakeMKV to Convert M2TS to lossless MKV

As its name shown, MakeMKV makes MKV files out of any files including M2TS files no matter Blu-ray M2TS or M2TS camcorder videos. The MKV format can store multiple video/audio tracks with all meta-information and preserve chapters.

MakeMKV download | MakeMKV Alternative

Method 3: Convert M2TS to MKV with Pavtube Video Converter Ultimate

As for M2TS used for Blu-ray disc, they are not simply saved in that optical media storage, but also encrypted with numerous protections, such as The Image Constrain Token (ICT), and The ROM-Mark. Pavtube Video Converter Ultimate is the best Windows video transcoder, which is fully compatible with Windows 10, Windows 8, Windows 7, etc. It can remove the protection in M2TS files and then convert Blu-ray M2TS, HD camcorder M2TS files to 2160p/1080p/720p MKV, H.265/H.264 MKV and 3D SBS/TAB/Anaglyph MKV. Besides, it also can convert other video such as MP4, WMV, Blu-ray, DVD, ISO, VOB, TS, VRO, etc to MKV files and convert M2TS to MP4, AVI, 3GP, WMV and other format video. It can shrink 50 GB video to 10 GB while keeping best quality.

Step 1: Download the Windows Video Converter:


Step 2: Add M2TS files

Launch the program and add the movie you want to encode by clicking the “Files” icon or just drag and drop M2TS files onto the main interface. You can see the chapter information of your M2TS file. This software supports batch conversion so you can add multiple M2TS files to batch convert to MKV.

add m2ts files

Step 2: Choose MKV format

Click “Format” to open the drop-down list. Choose “MKV HD Video(*.mkv)” from “HD Video” catelog. From the below picture, you can see that Pavtube Video Converter Ultimate gives you many choices so that you also can convert M2TS to MP4, MOV, etc format or convert M2TS to iPad, iPhone, Samsung, etc. You also can convert 3D M2TS to 3D MP4/MKV.

MKV format

Tip: If you like, you can click “Settings” to change the video encoder, resolution, frame rate, etc. as you wish. You can choose to convert M2TS to H.265 MKV, H.264 MKV or DivX MKV. Keep in mind the file size and video quality is based more on bitrate than resolution which means bitrate higher results in big file size, and lower visible quality loss, and vice versa.

The last thing you need to do is hit the “Convert” button to copy M2TS to MKV format. Just wait a moment and then you can output videos. Then you can stream the MKV files on KodiRoku 4, etc.

Learn: Rip Blu-ray to M2TS | Convert Blu-ray to MKV Directly

Tips: Top MKV Player

1. KMPlayer

KMPlayer lets you play MKV video file format easily. MKV is a popular video format. By using this application you can easily watch videos and movies created in this widely used format in full screen mode. It also supports media file formats e.g. OGG, WMA 8, 7, AAC, MPEG 3, 2, 1 etc.

2. VLC Media Player

Another fine software in this list is VLC Media Player. It lets you play MKV video files quickly and easily. It has an easy to use user interface. Apart from MKV it can also play a variety of file formats e.g. MP3, WMV, WebM, H.264, DivX etc. It is a cross-platform application and is available for Mac OS, Linux and Windows. 

3. Miro

Miro is a nice application that lets you listen to music and watch, arrange, download videos easily. Apart from MKV files this tool can also play a variety of file formats e.g. flash video, WMV, Divx, MPEG, AVI etc. It comes with a built-in Bit torrent client and video converter. By using this application you can watch videos in full screen mode. 

Related Articles: