How to Solve “iMovie WMV” and “WMV iMovie” Issues Easily?

Leave a comment

Many of us may have the need to export iMovie to WMV for sharing with Windows-based friends like play iMovie in Windows Media Player, or edit iMovie in Windows Movie Maker etc. Having some interesting WMV videos, either downloaded from the Internet or shared by friends who own PCs, and want to edit them on iMovie? You might have tried to, but in reality iMovie can not directly export WMV. Let’s face it, Windows and Mac will never fully get along. Fortunately, there are always solutions out there. That means if you want to open and edit WMV video in iMovie smoothly, you need to firstly convert WMV to iMovie friendly videos on Mac.
Hot Search: iMovie Tips | Share iMovie Videos | Get iMovie for free | iMovie VS FCP | iMovie Alternatives | Exporting iMovie projects

Since iMovie work best with clips in the Apple Intermediate Codec encoded MOV format, the easy workaround to transfer your local WMV files or WMV files from websites to iMovie is to convert WMV to iMovie compatible AIC MOV with a WMV converter software.

To use WMV files in iMovie, you just need a video converter program to convert WMV to iMovie compatible format. Here, Pavtube WMV to iMovie Converter can give you easy but effective solution for importing WMV footages into iMovie for editing on Mac (including Mac OS X 10.11 El Capitan). With the assistance of the WMV to iMovie Converter, you can effortlessly transcode WMV file to iMovie acceptable AIC .mov. Then, what you need is just to import the converted file into iMovie for editing. Just follow the steps below to transcode WMV to AIC for importing to imovie for editing on Mac OS X El Capitan.

Preparation: Free Download Top WMV to iMovie Converter


Other Download:

– Pavtube old official address: http://www.pavtube.cn/imedia-converter-mac/
– Cnet Download: http://download.cnet.com/Pavtube-iMedia-Converter/3000-2194_4-76177788.html

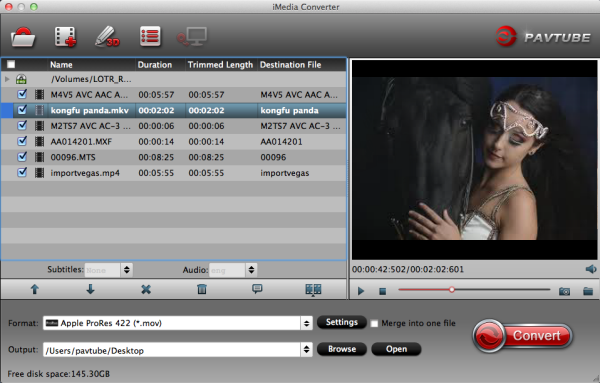
Step 1: Install and launch Pavtube iMedia Converter for Mac. You can directly drag and drop mp4 video files to this software.
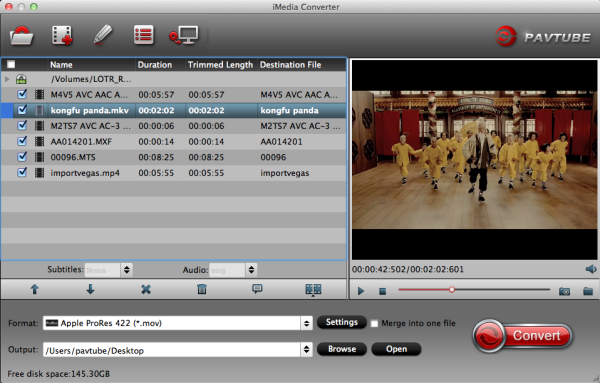
Step 2: Choose an output format for iMovie. Click the Format icon to open the format list. Then select iMovie and Final Cut Express -> Apple InterMediate Codec (AIC)(*.mov), as the output format to get videos with optimized settings for iMovie.

Tip: If you like, you can click “Settings” to change the video encoder, resolution, frame rate, etc. Remember bitrate higher results in big file size, and lower visible quality loss.
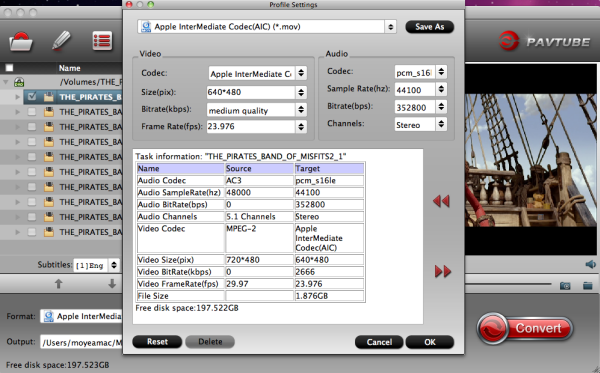
Step 3: When all the settings are fine, click the “Convert” button to start converting your WMV files to optimized AIC .mov video files for iMovie. When then conversion completes, click the Open button to get the ripped video files. Launch iMovie and click File > Import > Movies to import the converted videos to iMovie for further editing. Just create your masterpiece with joy!

Read More:

Importing GoPro HERO4 Black 4K MP4 videos to Premiere Pro

Leave a comment

GoPro has announced their latest action camera, the HERO4, in both Black and Silver editions, along with the Hero, an entry-level GoPro. The kind folks at GoPro invited me to try out these cameras last week, in an activity-filled day in San Francisco. The point here, you will find it a painful experience to upload GoPro Hero4 4K to Adobe Premiere Pro. If you have any issue when importing GoPro Hero4 4K MP4 files to Adobe Premiere Pro, just follow this simple guide, which offers you a quick fix for the problems with GoPro Hero 4 footage and Premiere Pro.

The same as its predecessors, the the higher-end Hero4 camera records in MPEG-4 and outputs its files as .MP4 files. Files are compressed using the h.264 codec. So the files you are getting out of GoPro Hero4 Black/Silver are suited to be delivered as is, which is usually not what you want. If you want to import the (4K) MP4 videos from GoPro Hero4 to Adobe Premiere Pro CC/CS6/CS5 for editing, you first need to convert GoPro MP4 to a more editing- friendly format, such a Adobe Premiere’s MPEG-2.

To transcode GoPro MP4 footage for editing in Premiere, you’re highly recommended to use iMedia Converter for Mac which is the best Mac Video Converter for GoPro Hero4 footage. With this Gopro video converter, you can effortlessly transcode GoPro Hero4 Session/Black/Silver, GoPro Hero 3/3+, GoPro HD files to Premiere Pro as well as FCP, iMovie, Avid Media Composer, After Effects and more editing programs. And there is no need to worry about the quality loss. Here is the review.

Note: If you want to import GoPro Hero4 videos to Pinnacle Studio, Sony Vegas Pro, Windows Movie Maker, try the GoPro video converter Windows version. Learn>>how to get the H.265 4K Videos to Adobe Premiere ProBlu-ray/DVD Clips in Premiere Pro and so on.

Free Download GoPro Video Converter:


Other Download:

– Pavtube old official address: http://www.pavtube.cn/imedia-converter-mac/
– Cnet Download: http://download.cnet.com/Pavtube-iMedia-Converter/3000-2194_4-76177788.html

Here I share a simple guide on how to convert GoPro Hero 4 MP4 files for Adobe Premier Pro editing smoothly. 

Step 1: Add Gopro Hero4 footage

Install and launch the GoPro Hero4 video converter and load source MP4 clips(not matter in 1080p, 4K) to it.

Step 2: Choose output format

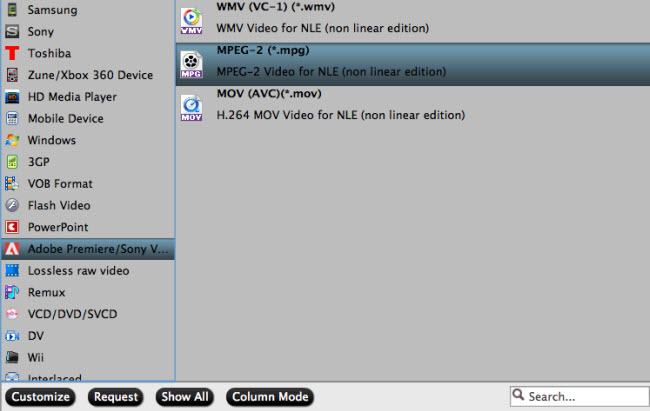
Click “Format” pull down list to select Adobe Premiere/Sony Vegas> MPEG-2(*.mpg) as the best video format for Premiere Pro. WMV, MOV formats are the good choice as well.

Step 3: Advanced Profile Settings

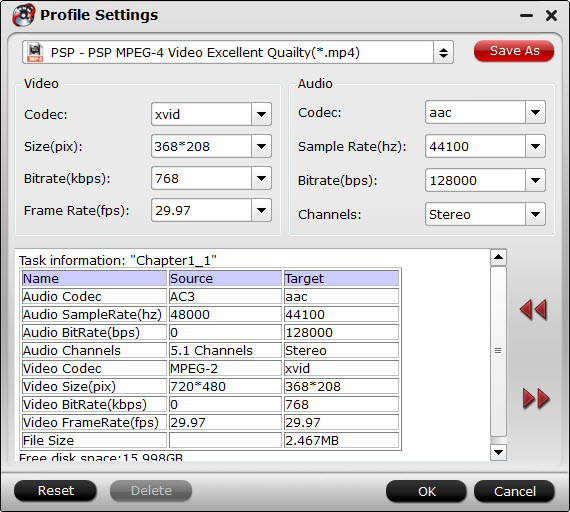
In case the default settings do not fit your requirement, you can click “Settings” button and enter “Profile Settings” panel to adjust video size, bit rate, frame rate, sample rate and audio channels. Here personally I recommend you to set the video size as 1920*1080p for better editing. Of course, if you want to get original 4K resolution, just keep the video size as original.

Step 4: Start encoding GoPro Hero 4 videos

Click “Convert” button to start transcoding Gopro Hero4 MP4 video to MPG/MOV/WMV for importing to Premiere Pro CS6/CC or Adobe PP CS3/CS4/CS5.

When the conversion task is finished, click “Open” button to get the exported files and then import the converted GoPro MP4 files into Adobe Premiere Pro To do further editing flawlessly.

Additional features of the GoPro to Adobe Premiere Converter:

1. Settings- Click it to customize audio and video parameters Video Codec, bit rate, frame rate, Audio codec, sample rate, audio channels. Notice that you can not “convert up” video quality.

2.Editor (next to “Add” icon) – Click to set add watermark, deinterlace, trim, crop, etc.

3. If you want to smoothly edit GoPro Hero4 footage in Final Cut Pro X or FCP 7/6, you just need to choose the “Final Cut Pro > Apple ProRes 422 (*.mov)” as output format; For iMovie, select “iMovie and Final Cut Express -> Apple InterMediate Codec (AIC) (*.mov)” in the second step; For Avid Media Composer, choose “Avid Media Composer > Avid DNxHD(*.mov)” as output.

Soon after the conversion is finished, just click “Open” button to get the convert GoPro MP4 files for editing in Adobe Premiere Pro CS6/CC or Adobe PP CS3/CS4/CS5 perfectly.

Read More:

Download & Share 3D YIFY Movies on PSP without YIFY Movies Official Codecs

Leave a comment

Tutorial to Convert 3D YIFY Movies to PSP and Play 3D YIFY on PSP

Why convert 3D YIFY Movies to PSP? Because every bean has its black, so does PSP. From its official specifications, it’s easy to draw that PSP can play some common videos like MP4, AVI, but not 3D YIFY mkv files. You can’t directly download and play 3D YIFY movies on PSP without YIFY Movies Official Codecs. Here a must-have video converter tool for PSP is recommended to all PSP users for converting 3D YIFY video to PSP on Windows 10 with a few mouse clicks.

Share 3D YIFY Movies on PSP

About PSP: Sony PSP is a handheld game console manufactured and marketed by Sony Computer Entertainment. It is not only a cool gaming device, but also a media player for playing songs and videos as well. It is great for enjoying videos on Sony PSP device easily delivering the perfect quality video on its 480 x 272 high resolution display.

PSP Supported Media Formats:

MemoryStick Video Format

  • MPEG-4 Simple Profile (AAC)
  • H.264/MPEG-4 AVC Main Profile (CABC)(AAC) and Baseline Profile (AAC)

MP4

  • MPEG-4 Simple Profile (AAC)
  • H.264/MPEG-4 AVC Main Profile (CABC)(AAC) and Baseline Profile (AAC)

AVI

  • Motion JPEG (Linear PCM)
  • Motion JPEG (u-Law)

To Make downloaded 3D YIFY MKV files from top Movie Torrent Sites accepted by PSP, you simply need a 3D YIFY Converter. Then, how to grab the best 3D YIFY to PSP converter for Windows 10?

1. It requires a video converter totally compatible with Windows 10.
2. A user-friendly converter is a good choice so that you can get how to convert 3D YIFY to PSP immediately.
3. Conversion speed and output quality are also should be included in selection criteria.
4. It is sure that you prefer a clean and safe program bundled no adware, spyware, virus or other harmful plug-ins.

According to the above tips, Pavtube Video Conveter Ultimate (Read review) is qualified to be the best 3D YIFY to PSP converter for Windows 10, which is available to convert downloaded 3D YIFY mkv videos to PSP compatible MP4/AVI format on Windows (10/8/7/XP) in couple of minutes with deliver crisp images and hi-fi audio quality in a few clicks. Built-in more than 200 profile presets, this 3D YIFY Converter realizes SD/HD/4K videos to iPhone/iPad, Android/Windows devices conversion. It’s genuinely succinct and elegant interface also improves the user experience to a large degree, even for those novices.

Download 3D YIFY Video Converter:

Windows Download      Mac Download

How to Convert downloaded 3D YIFY movies to PSP for playing

After downloading the converter, install and run it. Note that this guide uses the screenshots of Video Converter Ultimate (Windows 10 included) version.

Step 1: Add 3D YIFY Downloads

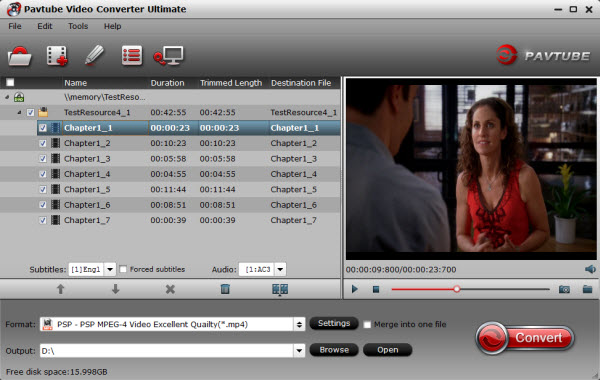
Click Add button to add 3D YIFY MKV videos to the program. You can also directly drag the video files into the program. And you can add multiple files to save your time for this program supports batch conversion.

Step 2: Edit or clip 3D YIFY movies (Optional)

Click “Edit” on the menu to trim, crop, add special effects to your source movies.

Step 3: Set output options

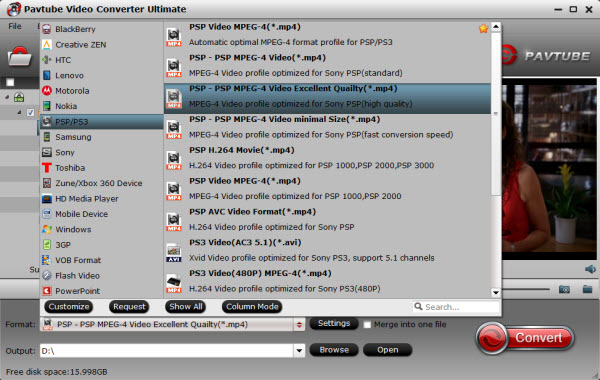
You can then select an output format and specify a directory on your computer to save the output files. If you want to convert 3D YIFY movies to PSP, you can just select formats like “PSP – PSP MPEG-4 Video(*.mp4)” from “PSP/PS3”.

Tip: You can also configure the parameters like resolution, frame rate, encoder and bit rate for video, and sample rate, channel, encoder and bit rate for audio and save it as your own profile.

Step 4: Start conversion

After all necessary settings and editing, simply press the “Convert” button to start 3D YIFY to PSP conversion. Within a few minutes, you can get the converted video files you want by clicking the Open button. Just transfer them to the PSP system, so that you can play and share 3D YIFY movies anytime anywhere.

How to Save movies and videos on PSP (Reference)

1. Chose your saving method and follow the instructions:

  • Transfer from a computer

You can connect your Memory Stick media or your PSPgo / PSP system to a computer, then transfer and save files from the computer to the Memory Stick media or built-in flash memory.

  • Saving directly to a PSPgo / PSP system

In some instances, you can also save directly to your PSPgo / PSP system.

2. Save the movie or video files into the VIDEO folder inside the PSP folder on your Memory Stick media or built-in flash memory. The PSP system can read videos up until second level subfolders, but will not read videos in third level or lower subfolders. You can create subfolders inside the VIDEO folder.

More Tips:

Create compatible 3D SBS video from your own 3D movie for Gear VR

Leave a comment

Samsung and Oculus have made it easy to import and watch your own 3D movies with Gear VR in virtual cinema mode. And once you’ve slipped the headset on and entered that world, it’s very easy to just sit back and passively enjoy your video content. It’s almost a holiday on your own couch, unencumbered by the wires and cords that would potentially restrict you on the Rift.

Watch 3D movies on Gear VR with Oculus Cinema

So how do we accomplish this?

There are two ways to watch your own video content in the “My Videos” section of Oculus Cinema. First, any movies you record using your Galaxy Note 4’s camera will automatically appear in the “My Videos” section. The other way is to copy your compatible video files directly to your phone or SD card in any of the following directories:

On your phone’s internal storage (Galaxy Note 4):
/DCIM/
/Movies/
/Oculus/Movies/

On your phone’s removable SD card (Card):
/DCIM/
/Movies/
/Oculus/Movies/

On a PC, your phone’s storage can be accessed from Windows Explorer by simply plugging in the USB data/charging cable – no software is required. On a Mac, files can be transferred to your phone using Android File Transfer (https://www.android.com/filetransfer/), which is a free utility provided by Google.

For 3D video content, Oculus Cinema supports the side-by-side and top-to-bottom formats. To designate that a file is 3D, create a text file with the same file name as your video and place it in the same directory. For instance, for mymovie.mp4, create a text file mymovie.txt, with the following content:

{
“format”: “3D”
}

Then what if you have downloaded a lot of video in 3D already and want to freely watch these 3D movies with Gear VR in Oculus Cinema on your own couch without format limitation? All you have to do is to convert these media sources to Gear VR supported SBS 3D video beforehand. Now it’s time to create SBS video in 3D for your Gear VR.

What you need:

  • Downloaded 3D movies
  • Pavtube Video Converter Ultimate – to convert 3D in all kinds of video types and turn them into 3D SBS MP4/MKV so that you can can create true theater entertainment at home instead of going to cinema.. Plus, you can edit video to get clips of your favorite scenes from a movie before conversion. (For Mac users, you can try Pavtube iMedia Converter for Mac)

Convert your 3D movies to 3D SBS MP4/MKV videos for Gear VR

1. Import 3D video files

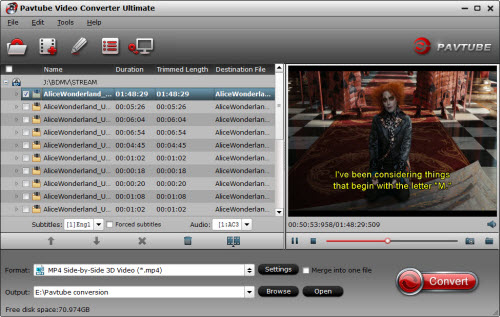
Click “Add Video” button on the main interface to load your 3D Movie files to the program. (Drag & Drop function is included.)

Import video for Gear VR

2. Set 3D as your output format

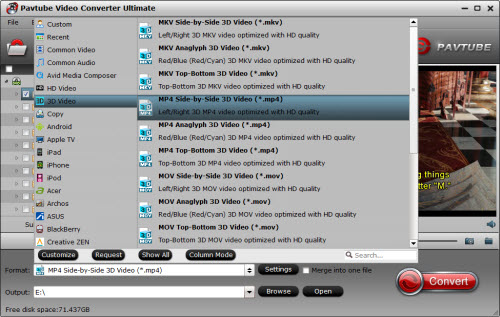
Click “Format” and you will find many presets. There are three types of 3D effect: Anaglyph 3D, Side-by-Side 3D and Top-Bottom 3D. Here, you are suggested to choose “MP4 Side-by-Side 3D Video(*.mp4)” or “MKV Side-by-Side 3D Video(*.mkv)” from “3D Video” option.

Choose format for Gear VR

Tip:

a. Adjust target video settings and 3D effect.

Click “Settings” which is next to “Format”, free change your target video size, bitrate, frame rate and 3D depth. If you want to get best video quality, pls switch them to “original”. 3D movies should be encoded “full side-by-side” with a 1:1 pixel aspect ratio. Content mastered at 1920×1080 compressed side­-by-­side 3D should be resampled to 1920×540 resolution full side­-by­-side resolution. We also recommend using a higher bit rate than a typical web stream at that resolution, as the pixels in your video will be magnified on the phone’s screen. The optimal bit rate is content dependent, and many videos can get by with less, but 5 Mb/s should give good quality.

b. Useful edit functions for enhancing your video files.

Clik “Edit” button, you can apply cool effects to your videos. To get more information about this, go to the user guide of Video Converter Ultimate.

3. Start conversion.

Now hit the big red “Convert” to start converting videos to start converting 3D to 3D SBS MP4/MKV on PC/Mac. After the conversion, click “open output folder” to quick locate the generated media file. With Gear VR, Samsung has created a plug-and-play VR headset. After the initial apps are installed from the included 16GB microSD card and you’ve logged into your Oculus account, diving into the world of VR is as easy as popping the Galaxy Note 4 into the Gear VR. (Read how to use Gear VR here)

Now get your Gear VR to watch your own 3D movies in Oculus Cinema on your own couch as you wish! Have a nice time!

Read more tips:

How to Solve Windows Media Player Won’t Play H.265 Problem?

Leave a comment

Today is the turn of HEVC. This new video codec is already becoming integrated in more consumer products with many of TVs and mobile devices being sold today are with HEVC decoding capabilities. However, many applications and devices are still need time to support the new codec including Windows Media Player. Well, how to tackle this tough problem? Now no need to worry! This article will guide you to solve can’t play HEVC/H.265 in WMP problem and aid you to play H.265 video on Windows Media Player with no amount of road blocks.

play H.265 video on Windows Media Player

If someone wants to play H.265 video on WMP directly, an inevitable problem lies-WMP doesn’t support HEVC/H.265 video files. Fortunately, such a problem is solved by using the three methods below:

Method 1: Install the Must-have Codec to Solve Can’t Play H.265 in WMP Problem

In a bit to play H.265 video file well with WMP, you need to install all-in-one codec package at the first place. You can download and install the K-Lite Codec Pack. (Read its supported codecs here) Then restart your computer and you can then play H.265 files on Windows Media Player with smoothness.

Method 2: Resort to the Windows Media Player Alternative for Playing H.265 Files

Assuming that you are not versed in dealing with Windows Media Player won’t play H.265 problem by installing the abstract codecs or converting H.265 files, it doesn’t matter! You still have another option-turn to Windows Media Player alternatives for assistance. Among them, VLC is the most preemiment H.265 video players. Or you can find more H.265 players on the Windows store.

Method 3: Convert H.265 Files to Windows Media Formats

Since Windows Media Player is developed by Microsoft, it’s advisable for you to convert H.265 files to Microsoft’s WMV and ASF (in general, there is no problem about WMV and ASF playing on WMP.). In this way, you would be far away from the WMP won’t play H.265 trouble. Fortunately, Pavtube studio has announced that the Windows product has been upgraded to support encoding and decoding H.265 videos. Is that cool? Certainly, you can’t make this come true without the aid of the latest version of Pavtube Video Converter Ultimate, which can help you convert H.265 to WMV, ASF, MPEG and more WMP compatible formats with unaffected quality in solely mins for nicely importing to Windows Media Player. (Read reviews)

Note: If you have already owned the Pavtube Video Converter Ultimate, just open the main interface and select the “Help” >> “Update” to upgrade/download to the latest version for free to deal with your H.265 video.

Free download H.265 to WMP Converter:

Windows Download      Mac Download

Details on how to convert H.265/HEVC to WMV for Windows Media Player

Step 1 Load H.265 videos

After you install the H.265/HEVC decoder correctly on your computer, drag you files in this program directly or with “Add Video” button. This top-notch H.265 to WMV converter pro supports drag-drop and batch conversion, so you can import and convert several H.265 files at one stroke.

MKV to WMP Converter

Step 2 Select Output Format as WMV

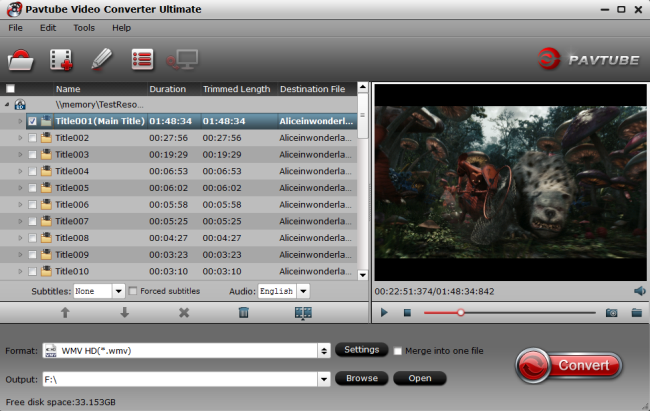
Come to the output list and choose HD Video > WMV HD(*.wmv) as the best video format for adding to Windows Meida Player. Of course, you can choose other WMP compatible formats like MPEG-2 or ASF.

best format for Windows Media Player

Step 3 Optional adjustments of output videos

Adjust the video and audio parameters, including the Bitrate of Video & Audio, Video Size, Sample Rate, Frame Rate, Audio Channels, etc., by clicking the Settings button on the main interface for getting the best quality.

Step 4 Start to convert H.265 to WMV

Now lightly click “Convert” to get H.265 to WMV conversion work started with a split second. You can view the conversion progress from the progress bar at the bottom of the dialog box. After conversion, you can import the output files to Windows Media Player for playing.

Apart from aiding you to effectively fix the WMP won’t play H.265 problem, this all-in-one video converter program makes you wow at its superiority in converting any video no matter the SD or HD video from camcorder or online website so that you are free to play back any video on your latest iPhone, iPad, Samsung, Sony, Microsoft devices with 1:1 high quality reserved.

More video solutions for you:

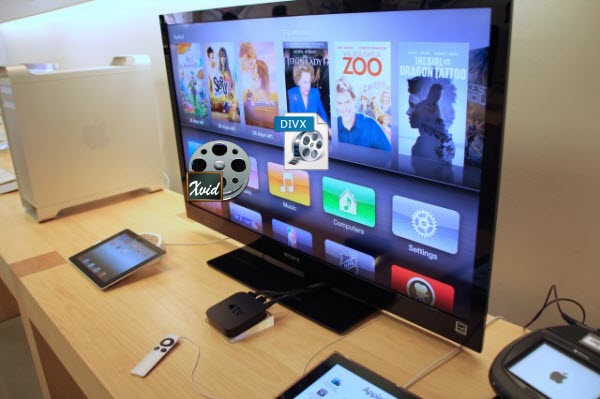
Apple TV AVI solution – Stream XviD/Divx files to Apple TV for watching

Leave a comment

I have an Apple TV and I want to join my XviD and Divx video into Apple TV- the 3rd generation for playback but there seems to be some problem with it. Which is the best way?

Stream XviD/Divx files to Apple TV

Apple TV is a hot media device for us watching movies. (Read Apple TV vs Chromecast comparison review) But just like other Apple devices it can only supports MP4, MOV, M4V videos. As you see, the XviD/Divx AVI isn’t in the supported format list. If you wanna view XviD/Divx files on your Apple TV, the best solution is to encode/re-encode XviD/Divx to Apple TV supported video format first. Here’s is how:

First of all, download and launch Pavtube Video Converterr Ultimate which would do XviD/Divx AVI to ATV conversion which only a few clicks. With it, you convert almost various formats of 1080p/720p HD videos including XviD/Divx AVI, MKV, VOB, MPG, TiVo, WMV to Apple TV friendly format for playback. It directly offers users an optimized pre-setting for Apple TV. Even if you don’t know what format is the best for Apple TV, you can also do it well. Meanwhile the quality of the converted videos is as decent as possible as original. The equivalent Mac version is iMedia Converter for Mac.

Following is the guide about how to XviD/Divx file formats to M4V for Apple TV:

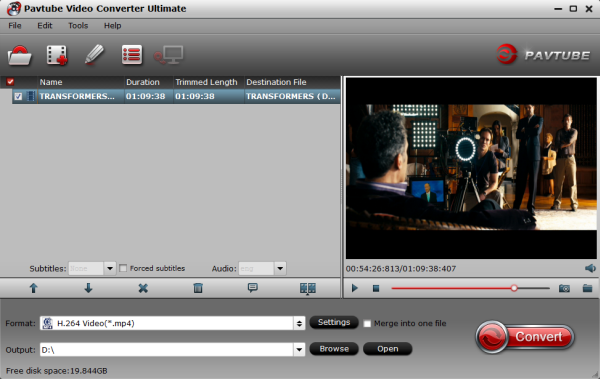
Step 1: Download and Install Apple TV Video Converter. Select your movie. Click “Add Video” to import your source materials in XviD/Divx format. Batch conversion is supported so that you can add multiple files.

Apple TV Video Converter

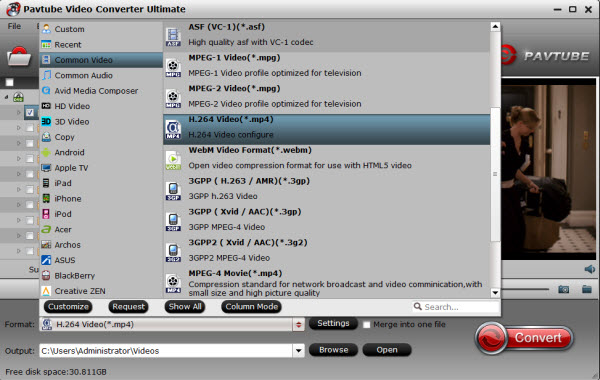
Step 2: Choose the output format. Click on Format > Apple TV. From the drop down menu, select the proper output format.

a. For Apple TV 3 users, Apple TV 3 Dolby Digital Pass-through (*.m4v) is recommended.
b. For Apple TV 2 users, please select the Apple TV 2 Dolby Digital Pass-through (*.m4v).
c. For Apple TV users, Apple TV H.264 1280×720(*.m4v) will be better to keep the videos in HD.

Apple TV Video Format

Step 3: Click the “Settings” icon and you will go into a new interface named “Profile Settings”. You can adjust codec, aspect ratio, bit rate, frame rate, sample rate and audio channel in the interface to optimize the output file quality.

Find no 5.1 Surround Sound from Apple TV, here is the solution. Actually, Apple TV cannot support AC3 5.1 audio track. While, we usually have the demand to get the full AC3 5.1 surround sound to let Apple TV pass-through Dolby Digital to A/V receiver to take advantage of our surround sound system. This Apple TV Video Converter provides pre-set Apple TV profiles. The particular profiles are H.264 video files with AC3 5.1 pass through and AAC stereo. Both AC3 and AAC audio are retained so that you can either let Apple TV pass-through Dolby Digital to A/V receiver to take advantage of your surround sound system, or have Apple TV decodes AAC and exports stereo audio

Apple TV Format Settings

Step 4: After above settings, you can start the XviD/Divx to Apple TV conversion. Once the process completes, locate the files and transfer and copy the converted .m4v videos to Apple TV. As you see, now you can effortlessly watch XviD/Divx videos on Apple TV with the best quality. Besides mkv, you can also rip Blu-ray/DVD or convert MKV and MTS to play on Apple TV.

VLC MP4 Solutions – How to Convert VLC Files to MP4 Files

Leave a comment

As a VLC lover, you may probably store lots of movies in the VLC library. Well, want to convert these videos or movies in VLC to MP4 format for playback on your mobile phones, ipod, portable players etc? If so, you can learn how to convert VLC videos to MP4 videos quickly and easily in this article.

This full guide refers to:

Q one: How to Convert VLC Files to an MP4 with VLC?
Q two: which is the best solution of Convert VLC files to MP4?

Before you started, you need Troubleshooting:

If you encounter any problem while trying to follow this conversion guide or are trying to do something else related to VLC, I’ll encourage you to seek out help in the following ways:

A. Update your VLC Player to the latest stable version (currently 2.1.5).

B. Check the Videolan support page which has lots of useful links to their forums, wiki, irc channel, documentation and mailing list.

Part I: Issue solved about question one(Convert VLC Files to MP4 with VLC).

Converting your VLC videos to MP4 is an easy process once you have downloaded or updated to the most current version of VLC. Depending on the file size, file type and quality of your input VLC file and output settings, some loss of quality may occur during conversion. Allow several minutes to several hours for conversions to complete.

1. Download and install the latest version of VLC Media Player. Agree to the licensing terms and launch the program.

2. Open your video in VLC and wait until it loads. Click “Settings” and select “Preferences.”

3. Click the “Advanced Options” box in the lower right-hand side of the screen. On the left hand side, click on “Stream Output” and “Sout Stream.” Select the “Transcode” option and hit “Save.”

4. Click on VLC’s main file menu and select “Open File…” Press the “Browse…” button and direct VLC to your video.

5. Choose the “Stream/Save” option at the bottom of the screen and click “Settings.”

6. Select “MP4” as your “Encapsulation Method.” Make sure that the “File” box under “Outputs” is checked, as well as your “Video Codec” and “Audio Codec” boxes.

Click “OK.” When the video loads in a new player window, click “Play” and wait for the conversion to finish.

Part II: Issue solved about question two (Easiest way to Convert VLC files to MP4).

Considering VLC video files are in various formats, you need a powerful video converter for your help. This VLC to MP4 Converter is the best VLC Converter to MP4, it can not only Convert VLC to MP4, but also convert vlc files to any popular formats, such as AVI, 3GP, WMV, MKV, MPEG, FLV, MOV, MP3, etc, even Blu-ray/DVD files, This great VLC to MP4 converter can make you enjoy all of your VLC videos on your MP4 media player with the best viewing effect.

The operation is too damn easy, just Free download VLC to MP4 Converter and follow the step-by-step guide to Convert VLC to MP4 freely.

Step 1. Load VLC files.

Add VLC files to VLC to MP4 Converter, Click “Add Video” button to load the vlc files you want to convert. Batch conversion is supported here.

 Convert VLC Files to MP4 Files

Step 2. Choose MP4 as the output format.

Choose output format in the drop-down list of profile, and set a folder for your converted VLC to MP4 files by clicking “Open” button.

 Convert VLC Files to MP4 Files

Step 3. Convert VLC to MP4.

Convert VLC to MP4 Convert VLC to MP4 will begin if you hit the “Convert” button, just a few seconds you will get the converted VLC to MP4 files with high output quality.

Note: If you want to play the output files on some device, one extra step is to transfer the files to the device via cable.

Now, you can get the best and easiest way to Convert VLC Files to MP4 Files. Have fun and sharing to others who is still in trouble!

Related Articles:
Backup DVD Discs to VOB for Free Enjoyment on Mac via VLC
Why Can’t I Play DVDs With Windows Media Center?

2014 Back to School Coupon Codes – Get 30% Off Pavtube DVDAid

Leave a comment

Now it’s almost time to back to school, have enjoyed a color and meaningful Summer break? Let’s get ready and be excited for another great term! Meanwhile, after a long summer holiday, are you looking forwared to see everyone and prepare some cool gifts for your classmates or teachers?

Welcome to the Pavtube 2014 Back to School Promotion Center where Up to AMAZING 35% OFF Back to School Specials are waiting for you. You be surely be entertained at your free time.

The giveaway includes Blu-raysDVDs and HD Videos related software which will give you great experience when enjoying these videos and movies on Android/Apple/Windows devices. Besides that, you will have no worry about any compatibility issues when editing the MTS/MOV/MXF files in Mac editors(FCP, FCE, iMovie, Avid Media Composer, Adobe Premiere, etc.), and Windows editing programs (Sony Vegas, Premiere Pro, Movie Maker, etc.)!

Hurry to get- 30% OFF DVDAid now!

Powerful abilities to remove DVD protection, convert DVD to any video and audio format, and edit DVD to create personal movie.

TERMS & CONDITIONS APPLIED:

The deal is valid from 15th Aug to 15th Sep, 2014

More details are here:

http://www.multipelife.com/back-to-school-specials-2014

From: http://movie-tips-review.blogspot.com/2014/08/2014-back-to-school-coupon-codes.html

How to Open AVI files with Windows Media Player

1 Thought

Windows Media Player Won’t Play AVI?  To solve this problem, I will give this tutorial to show you how to make Windows Media Player play AVI files on Your PC or Portable Devices.

Windows Media Player is a great program developed by Microsoft for viewing audio, video and viewing images on personal computers running the Microsoft Windows operating system. Windows Media Player claims to support AVI media files, however,there are still some issues when you want to play AVI in Windows Media Player. For example, Fraps uses its own proprietary codec to encode its AVI movies which will not play in Windows Media Player.

The problems occur when playing AVI videos using Windows Media Player lie in that Windows Media Player lacks the proper AVI compressor/decompressor or codec. If you want to watch AVI movies on WMP directly, here are some very easy solutions for you:

  • Method 1. Install codec package

In order to enable the windows media player to play audio or video formats that are not included in the operating system by default, you would have to obtain the necessary codecs. For instance, to play AVI movies well with WMP, you need to install DivX or XviD codecs first.

Get DivX codecs at: http://www.videohelp.com/tools/DivX-5 and XviD codecs at http://www.koepi.info/xvid.html. Then restart your computer and you can then play .avi files with Windows Media Player.

Or get K-Lite Codec Pack, a collection of codecs. Generally speaking, with K-Lite Codec Pack installed, you can play almost all the movie and the AVI files should be able to play in Windows Media Player. (Download K-Lite Codec Pack at http://www.free-codecs.com/download/K_Lite_Codec_Pack.htm)

  • Method 2. Play AVI videos in Windows with VLC

As an alternative, you can use the VideoLAN program, which is also known as the VLC Media Player. The VLC media player is an open source program developed by the VideoLAN organization. The VLC Media Players comes with a large library of audio and video codecs pre-installed. For some people, this option serves as an alternative to using the windows media player which needs to be manually upgraded and tweaked in order to play certain file types.

  • Method 3. Convert AVI to Window Media Player supported videos

The other option, is to simply install Pavtube Video Converter Ultimate. Lots of users are impressed by this converter since it is powerful enough to convert camcorder videos to multiple video formats for iOS/Android/Windows Tablets & Phones and HD Media Players as well as video editing software including Sony Vegas, Pinnacle, Avid MC, Premiere, and more. And you can enjoy the powerful edit function, like trim, crop, watermark for text, image and video, 3D effect, subtitles and so on.

The following guide will show you how to convert AVI files to HD WMV for playing on Windows Media Player. Download it and follow below steps.

Step 1. Load AVI video files.

You can choose “add video” directly or “load files” to add the whole folder.

Step 2. Select output format for Windows Media Player.

Click “Format” menu you will find various video formats listed by different devices. Just choose a compatible video format for Windows Media Player. You can choose “Common Video” > “WMV” as the output format, or select “HD Video” and choose “WMV HD(*.wmv)” as the output format.

Step 3. Edit loaded AVI video files.

Click “Edit” button and you are allowed to trim, crop, add text/image/video watermark or some effect to your output video for making it perfect. Here the function of adding subtitles to output files will contribute to make your own videos. You can use free software Subtitle Edit to edit your subtitle content then add it to output videos.

Tips: Click “Settings” on the interface and you can adjust the parameters including size, bitrate, frame rate, etc. to get a high quality of output files. And keep the settings the same as original video recordings will provide you the least loss of video quality.

Step 4. Start conversion.

Click the “Convert” button to start conversion. When it completed, click the “Open” button to get the generated videos for Windows Media Player.

When the conversion finishes, you can click “Open” button to get the final output files. Open Windows Media Player and then add items to the Windows Media Player Library for playback.

More features about it:

1. Rip and convert Blu-ray and DVD including 1:1 backup Blu-ray/DVD movies to PC hard device for future needs.

2. Directly Copy feature will save 100% intact .M2TS main movie from original BD disc.

It is an integration of Blu-ray Ripper, DVD Ripper and Video Converter and it will meet almost all your requirements about converting videos.

More solution are here:

What’s WLMP file and guide to convert WLMP to WMV

Leave a comment

How to convert .wlmp to .avi or .wmv or .mpeg1/2/3/4?

I need to convert a Windows Live Movie Maker file (.wlmp) to either an AVI, WMV, or MPEG (AVI or MPEG best) I’ve been looking on the internet and haven’t found anything free and good. I’d at least like the program to be under 100 MB. I like my space.
As far as i know, WLMP file extension is the Movie project file created by Windows Live Movie Maker, a program that allows users to create their own movies and slideshows; contains movie transitions, music, and effects as well as links to digital photos or videos.

WLMP files are used to create personal videos for sharing with friends and family. They can be exported to .WMV files, published to YouTube, and burned to DVDs. You should know, WLMP files are not video files. They are project files used to create videos.

When you save a project in Windows Movie Maker, it does not export your video. This file is still dependent on the original source files and cannot be played and watched. Follow the steps below to create a common video:

Continue reading »