Directly Copy Blu-ray to Blu-ray Player from Hard Drive

Leave a comment

How to play Blu-ray Disc? You may choose play Blu-ray movies on HD TV/Smart TV via Blu-ray Player, or play it on computer with Blu-ray Drive. Whatever, Blu-ray bringing us more and more surprise. Want to stocking your Blu-ray collection on a large hard drive? Or Mainly to rip blu-ray discs to M2TS files for enjpoyment? This guide will help you out!

The way of copying Blu-ray to M2TS for external hard drive is simply easy. With the help of Pavtube BDMagic, you can 1:1 copy Blu-ray to external hard drive in M2TS, preserving multiple audio streams, subtitle tracks and chapter markers without any quality loss. Moreover, you can get 6X time Blu-ray to M2TS ripping speed NVIDIA CUDA technology. Read the review.

The program prefers to bypass the encryption immediately after it appears, stripping the protection before playback software recognizes the disc, and it can always catch up with the latest Blu-ray copy protection variant. And the Blu-ray backup software is very easy to use for Blu-ray backup and ripping. With the tool, you can easily copy BD whole content or just backup main movie from Blu-ray with its provided copying features. Plus, it also enables users to fast rip video/audio from Blu-rays and convert them to MP4, MOV, AVI, WMV, FLV, MKV, VOB, MP3, OGG, WMA, etc. for playing and sharing anywhere you like.

Note: If you operate this process on Mac, you need a Directly Blu-ray Copier for Mac (Mac OS X El Capitan include).

Hot Search: Blu-ray Tips | Directly Copy Blu-ray with keeping 7.1 | 3D Blu-ray to Stereoscopic Player | Pavtube Products Comparison | Blu-ray Ripper Review |

Download the best Blu-ray copying software:


Other Download:

– Pavtube old official address: http://www.pavtube.cn/blu-ray-ripper/
– Cnet Download: http://download.cnet.com/Pavtube-BDMagic/3000-7970_4-75922877.html

Note: This Blu-ray Copier can 1:1 backup Blu-ray disc to BDMV and CERTIFICATE folders without any information and video quality loss. It can rip and backup Blu-ray disc of region A/B/C so you don’t worry about Blu-ray region codes here.

Backup Blu-ray to M2TS for watching on Blu-ray Player – Losslessly Backup Blu-ray with original structure

Step 1. Launch the Blu-ray copying software. Click the BD disc button to load your Blu-ray movies. The Blu-ray titles and chapters will be listed on the program within a few seconds.

Step 2. Click “Browse” button to select a destination folder for the output files.

Step 3. Click “Copy the entire disc” button in the main interface to starts copying the Bluray disc on Windows 10 maintaining the original structure menu.

As soon as the copying task finished, you can click “Open” button to locate the Blu-ray directory. The decrypted Blu-ray folder contains all information and contents in the original disc. Among them, the BDMV folder is the most important one with audio and video files in it. Open BDMV -> STREAM folder and you will find all the .m2ts movie clips. You can play these M2TS videos on Windows or have a further conversion and transfer to other devices for playback.

“ M2ts. Extracting the m2ts file(s) will not perform any compression which allows for the best possible video quality. Even if the output file is 25gb + every time, I do not care since, as you know, storage is getting very cheap… And I prefer stocking my movies on a large hard drive instead of having a bunch of BDs. FYI, I watch the atmos movies on my blu-ray player using the included usb slot. I connect a usb external hard disk to it. This way, the video / audio data stream flows to my “atmos capable” receiver from my bd player through hdmi which is needed for atmos.” – From Pavtube users who has been solved these questions.

Another way to Backup entire Blu-ray:

Full Disc Copy is a good way to backup the entire Blu-ray disc. It is capable to 1:1 backup the whole blu-ray preserving original structure and chapter marks and you will get one folder containing BDMV and CERTIFICATE folder. If you want copy the entire blu-ray for backup or creating ISO file and DVD, you can try it now and see further reading about how to make Full Copy of Blu-ray

If you have no idea about how to play the generated m2ts files, you can count to the free VLCPlayer, which support various video formats and generated BDMV folder. And it has VLCPlayer for Mac available for Mac users.

Workflow is so easy and quick, and it will provide you intact main movie of Blu-ray to M2TS backup at fast speed. Now just go to enjoy it.

Read More:

Workaround to Rip Blu-rays to PS4 Playable File Type

Leave a comment

Blu-ray Movie lovers may be delighted because the newest Sony’s PlayStation 4, has added Blu-ray functionality to make it a snap to play Blu-ray on PS4 a snap. With it, you can play the latest games on HDTV’s big screen. And if you happen to have a collection of Blu-rays, you can also convert them for playback on this great device. However, this Xbox One’s competitor seems to be far from perfectness with regard to the Blu-ray feature. Now, Let’s learning how to rip or convert your Blu-ray collections to store on PlayStation 4 (PS4), then you can take it everywhere for playing.

Hot Search: DVD to PS4 | YouTube Videos on Wii, PS4 | iTunes Movies on PS4 | 4K Videos to Xbox One | Share PS4 Screeshots Online

Of course, maybe do some audio video setting could be on the cards to make Blu-ray playable on the Sony’s new game console. But the complexity might be a lot more irritating. So there is much more available way to fix the issue? Luckily, there is! Based on my own experiment and customer’s feedback, the quick workaround is to convert Blu-ray to PS4 supported video formats like MPEG4, H264, etc. Actually, it is easy and worth your effort as long as you have a right Blu-ray to PS4 converter software like Pavtube BDMagic <review>. It offers specified video formats for PS4, PS3, PSP and many other game hardware like Xbox 360, Xbox One, Wii and more. With it, you can rip Blu-ray to PS4 compatible videos with fast speed and extremely high quality.

Part 1: Download and install PS4 Software Update 3.11

As PlayStation 4 won’t play Blu-rays or DVDs out of the box, customers have to install the software update when first getting it.

If the PS4 is connected to the Internet, go to the function screen, select “Settings” -> “System Software Update”, and update to the latest system software 3.11. In case the PS4 has no Internet connection for the time being, users can also use an external disc or USB storage to update the console system. (Download PS4 system update file, about 308 MB)

1) To update via a disc, download and burn the system file into a disc, then play the disc on the PS4. Follow the guide to complete the update.

2) To update via a USB storage, first download the system file to computer and rename as “PS4UPDATE.PUP”, create a folder “PS4” and a sub-folder “UPDATE”, copy the file into “UPDATE” folder. Then copy the whole “PS4” folder into the USB storage. Next, touch the power button for at least 7 secs and wait for the complete shut-down. Connect the USB storage device. Long-touch the power button again until the PS4 starts, then follow the instructions to update.

After installing the update, go to “Settings” -> “System Software Update” under function screen to make sure the update (version 3.11) has been successfully installed. After that, users will be able to play Blu-ray or DVD discs on PS4, transfer PS4 games to PS Vita via Remote Play, use the featured sharing system as well as other functions, which are however unavailable under the default system.

Preparations

1. Internet connection
2. An internal or external Blu-ray drive with your Blu-ray disc inserted
3. Blu-ray Converter app for Windows or Mac Pavtube BDMagic for Mac: you can read PS4 Video Converter for Mac review>.

Free Download and trail:


Other Download:

– Pavtube old official address: http://www.pavtube.cn/blu-ray-ripper/
– Cnet Download: http://download.cnet.com/Pavtube-BDMagic/3000-7970_4-75922877.html

Step 1. Run the software and load Blu-ray.

Click “Load file” button to import Blu-ray/DVD. The software will recognize the real main title of Blu-ray and pick it automatically. You do not need to look for the main title manually.

Step 2. Click on “Format” boarder to set output format.

Click Format bar and choose “PS3 Video(AC3 5.1)(*.avi)”, “PS3 Video(480P) MPEG-4(*.mp4)”, “PS3 Video(720P) MPEG-4(*.mp4)”, “PS3 Video(1080P) MPEG-4(*.mp4)” from PSP/PS3, which can be recognized by PlayStation 4 well.

Tips:

1. Click the Subtitle option and you choose the prefer language you want from the drop-down list. The PlayStation 4 (PS4) converter will hard burn the selected subtitle to PlayStation 4 (PS4) video, so that you can enjoy movies with hard-burned subtitles. Then click Audio to select the language like English, French to hear.

2. Click “Settings” to change the video encoder, resolution, frame rate, etc. as you wish. Keep in mind that bitrate higher results in big file size, and lower visible quality loss, and vice versa.

Step 3. Finally click on “Convert” button to start converting movies to MP4 for PS4 streaming and playing. When the conversion finished, you can enjoy you Blu-ray collection on PS4 at everywhere for playing.

You can use a PC with PS4 Media Server, TVersity, Windows Media Player 11, Vuse, Nero MediaHome or Mezzmo configured. (Learn how to set up Windows PC as a DLNA Media Server for PS4 streaming.)

Read More:

Re-encode HD Videos to H.265 MKV/MP4 on Windows/Mac

Leave a comment

In near future, HEVC will be used by almost every content. It is a matter of decision for service whether to send data using HEVC/H.265 instead of MPEG-4/H.264. H.265 or High Efficiency Video Coding (HEVC) is the latest generation video compression standard. HEVC doubles the data compression ratio compared to H.264 or MPEG-4 AVC at the same level of video quality. So, converting to HEVC H.265 from video H.264 HD video or other HD video including AVCHD, MXF, MTS, M2TS, MOD, TOD, HD MP4, HD AVI, HD MKV, HD WMV, ProRes can not only reduce file size but also improve quality using the same bitrate.

Hot Search: Blu-ray to H.265 | DVD to H.265 | H.265 to TV | H.265 to NAS | H.265 to Roku

A lot of users want to convert their video files to H.265 format since it’s the best format for video experience. Let’s see step by step procedure to convert H.264/MPEG-4, MKV, Tivo, FLV, M2TS, VOB, WMV and others to H.265/HEVC MP4/MKV files and you will get a clear idea.

In order to convert different video files like H.264, MPEG-4, MKV, VOB, FLV, F4V, WMV, Tivo, MP4, MOV, MPG, WebM and others to H.265 (HEVC), you will need to have a reliable H.265/HEVC Video Converter to do the job. You can also convert H.265 files to other formats, too. The Pavtube Video Converter Ultimate is one of them. (Mac version is iMedia Converter for Mac) is one of them. It’s available for both Windows and Mac OS X (including El Capitan).

This app not only can encode 4K/SD/HD video, but Blu-ray/DVD to H.265 MKV/MP4. In “Settings”, it has original setting, so you can keep original bitrate, resolution, frame rate, and audio channel, bitrate while only change the video codec. You can download a right trial version of the converter to try. The following steps are based on Windows, but you can also convert movie library to H.265 on Mac with Mac version as the steps.

Free download and install


Other Download:

– Pavtube old official address: http://www.pavtube.cn/blu-ray-video-converter-ultimate/
– Cnet Download: http://download.cnet.com/Pavtube-Video-Converter-Ultimate/3000-2194_4-75938564.html

How to Convert Whole Movie Library to H.265 MKV/MP4 on Windows?

Step 1: Add movie library to app

You have two different ways to do this, first is by going to ‘File’ tab, then choosing ‘Add Video/Audio’, a file folder will pop up and from there you can browse and choose the file you want to convert. The second and simpler way to do this is by opening the folder containing the file you want to convert and simply dragging it from the folder then dropping it on the pane of the video converter software.

Step 2. Choose target format.

In order to convert movie library to H.265 MKV/MP4, you just have to select the format you want your file to be converted to, let’s say, MP4 (since it’s the best file that goes with Apple devices.) you can do this by choosing the format icon in “Common Format” pane to see the drop-down format available in the software, choose ‘H.265 MP4’ in the Format tab you can see from the Video category, or choose MKV and then select ‘H.265’ as video Encoder by going to the Settings option.

If you want to convert a H.265 file format into another format, simply choose what format you want your file or files to be converted to.

Step 3. Adjust output file parameters (Optional)

You are allowed to adjust video and audio parameters if you are not satisfied with default settings. Presets like size, bitrate, frame rate, audio channels, etc. can be customized in your own way.

Step 4: Start converting movie library to H.265

Now hit on the “Convert” button on software main interface to start the conversion. After conversion, hit “Open” or “Open output folder” to quick locate generated H.265 MP4 files.

Look, this H.265 Decoder and Encoder is so easy to operate. Just enjoy!

NEWS!!! Recently, Pavtube Studio has upgraded its top-ranked Pavtube Video Converter Ultimate to version 4.9.0.0 with supporting the most advanced hardware acceleration NVIDIA CUDA & AMD APP by H.264/H.265 codec, which can give users 30x video transcoding speed than before.

Related Articles:

10 Ways to Play an AVI File You Didn’t Know About

Leave a comment

AVI, Audio Video Interleave, is a multimedia container format commonly used in our daily life. However, its compression standard is not universal and different compression standards can cause failure while playing an AVI file. AVI files are great because they always offer great quality video. But sometimes you download an AVI file and it won’t play. So how can you play an AVI file?

Before moving to the main point, let’s talk about codecs. They’re important. Here’s a definition: “Codec is a small piece of program that plugs into your computer’s operating system and allows the software installed on your computer to perform the “decoding” for the video that has been ‘coded’ with the codec you installed.”

Maybe you’ve also heard about codecs, coders, encoders, and decoders, and you’re totally lost. What’s the relationship between them? Actually, a coder and an encoder are the same thing. A codec just a coder/encoder combined with a decoder. So, when someone talks about a codec, he or she is talking about two things: coder/encoder plus a decoder.

This site sums it up: “Codec, as a word is an abbreviation of coder/decoder. The person who put the video inside the video ‘coded’ the video and the person who wants to open the video (that is you) has to ‘decode’ the video.

Then you know that each video file contains a codec. If you want to play AVI, you not only need to be familiar with different tools/ways/platforms to play, you also need to know about codecs. Note that two AVI files that look the same may actually contain different codecs—that’s what happens when you can open one but not the other.

If you can’t play an AVI file, you have five main tools to use: software, operating system, device, video codec, and audio codec.Software

1. How to play an AVI with Windows Media Player

When software is the problem, the common solution is to replace one program with another. For example, if you can’t open your AVI with Windows Media Player, you might use VLC. But is Windows Media Player truly a poor playback tool? Nope. Most of the time, you can just check the box Windows Video File (avi) in Menu->Tools->Options->File Type. (Note that this doesn’t exist in WMP12, and is only available in the previous version.) Pls turn to>>Windows Media Player Won’t Play AVI? Solved with 3 methods.

2. How to play AVI with QuickTime on a Mac

Another common option people will recommend when you can’t play an AVI file with QuickTime is to convert it to another common video format, like MP4. But you can usually solve the problem just by adding a plugin like Perian. Perian is a great open-source (free) QuickTime plugin that allows to playback most of video formats like that cannot be played natively on Mac QuickTime, like AVI. Pls turn to >>Playing AVI on Mac OS X El Capitan.


Operating System

3. Ways to play AVI on iPad/iPhone/iPod

There are at least 2 ways to play an AVI on your iOS devices. The simplest way is to download a video player, which can support almost all kinds of video formats, including AVI. The most common tactic is to convert the file to another common format, like MP4, and display in your all iOS devices. However, for video playback in iOS devices, the hardest part is not how to play videos, but how to get them. The most convenient way to get videos for your iPad is via the iTunes Store. Signing up for a US iTunes account can save much time and money for you. What you need is a valid address in the United States. Then choose “None” for your payment option. Then buy iTunes US vouchers online and redeem them into the US iTunes account and enjoy your videos with no problem. Pls turn to >>Convert AVI to iTunes for importing.

4. How to play AVI on Android phones like SAMSUNG/HTC/NEXUS

Nine of ten people would recommend using a video converter to convert the AVI to other formats. However, the main problem you encounter is not to how to play an AVI on those android phones, but how to play it well. After you’ve installed a video player from Google Play or Amazon Apps, you can play AVI files on an Android phone. But there are usually some playback issues such as stuttering video, freezing video, audio sync issues, or even playback in slow-motion. Avoid those issues by using something called “Hardware Decoding,” which is completely designed for playing video. Pls turn to >>Enjoy 1080p/720p, HD Videos on Android.

Device

5. Ways to play AVI on TV like SAMSUNG TV

There are at least three ways to play an AVI on SAMSUNG TV/Apple TV. The most common way is to transfer your video to TV via USB/AV Cable/WiFi (HDMI Cable is only available for those who have an HDMI Plug). The second way is to convert with a video/TV converter. The last way is to cast it to TV directly with Chromecast. However, Chromecast doesn’t support AVI directly. You need to use a converter first and then plug this thumb-sized media streaming device into the HDMI port on your TV. Then you can set it up with a simple mobile app and share your favorite online shows, movies, and even webpages to your TV using your smartphone, tablet or PC. Pls turn to >>How to Play AVI on Samsung TV Via USB Port.

6. Ways to play AVI on Xbox 360

There are no special processes to play an AVI file from DVD, USB, or WiFi, because the Xbox 360 console only supports AVI files with DivX and XviD video. However, what if your video is not DivX or XviD? Don’t worry. Read tip 5 for how to convert AVI to DivX or XviD format directly. But that all assumes you have the fall 2007 update. To get the update, all you have to do is have the latest Dashboard update installed. (You are prompted to install Dashboard updates when they are available, the moment when you sign in to Xbox Live). >> Turn to Embedding .SRT to Divx/Xvid AVI for Xbox 360.

7. Ways to play AVI on Kindle Fire

Since it’s an Ebook reader, Kindle Fire has many limits to play videos, especial for AVI files, which have various codecs inside. Like any other mobile devices, users can choose to download a powerful video player app to play AVI files or convert AVI to other suitable formats. However, the first thing to notice before dropping your video files to Kindle is that it doesn’t have much space. There are only 5GB of space and you have no way to extend it with external SD card or similar. Therefore, when converting to other formats you need to pay attention to the size and resolution. Turn to >>Guides for Beginners to Enjoy AVI movies on Kindle Fire HDX.

Codec

8. Use the FFDSHOW codec to solve all AVI problems

Most users have video players on their PC/Mac. What they need is just a suitable codec to play them. FFDSHOW is the one you need. It’s a codec that supports most downloaded videos. What’s more, it’s free and open-source. It supports most common video compression methods and can provide good supports for using subtitles and various picture improvements. So just download it, install it on your PC, and follow the on-screen guides.

9. Other ways to play an AVI using codecs

Most of the time, your AVI problems can be solved with FFDSHOW. However, it’s still possible you won’t be able to decode it. In that case you need tools to analyze the AVI and find the right codec. There are two common tools: AVIcodec and GSpot, but I prefer to the former.
AVIcodec is a simple and easy-to-use program with two main tabs: Multimedia files and Codecs & Filters. Under Multimedia files, users can open and analyze video and audio files. That’s what we need. >>Top 5 Free Online AVI to MP4 Converter.

10. Ways to play an AVI with AC3Filter

Occasionally, an AVI file will play without audio. How does that happen? Like video, audio is also encoded and decoded with certain codecs. When you’re using multi-channel formats like AC3 and DTS, it requires special codecs to decode, like AC3Filter. It’s a free and open-source decoder.

All in all, there are multiple ways to play AVI video files.Try them out and see which is best to solve your problems. Click here to know more about ways to play any other video formats. Leave comments if you have any further questions.

Source:http://www.lifehack.org/articles/technology/10-ways-play-avi-file-you-didnt-know-about.html

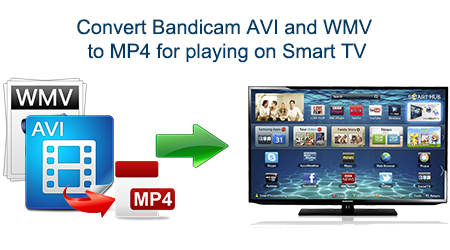
All-in-One-Solution>> Use Pavtube Top AVI Video Converter can help you solve all AVI playback issues

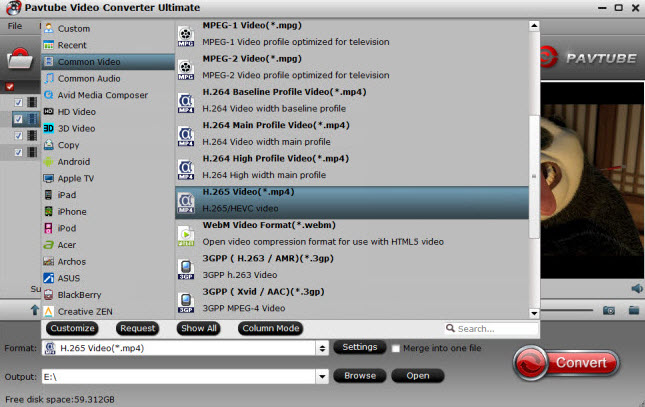
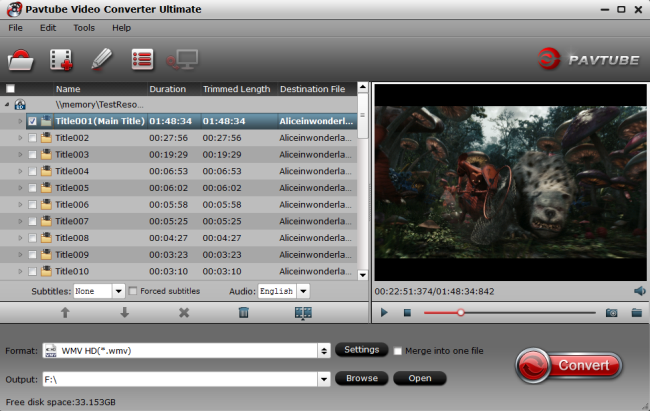
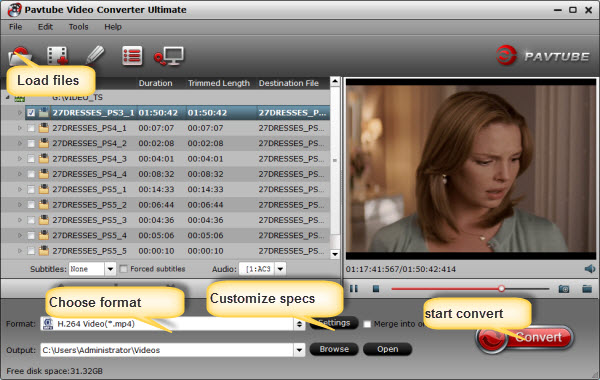
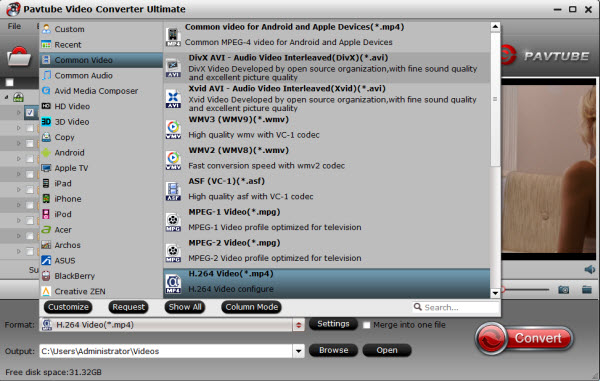
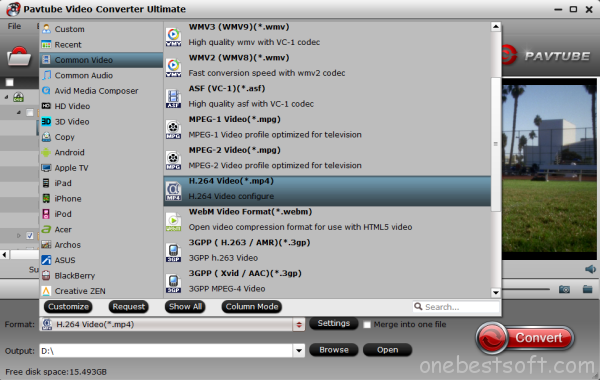
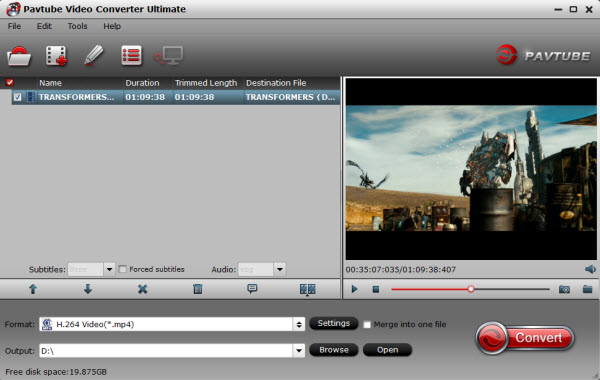
Here, Pavtube Video Converter Ultimate that lets you easily convert any AVI videos (or HD videos, Blu-ray, DVD movies, YouTube videos, etc.) to any formats that you like. Overall, the all-in-one program can easily convert Blu-ray DVD disc, DVD folder, DVD IFO/ISO file and various videos inluding the BDMV files to any video format for different devices including iPad Air 2, iPad Pro, iPhone 6S, iPhone 6s Plus, Kindle Fire HDX, Apple TV 4, Samsung Galaxy Tab S2, Galaxy Note 5, Google Nexus 7/10, WD TV, WD TV Live, and more. Here is review.

For Mac OS X El Capitan users, iMedia Converter for Mac is a helpful app to encode videos for further usage.

Hot News: Pavtube Software officially released its 2015 Christmas Day Deal. Pavtube Video Converter Ultimate/iMedia Converter for Mac is available with 20% off is provided on christmas week, Don’t miss it!

Pavtube AVI Converter Main Features of this software:

* Easy to use and user friendly interface.
* 100% compatible for Windows Vista, work fine with Windows 10/8.1/8/XP, Vista and Windows 7 (32bits and 64bits).
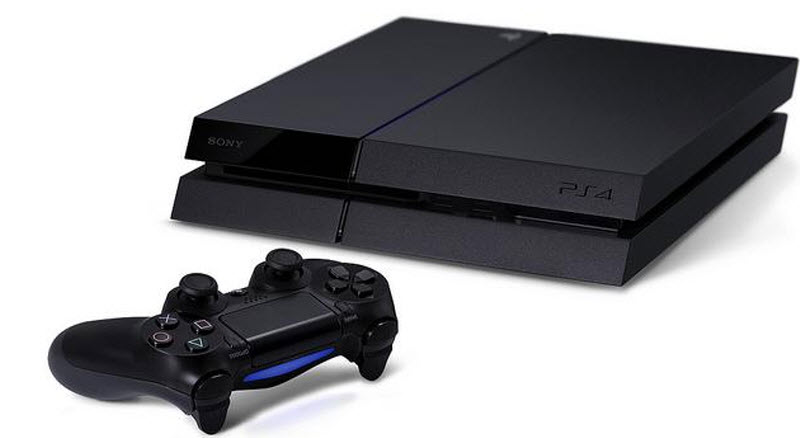
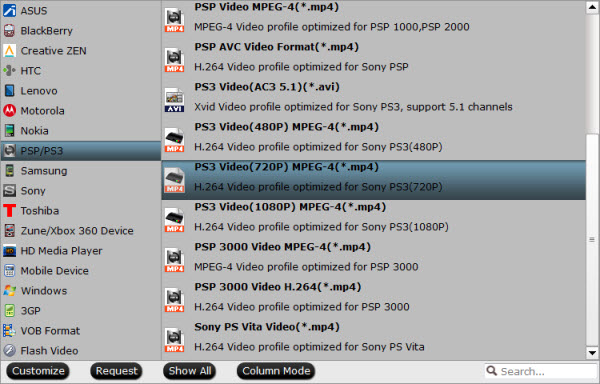
* Convert video files to MP4 can be played in MP4, iPod, iPod Touch 6, iPhone 6s/6s Plus, Mobile phone, PSP, PS4, Zune, Apple TV 4.
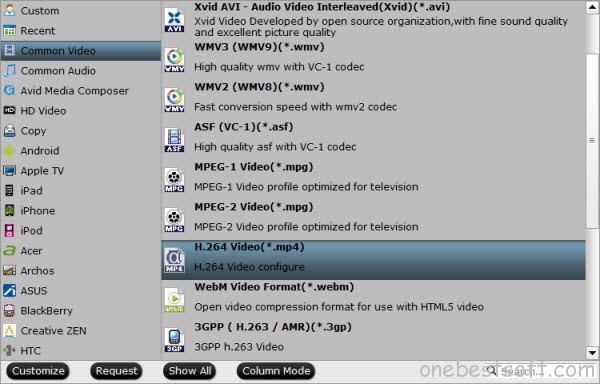
* Support all popular video formats such as AVI, MPEG, MP4, WMV, DivX, Xvid etc to MP4. (You can convert to AVI from a variety of source formats including MKV to AVI, MP4 to AVI, FLV to AVI, MPEG to AVI, MOV to AVI, WMV to AVI and many more.)
* Convert HD and SD Video to AVI – AVI Video Converter works perfectly for almost all popular video inputs, it can easily convert any video to AVI format from array of source HD and SD videos including MKV, MTS, M2TS, FLV, WMV, MOV, MP4, H.264/MPEG-4,3GP, TS, MPG, MPEG, VOB, ASF, Xvid, Divx, etc.
* 100% CLEAN software, no adware or spyware.
* The latest version can have better video quality

Download this Top AVI Video Converter software:


Other Download:

– Pavtube old official address: http://www.pavtube.cn/blu-ray-video-converter-ultimate/
– Cnet Download: http://download.cnet.com/Pavtube-Video-Converter-Ultimate/3000-2194_4-75938564.html 

Convert Bandicam AVI and WMV to MP4 for playing on Smart TV

Leave a comment

More and more people are getting confused about why the Bandicam AVI and WMV videos in Smart TVs can not playback. For some people who usually record their game videos or other full Desktop screen record, this app totally works well. The install space is small but output quality is very sharp. The recorded videos came from Bandicam usually goes to AVI or WMV format. Those formats are compatible with most tablets and smartphones.

But since those formats are both “Container” formats, the codec in this “Container” may disorder in it. If you are puzzled by the problem that you can’t play Bandicam AVI and WMV movies on Smart TV via USB flash drive directly, here recommend you the best Bandicam Video Converter to solve the issue.

Pavtube Video Converter Ultimate is the best Bandicam Video Converter tool for you. With this software, you can convert Bandicam recorded video to any video format, even 3D videos. In addition, you can rip and convert all kinds of AVI, MKV, MOV, VOB, FLV, WMV, MTS files and Blu-ray/DVD files to any format for playing and sharing. By running it, there’s no need to set the codec yourself: the program has optimized presets for all the Smart TVs, including Sony, LG, Panasonic, Vizio, Samsung, etc. Besides these, you can convert any 4K and Full HD video file like MXF, MTS, MOV, MP4 to Smart TV compatible format without loosing quality. Here is review.

Plus, with the built-in video editor, you can also choose to trim, crop, add watermark to your original videos. If you are Mac users, please turn to iMedia Converter for Mac (El Capitan, Yosemite included), which has the same function as the Windows version.

Now please follow the guidance below to convert Bandicam AVI and WMV to Smart TV supported formats so as to nicely transfer AVI or WMV files from Bandicam to USB flash drive for playing on Smart TV smoothly.

Free Download and trail:


Other Download:

– Pavtube old official address: http://www.pavtube.cn/blu-ray-video-converter-ultimate/
– Cnet Download: http://download.cnet.com/Pavtube-Video-Converter-Ultimate/3000-2194_4-75938564.html

Good News! To thanks for your continuous support, Pavtube Official Website and Pavtube Facebook all has been released its 2015 Christmas Day Deal. Pavtube Video Converter Ultimate is available with 20% off is provided on christmas week, Don’t miss it! Pay less to get powerful Blu-ray/DVD/Video Converter to build your own home media center on your becoming Christmas!

Converting Bandicam AVI and WMV to Smart TV best video format

1. Import Bandicam AVI and WMV files

Launch the AVI and WMV file converter. Click “Add File” button to import the .avi files which you like to play on Smart TV. This software supports batch conversion.

2. Set Smart TV compatible format

Click the format bar, in the drop-down profile list, it has “TVs” column. Here, you can choose the optimized TV profile as the output format to for Sony, LG, Panasonic, Vizio, Samsung Smart TVs.

Note: If you want to stream your video clip to your Table or your phone so that you can enjoy them whenever and wherever you want, just choose the correct format your devices support. Or select brand name your device on the format list, such as SamsungiPhone. Then you can enjoy the video without any quality drop or lagging.

Tip: Video, Audio settings

Before start the video conversion for Smart TV, you can click the Settings icon and adjust the video bitrate, codec, frame rate, audio sample rate, etc parameters.

3. Start AVI/WMV to Smart TV conversion

Click the “Convert” button to start converting AVI/WMV to Smart TV more supported MP4 video. When the conversion is finished, you can click “Open” button to get the generated MP4 files effortlessly. Just transfer and play Bandicam AVI and WMV movies on Smart TV with ease.

So here you have my words that the question, Smart TV won’t open Bandicam AVI videos? Solved!

Read More:

Top One Solution – Getting mkv’s to play nice on Roku 4?

Leave a comment

Reddit User’s Commen Question: 

“ I’ve read that officially Roku supports mkv but I believe that goes as far as the container but not necessarily other codecs. My issue is I have a fair amount of mkv’s that will play, but they constantly stutter and skip as if they are in slow motion. I suspect it’s the audio codec used and not necessarily the container/video codec. Is there a windows tool I could use to change the container to mp4 or (and I said what I suspect is the real issue) re-encode the audio to some other format? My goal being that I don’t want to re-encode the video and don’t believe it’s necessary.” – Source >> here.

In this case, some people may give up playing their favorite MKV movies on Roku 4. In fact, it is not a hard thing, because we can convert MKV/AVI/MOV movies to Roku 4 friendly video formats. In this article, we will give you the tips and tricks how to watch MKV, AVI, MOV movies on Roku 4 via USB flash drives smoothly.

Roku USB Media Player channel only plays MKV files encoded with H.264 video codec and AAC/MP3/DTS/AC3 audio codec. If the MKV is encoded with other video or audio codec like MPEG-2, WAV and etc, we will fail to play MKV on Roku 4 via USB drive, SD card or external HDD. Under this circumstance, you need to encode.

To solve Roku won’t play MKV files issues; a recommended fix is to convert Roku unsupported MKV to Roku more compatible MKV or MP4. For naturally unsupported MKV formats of Roku, you will need a third-party tool to help you out. HerePavtube Video Converter Ultimate is your best choice which is capable of converting your media to Roku supported formats like MKV, MP4, MOV, WMV for streaming with no quality loss.

And what I’ve learned is that MP4 would be one best target format for it is fully compatible with nearly all media devices including iPad Pro, iPhone 6S/6S Plus, PS4, Apple TV 4, etc. If you are running on Mac OS X El Capitan, turn to iMedia Converter for Mac. If you haven’t got the software, download it now and let’s start the conversion.

How to Encode/Re-encode MKV to Roku 4 compatible format

Download MKV (DTS) to Roku 4 Converter:


Other Download:

– Pavtube old official address: http://www.pavtube.cn/blu-ray-video-converter-ultimate/
– Cnet Download: http://download.cnet.com/Pavtube-Video-Converter-Ultimate/3000-2194_4-75938564.html

1. Add MKV movies

Run the MKV to Roku Coverter; click the Add button to load movie files to the program from your computer. You can also directly drag the video files into the program.

2. Select the output format

Hit the Format box and choose your desired format. To store your movies on Roku for widely using, you’d better encode them to .mp4, .mov, or .mkv, etc compressed format.

Tips:

1. If you like, you can click “Settings” to change the video encoder, resolution, frame rate, etc. as you wish. Keep in mind the file size and video quality is based more on bitrate than resolution which means bitrate higher results in big file size, and lower visible quality loss, and vice versa.

2. There are also some optional tinkering you can take to make the videos look better on a HD TV screen, such as changing the aspect ratio or specifying the video resolution. Just click the Settings (beside Format) icon to do it.

3. Start to convert videos to Roku 4

Simply click the Convert button to start encoding video to MP4 for Roku 4. Within several minutes, you can find the converted file on your computer by clicking the “Open” button. Afterwards, it’s free to stream your media files from Roku 4. Make sure the wireless network connection is accessible among the Roku and iPad, Apple TV, PS3HD TV or other media players. What’s more, you can also set Plex on Roku for Blu-ray/DVD playback on Roku 4.

More features of the MKV to Roku 4 Video Converter:

a. Edit or clip MKV movie files- Click “Edit” on the menu to trim, crop, add special effects to your source movies.

b. Advanced settings- With the right settings you can retain the quality of the original MKV movie files while also saving space. This is particularly helpful when streaming over your network. Simply click Settings bar and you can tweak the settings to your satisfaction and even save it as preset.

Read More:

Save DVD on Google Drive For Playing on Christmas Party !

Leave a comment

“Can I upload a bunch of old DVD’s onto Google Drive or Google’s new Photo? I have a bunch of old movie DVD’s I’d love to get rid of but still have access to on the cloud.” – Question from Quora.

Google Drive is Google’s new cloud storage services, like Dropbox, Apple iCloud, SkyDrive. It allows users to store files in the cloud, share files, and edit documents, spreadsheets, and presentations with collaborators. It support 30 types of files, such as document, pictures, HD video, Adobe Illustrator and Photoshop, but problem comes, right? Why can’t we stored directly DVD movies on Google Drive?

At first, Google Drive gives you control over all of your file types in a single place, including video files. Here, we listed the useful features of Google Drive as below:

  • Documents are free. Google gives you 5GB of free storage space.
  • Upload up to 30 types of files.
  • Share files, pictures, videos.
  • Utilize Google Goggles
  • Collaborate on videos, photos, and more.
  • Install third-party apps

Almost all movies are encrypted with CSS copy protection. Decryption keys are stored in the normally inaccessible lead-in area of the disc. You’ll usually get an error if you try to copy the contents of an encrypted DVD to Google Drive. However, if you have used a software player to play the movie it will have authenticated the disc in the drive, allowing you to copy without error, but the encryption keys will not be copied. If you try to play the copied VOB files, the decoder will request the keys from the DVD-ROM drive and will fail. You may get the message “Cannot play copy-protected files”.

Now that it doesn’t work to directly copy DVDs to Google Drive, using DVD ripping software is the best way to rip DVDs to Google Drive supports MP4, AVI, MOV, FLV, WMV etc. video files. Here Pavtub DVDAid is recommended to you. This DVD ripping tool can rip any encrypted DVD and convert DVD to Google Drive readable MP4, MOV etc. formats as well as other popular formats, like rip DVD to AVI, MKV, M3U8, H.265, WMV, MPG, FLV, SWF, M4V, etc. on Windows (including Windows 10, 8.1 and 8). For the video size limit of Google Drive, etc site, the built-in editor also allows you to extract DVD clips with the very part you want. Or, you can just choose to rip certain chapters of a DVD as you like.

Note: If you are a Mac user, please turn to DVDAid for Mac, support Mac OS X El Capitan, Yosemite 10.10, 10.9 Mavericks, 10.8 Mountain Lion, 10.7 Lion, Snow Leopard10.6, Leopard 10.5. Now download the right version of the program and follow the guide below.

Other Download

– Pavtube old official address: http://www.pavtube.cn/dvd_ripper/
– Cnet Download: http://download.cnet.com/Pavtube-DVDAid/3000-7970_4-76158510.html

Rip DVD to Google Drive in readable video format for uploading?

Step 1. Load DVD movies

Insert the DVD disc into your computer’s DVD drive and run DVD Ripper. You can click the “Load DVD” button to load the DVD files to the program. DVD ISO/IFO, VIDEO_TS folder are supported also.

Step 2. Specify output format

As has been stated above, Google Drive supports MP4, etc video files. So you can just select “Common Video” > “H.264 Video(*.mp4)” as the output video format. Also you can transfer your DVD to Media Hub,Cloud Storage and External Hard Drive/Thumb DriveFlash drivePlex for storage and playback.

Step 3. Trim/Edit DVD files

A. Since Google Drive has limitations about the uploading video size(If you only have the free account, you only have 2 GB of space), please pay attention to the video size when ripping DVD movies for Google Drive. Here we should highlight the trim function on this software.

B. Just click “Edit” to trim the DVD videos to get the very part you want. Besides trimming, cropping, adding watermark, adjusting special effect, are well supported as well.

Step 4. Start converting DVD to Google Drive

When all these settings are ready, you can click the “Convert” button to begin the DVD to Google Drive conversion. When the ripping is done, you can click on “Open” button to locate the ripped videos.

Tips: You can learn other tips about >> how to Compress your video files to save space on Google Drive.

Editor’s Note: Tips and notes:

Sync or upload your video in the original format and in the highest quality possible. The maximum resolution for playback is 1920×1080. Audio and video lengths should be the same, audio and video should start and end at the same time.

How to Preview and play a video in Google Drive:

All of your uploaded videos can be found when you search Google Drive for Videos using the drop-down arrow in the search box. Click a file name to open and play the video using the Google Drive video player.

Now, you can easily rip DVD movies and want to add to Google Drive for streaming and playback on iPhone, iPad, Android, Surface Pro 4, BlackBerry, Plex, PS4, WDTV, smart TV and more media devices, The program is very easy to use and the output video quality is excellent. You should give a try!

Read More:

Rip DVD to SBS 3D MKV, AVI, MP4 and MOV on Mac OS X El Capitan

Leave a comment

Have you ever imagined turning all your DVD movies into 3D (Anaglyph 3D, SBS 3D, Top/Bottom) movies and enjoying them on your 3D devices with 3D effect on Mac OS X El Capitan?

As you may already be aware 3D movies have joined our daily lives for a couple of years, and 3D video is becoming the most sought-after thing. Maybe most 3D movie fans would ask the same question to either backup their movies free from DVD physical disks or prepare for future usage such as watching copied 3D movies on 3D player.

If you wanna get 3D playback on your 3D devices, you have to order another 3D version which costs extra money. Now you can copy DVD movies to 3D video without spending more money! You need just the BDMagic for Mac (review) to help you to transfer your 2D DVD movies to 3D video if you are Mac users and you could watch your favorite DVD movies with 3D effect preserved. The windows version is BDMagic.

How to rip DVDs to 3D (Anaglyph 3D, SBS 3D, Top/Bottom) movies on Mac OS X El Capitan

1. Add 3D DVD source file to the program.

Download and install the latest Mac Blu-ray Ripper onto your computer. Launch it and click “Load file(s)” icon to load DVD files.

2. Set 3D SBS video format as output

Click “Format” bar and move mouse to “3D Video” column, you can choose “MP4 Side-by-Side 3D Video (*.mp4)” or “MKV Side-by-Side 3D Video(*.mkv)” as output format. If you want to output Anaglyph 3D or Top-Bottom 3D, you could choose it according to your specific need.

Tip:You can adjust target video settings and 3D effect.

Click “Settings” which is next to “Format”, free change your target video size, bitrate, frame rate and 3D depth. If you want to get best video quality, pls switch them to “original”. Difference Between Anaglyph 3D and Side-by-Side 3D.

3. Start rip DVD to SBS 3D video on Mac 10.11

When everything is OK, just press the “Convert” button to start the conversion. It will not take much time. Just wait for the conversion process to get done. Once the conversion finished, you are able to get 3D MP4/MKV/AVI/MOV files via clicking “Open” button.

When play the 3D MP4/MKV on your 3D devices, You may find it comes up in two screen, just hit the 3D button on your device, and it will pop up a window saying put on your glasses, choose “OK”. Another window appears showing your 3D choice: Side-by-Side.

Now put on your 3D glasses, and then just enjoy 3D Movies!

You May Also Like:

MP4 Compressor: Reduce MP4 File Size for Uploading or Emailing Fast

Leave a comment

Have you ever spent hours and hours working on and perfecting a video only to discover that it looks terrible once you upload it to YouTube, Vimeo or other online video sites? Keep crop here and get a reliable solution to reduce the size of MP4 video file, the following guide will be helpful, showing you everything about how to make MP4 video smaller.

Tips for Compress Movies: Best Video Movie Compression Software | MPEG Compression Standard|Compress Audio to Smaller Size | Compress MOV Files |

People are itching to save all movies and videos in MP4 format on their hard drives. But you can’t have your cake and eat it too. The large amount of MP4 videos take up a whole lot space, though files in MP4 format are playable on almost all media players. No wonder many people ask for solutions to reduce MP4 file size to release their hard disc space. If so, you have suffered from bad compression.

Best workaround: You have to compress the MP4 file size to a smaller one, second for the incompatible problem, you can to check the target website supported formats then transcode your files into those formats. Then, you can upload your videos smoothly. Select a good converter can save you a bunch of times , for good converted quality and fast speed.

In this case, you need a professional yet easy-to-master MP4 compressor like Pavtube MP4 Converter Ultimate – It can compress MP4 files in a flash with loss-less quality (batch compression supported). This is your best choice for complete the compress all your video files. Here is the Here isreview.

With this all-on-one MP4 Compressor will help you not only transcode H.265/HEVC, MP4, MKV, M4V, AVI, MXF, TiVo, MOV, M2TS etc video files, but also the commercial discs if you like. Blu-ray, DVD, Videos all those file sources can be compressed for sharing online or transfer via different tools or NET. With those converters, you can also cut , trim , split, merge,etc with the build-in editor. For Mac users, iMedia Converter for Mac is a helpful app to encode videos for further usage. Refer to the guide on how to Reduce MP4 File Size for Sharing via Mac OS X El Capitan.

The following is a step by step guide on how to compress MP4 file with the help of the MP4 Compressor so that you can play MP4 files on portable devices like iPhone, iPod, PSP, etc and sharing MP4 files on Youtube, Facebook and Vimeo and so on.

How to Compress All of MP4 Video files with Pavtube Video Compressor


Other Download:

– Pavtube old official address: http://www.pavtube.cn/blu-ray-video-converter-ultimate/

– Cnet Download: http://download.cnet.com/Pavtube-Video-Converter-Ultimate/3000-2194_4-75938564.html

Step 1: Load MP4 Video Files.

Click on “Add File” button to add the video files that you want to play on Any deivces. Or simply drag your files or the folder where your files are to the program interface.

Step 2. Choose output format.

Click “Format” to find “HD Video” catalogue, select “MPEG-4 HD Video (*.mp4)” or “H.264 HD Video(*.mp4)” as the best video formats.

Step 3. Edit MP4 files before converting (Optional)

Click Edit button, you can realize editing MP4 videos like trim video, crop video, rotate video; add subtitles/effects/watermark and more. Change Parameter Settings, Incl. Video Resolution, Frame Rate and Bit Rate. Click “Setting” button of the program and a window will pop up. From Size(pix) drop-down list, select an appropriate parameter or enter a desire value for output file. Or choose lower value from the drop-down list of the right side of “Bitrate” to decrease MP4 Bitrate in order to resize your MP4.

Step 4. Start Compress your MP4 video files.

When all these settings are ready, you can click the “Convert” button to begin the compress MP4 on Windows conversion. When the ripping is done, you can click on “Open” button to locate the ripped videos.

Now please try this MP4 Converter, the program will transcode the MOV video clips with top speed with the help of NVIDIA CUDA and AMD APP acceleration. Now you can upload MP4 videos to Youtube, Facebook and Vimeo or Email  for share immediately.

Read More:

Fix Handbrake Rip DVD VOB to MP4 Aspect Ratio Distorted issue

Leave a comment

“I’m skillful at using Handbrake so I don’t know much about it yet. I’ve ripped 720×480 VOBs using DVD Decrypter and I’m now trying to convert these huge VOBs into more size-friendly MP4s with Handbrake. However, when I check “Keep Aspect Ratio”, it locks the dimensions to 720×304.”

If the DVD VOB to MP4 aspect ratio distored issue is not caused by the DVD Decrypter, you can fix the trouble with the suitable settings offered in the two options below:

Solution 1: Open Handbrake on your computer, on the main interface, click “Picture” tab, under this panel, click “Anamorphic”, from its drop-down options, select “Strick”, then the output video will strictly follow with the original file size. If there are still some problem with the output resolution, you will need to check if you have select the appropriate DVD Decrypter.

Solution 2: When decoding DVD or a Video_TS folder, Handbrake would spot the mismatch (2.37:1 stream vs 1.78:1 container) and would defer to the container’s settings. If you have selected “Anamorphic” > “None” option, disable “keep aspect ration”(since the reported PAR is wrong) and manually set the frame size to 720×400.

If the aspect ratio distored issue has some relationship with the DVD Decrypter, an alternative solution for DVD Decrypter + Hanbrake will be the best solution. Pavtube DVDAid for Windows/Mac (Top 5 DVD Ripper Review) is recommended to assist you to perform DVD VOB to MP4 conversion. This powerful tool is capable of ripping copy protected DVD VOB file to MP4, AVI and various other popular file formats. With its bonus “Crop” and “profile settings” function, you can flexibly adjust the output video file size to make it more suitable.


Other Download:
– Pavtube old official address: http://www.pavtube.cn/dvd_ripper/
– Cnet Download: http://download.cnet.com/Pavtube-DVDAid/3000-7970_4-76158510.html

Step by step to use Handbrake alternative to rip DVD VOB to MP4?

Step 1: Add DVD VOB files to the program.

Start up the program on your computer, click “File” > “Add Video/Audio” from load VOB files to the programs, all the added files will be listed in the left displaying windows on the main interface.

Step 2: Choose output file format.

Click the “Format” bar, from its drop-down list, select “MPEG-4 Movie(*.mp4)” in the “Common Video” category as the output file format.

Output DVD VBO to MPEG-4 format

Step 3: Keep original aspect ratio.

To keep original aspect ratio, make sure the “Display aspect ratio” and the “Size (pix)” in “Settings” option are all set as “Original”. If you want to keep the cropped aspect ratio, the program offers several aspect ratios for you to choose from, including 16:10, 16:9, 5:4, 4:3, 3:2, and 2:1.

Output Profile Settings:

Step 4: Start DVD VOB to MP4 conversion.

Click “Convert” button to start to convert copy protected DVD VOB to MP4 with the appropriate aspect ratio.

When the conversion is completed, hit “Open output folder” to find out where the converted files are saved.

Further Reading:

Convert DVD VOB to YouTube FLV file?

5 Method for viewing VOB files on Mac

Add and convert DVD VOB movies to Galaxy Tab 3 playable mp4 format

Stream VOB to Plex Media Sever With Best Profile Seamlessly

How to Play VOB on Kindle Fire without Any Hassle?