DVD to SuperDrive – DVD won’t play on SuperDrive?

Leave a comment

Q: “ Hello, I just recently bought a superdrive for my 2013 Macbook Air (Yosemite) and I’ve been using it for burning CD’s, but when I put a DVD in (brand new), it shows up on my desktop, but just gives me a bunch of audio files and won’t allow me to play it. Is it because I don’t have the DVD Player application? ‘Cause my Mac won’t let me download it. Any suggestions? Thanks. “

In the Apple Support Communities, we found the above post. We believe there are many similar posts with similar questions on other communities. Here, Follow this step by step guide to convert DVD Movies to SuperDrive supported video format for playback with ease.

Apple USB SuperDrive a pretty obvious option for MacBook owners. Apple has its own external DVD drive known as the SuperDrive, and it comes with the same aluminum design as the MacBook Pro and MacBook Air, so it’ll match your setup nicely. You might have a lot of DVD collections and want to find the best DVD player that supports almost all DVD playbacks on Mac. Here, you can find top 2 free DVD player as below which allowing you to play any kinds of DVDs:

Top 1: Apple DVD Player

To use Apple DVD Player, simply insert your DVD-Video disc in the computer and it will automatically display the disc’s DVD menu screen. You need to use your mouse to select items on the menu items. You can also use navigational buttons using the DVD Player Controller. If set to full screen mode, you will not be able to view the screen menu bar but can easily access by moving your pointer to the screen’s top. To change window sizes, select size from the view menu or video menu on Mac OS X v10.6 and earlier. To play a movie, click on Play Movie while in the DVD menu. When you play DVD with the DVD Player Controller, you can turn subtitles on or off, skip chapters, fast forward or rewind, stop, pause and much more.

Top 2: QuickTime Player

You can use QuickTime to open DVD movie files on hard disk or DVD. Use Finder or Windows Explorer and either double click on the file or drag it into the QuickTime Player icon. You can also select File from the menu options, click on Open, and navigate to the file you wish to play.

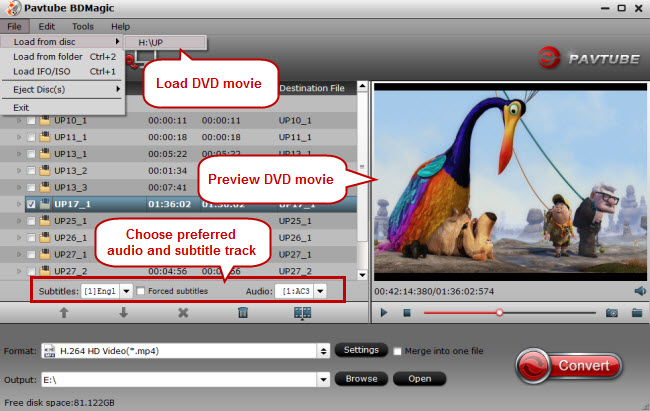
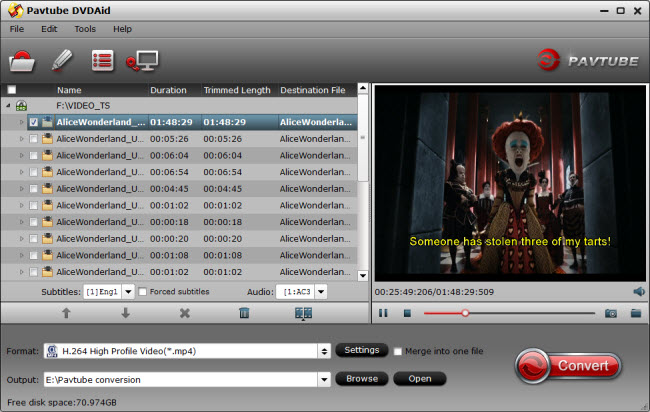
Rip DVD Movies to SuperDrive by use Top DVD Ripper – Pavtube 

Top Free DVD Ripper for Mac- Pavtube Free DVDAid for Mac

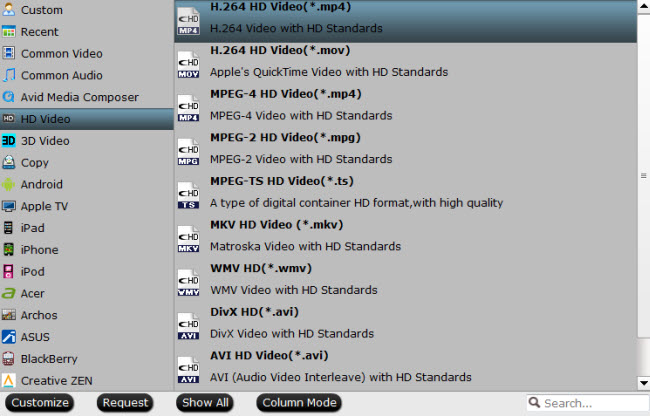
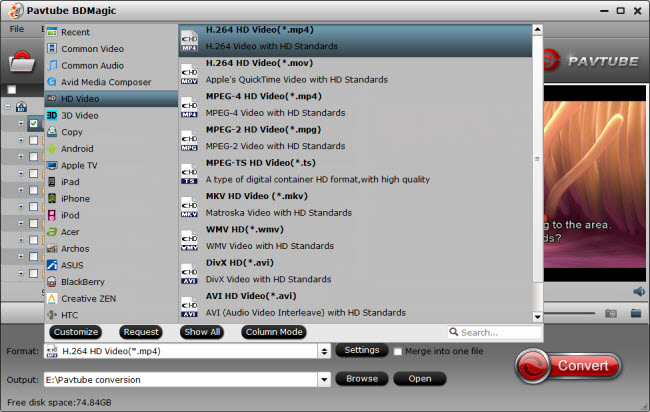
This free DVD Ripper for Mac offers you a fun, easy and fabulous way to rip DVDs, according to Pavtube, the giveaway version has all the features of regular DVD Ripper except it cannot output as MP4 nor does it have specific output profiles for electronic devices. Also be sure to check our Active Sales list for more free and cheap software!

  • Rip DVDs to MOV, MKV, AVI, MPG, VOB, WMV, FLV, etc with fast speed.
  • Helps edit DVD and add SRT/ASS/SSA subtitles to DVD movies.

Pros: Easy to use; Editing features; Support dealing latest DVD disc

Cons: Can’t convert video to mp4 format

OS:  Mac OS X Yosemite 10.10, 10.9 Mavericks, 10.8 Mountain Lion, 10.7 Lion, Snow Leopard10.6, Leopard 10.5

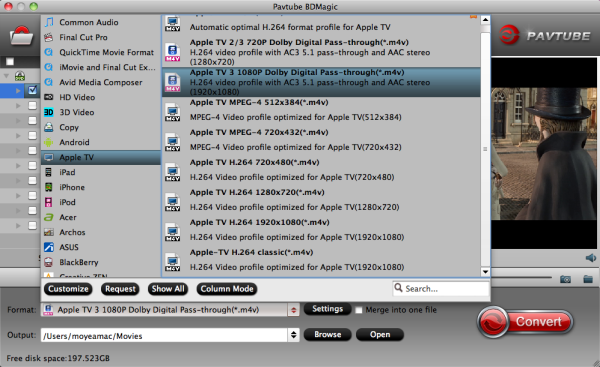
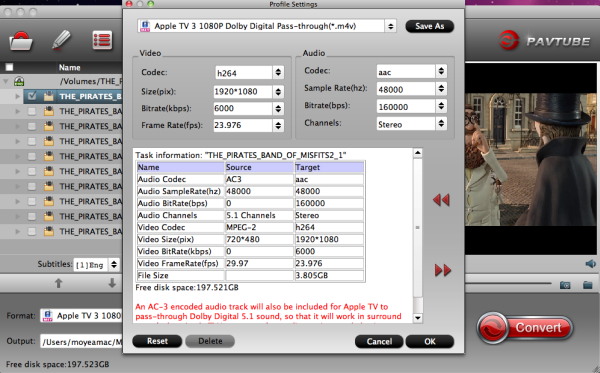
Upgraded full version – DVDAid for Mac (Alternative Windows version DVDAid )

Main features:

  • Best DVD ripping software on the market
  • Rip and convert DVD movies to MP4/AVI/MKV/WMV,etc with high quality.
  • Makes 1:1 copy of original DVD Disc without quality loss with all audio streams, subtitle tracks, extras, etc.
  • With CUDA/AMD GPU acceleration, and you will take short time of converting and get hours of enjoyments.
  • It’s simple to use and well worth the investment.
  • Support latest DVD
  • features with adding *.srt and *.ass subtitle

The steps refer to: Pavtube DVDAid for Mac Online Help

Tip:

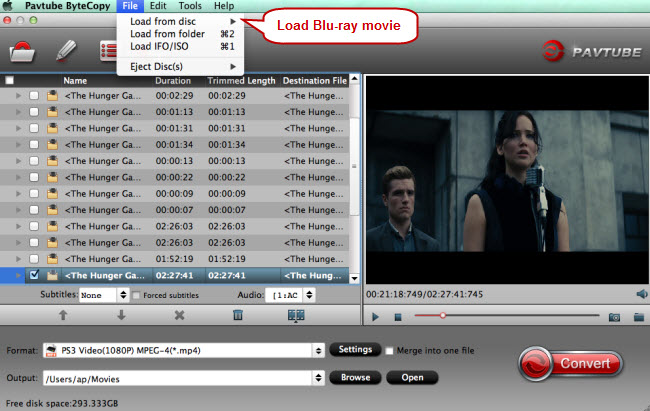
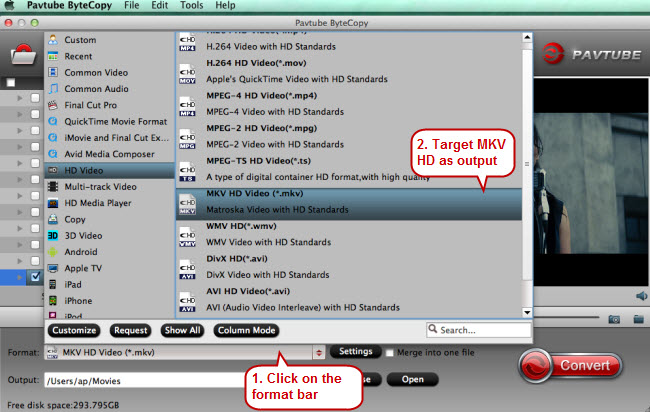
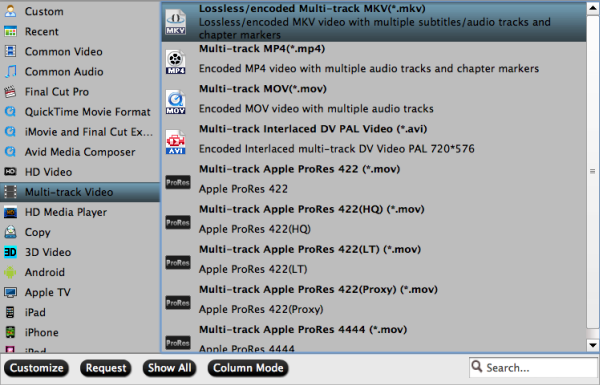
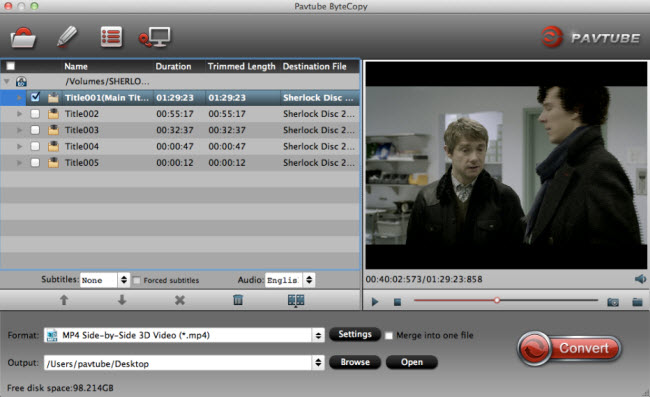
Want to rip your Blu-ray/DVD movies to 3D videos for playback? Want to convert or backup your Blu-ray movies and DVDs with keeping original multiple audio tracks and subtitle , trying Pavtube Bytecopy (Win/Mac). (Learn why choose it).

Now, you can get your favorite DVD Movies to SuperDrive on Mac for smoothly playback. Have a good time!

Read More:

Rip, Copy and Backup Fast & Furious: 6-Movie Collection (Blu-ray+DVD)

Leave a comment

Are you a big fan for Fast & Furious series? If you have collected Fast & Furious: 6-Movie Collection, you may want to put those movies to computer, iPad, iPhone, Galaxy Tab and more other media devices for enjoying at home or on the go. To do this, you should rip Blu-ray and DVD to playable digital videos first. Below we will throw a quick tutorial up, guaranteed to effortlessly backup Fast & Furious: 6-Movie Collection to hard drive to keep them away from being damaged, and rip Furious series Blu-ray/ DVD movies to virtually any format you need.

For copying Fast & Furious: 6-Movie Collection (Blu-ray+DVD) on PC/Mac for backup or for watching on portable devices on the go, you need to remove the Blu-ray/DVD copy protection first. Then Pavtube BDMagic for Win/Mac will be a great helper.

They make the best Blu-ray/DVD ripping & copying software out there. It’s by far my favorite — very easy to use, fast, and high quality. The first thing you want to do is click the link at the below for a free trial download of this software. That link will start an instant download of this program. Download and install the application from the link above, and you’ll be able to try it out for free. If you like it you can register and buy for the full version right from the program itself.

Below is the detailed features:

  • Remove the Blu-ray/DVD protection from Fast & Furious: 6-Movie Collection (Blu-ray+DVD) effortlessly
  • Convert Furious series (3D)Blu-ray/ DVD movies to virtually any regular formats MP4, MOV, MKV, FLV… to play anywhere
  • Extract Blu-ray/DVD background music to AAC, MP3
  • Backup your Furious Blu-ray/DVD movies without losing any quality

Windows Download      Mac Download

Backup Fast & Furious: 6-Movie Collection (Blu-ray+DVD) on PC/Mac Effortlessly

Step 1: Load Blu-ray movies into the program

Once you run the Furious Blu-ray/DVD Ripper, click BD disc button to load Blu-ray/DVD fromr your drive up into the Blu ray ripping program.

Load DVD movie

Step 2. Decide Blu-ray Copy Mode

A. Full Disc Copy Mode: Copy Furious Blu-ray/DVD Disc to a full Blu-ray/DVD folder containing all the content in original disc.

B. Directly Copy Mode: Backup Furious Blu-ray and DVD Disc to a file with M2TS or VOB as filename extension. This mode enables copy movie only from Blu-ray discs, compared with former mode, save time in copying BD/DVD Disc and space to store the output M2TS file to make reasonable and practical use.

Step 3: Choose an output video format

If you wanna rip Furious Blu-ray/DVD to your needed file types, you need specify a format as output format. Click on the dropdown menu of “Format”, and then choose your needed one from the multiple output format presets. You can rip Blu-ray to MKV, MP4, MOV, WMV, or rip Blu-ray for playback on iPad, iPhone, Xperia Series, Galaxy Tab and more other portable devices you can think of.

Choose output format

Tip: Click “Settings” button, then you are able to adjust all the settings in the following window to customize the output file quality, including codec, size, bit rate, frame rate, sample rate and audio channel.

Step 4: Rip and copy Furious (3D) Blu-ray/DVD movie

Once the above mentioned steps are finished, you can click “Convert” button to copy Fast & Furious: 6-Movie Collection (Blu-ray+DVD) to either the hard drive of your PC, or to your portable devices. When the copying/ripping task is completed, you can click “Open” button to get the ripped files for transferring to portable devices and you can easily enjoy them everywhere you wish to.

That, my friends, is how to backup Fast & Furious: 6-Movie Collection (Blu-ray+DVD)- the absolute best way to do it. Go ahead and give that a try. Enjoy having your favorite Fast & Furious: 6-Movie Collection in PC/Mac and any media devices now!

Tips: Top 3 Reasons to Use Pavtube BDMagic

1. Convert & Copy

The first freature we look for in any Blu-ray ripper application is the ability to remove the copy protections found on commercial discs. Pavtube bonus features bypassing Blu-ray DVD copy protections like CSS and region coding for personal use.

2. Video Editing Tools & Settings

Adjust technical aspects of your video such as resolution, aspect ratio, frame rate and more, this software comes with a video-editing module that allows you to alter the video and provides flexible settings for advanced users before you rip it onto your hard drive.

3. Various End Use

This Blu-ray Ripper has the abilities of fast copying any Blu-ray and DVD to AVI, MP4/H.264, MPEG, WMV, FLV, MOV, M2TS, etc. for saving on USB, hard drive, Chromecast, computer stick and so on, and converting DVDs to be friendly with Apple iPhone/iPad/iPod/Apple TV, game consoles, as well as Samsumg, HTC, Google, Microsoft, Huawei, Asus, Acer, Nokia and Motorola mobiles and tablets in terms of both file format, aspect ratio and the like. Latest Windows 10 and Yosemite 10.10 are supported.

Continue Reading:

Pavtube DVDAid v4.8.6.0 50% OFF/Giveaway for 2015 Mother’s Day!

Leave a comment

With the coming of Mother’s Day 2015, have you had any good idea of your gifts for your dear Mummy? Great news for all multimedia software users for the upcoming Mother’s Day: Pavtube launches a big Mother’s Day Promotion for all multimedia software users to celebrate Mother’s Day until May 14th.

To commemorate Mother’s Day, everybody who like our Facebook is welcome to get Pavtube DVDAid v4.8.6.0 50% OFF, which is a powerful all-in-one utility integrated by DVD Ripper, DVD Copy, DVD Editor, etc. Or you can also get Pavtube DVDAid as free gift if you Facebook Community activities. See other Mother’s Day specials below:

2015 Pavtube Mother’s Day Promotion

Promotion period: until May 14,2015

The promotion content:

1. Official Website 20% – 40% discount

a. List of 20% off Discount for all-in-one tools from May 10th to May 12th

Pavtube Video Converter Ultimate

All in one solution to convert Blu-ray, DVD, MP4, MOV, MKV, MXF, TiVo, JPEG, BMP, et to any video and audio format. The decoding and encoding of H.265/HEVC codec, create 3D movies from 2D or 3D resources is also supported by the program.

Pavtube iMedia Converter for Mac

A distinctive Mac video conversion tool to comprehensively handle all common SD and HD video, copy 2D/3D Blu-ray and standard DVD with original structure, convert all Blu-ray DVD collection to any video and audio format for all portable device.

b. List of 40% off discount video conversion tools on May 10th

Pavtube Video Converter for Mac (for Windows)

Have full access to SD videos,digital camcorder recordings, DVR videos on devices such as Apple/Android/Windows series, media players, game consoles and video editing programs.

Pavtube HD Video Converter for Mac (for Windows)

Turn Sony/Canon/JVC/Panasonic HD footage and 1080p/720p MKV, MOV, MXF, MTS, M2TS, M2T, TS, M4V, MP4, AVI, MPG, VOB, WMV, 3GP, FLV videos to any video format.

Pavtube MTS/M2TS Converter for Mac (for Windows)

Convert Sony/Canon/JVC/Panasonic recorded MTS/M2TS/M2T/TS/MOD/TOD footage to play on media players or edit with Premiere Pro, Avid Media Composer, Final Cut Pro, etc.

Pavtube MXF Converter for Mac (for Windows)

Converting MXF video files generated by Canon/Sony/Panasonic camcorders to various video formats such as H.264/MPEG-4, MKV, MP4, AVI, MPEG, WMV, FLV, SWF, F4V, etc.

Pavtube iMixMXF (for Windows)

Transcoding MXF video files to Multi-track Apple Prores MOV for Final Cut Pro or Multi-track MP4/MKV format for other video editing program and media playback devices.

Join Pavtube Facebook to enjoy 50% off discount and Giveaway

Still not satisfied with the promotions listed above, just visit Pavtube Facebook Official Community and join the 3 activities below for big discounts on more products.

a. Activities 1 on May 10th

Leave the most touching words you want to say to your mother on our official campaign pages and click “Like Us”, we will send you a 50% discount coupon code for our Pavtube HD Video Converter for Mac (for Windows).

b. Activities 2 from May 7th to May 14th

Click to like Pavtube Facebook Official Home Page, you will gain a 50% off discount for the following products:

Pavtube Video Converter Ultimate & Pavtube iMedia Converter for Mac

Pavtube BDMagic for Mac(for Windows)

Pavtube ByteCopy for Mac(for Windows)

Pavtube DVDAid for Mac

Pavtube HD Video Converter for Mac(for Windows)

c. Activities 3 from May 7th to May 14th

In addition, users forward our post page and write a review for any of our products, email the screen-shots of your review to support@pavtube.com or macsupport@pavtube.com. We will pick out the first twenty reviews we receive and send the review writers one of your desired software from our product list for free.

Wish all mothers in the world have a happy, healthy and wonderful holiday!

To get more detailed information about the 2015 Mother’s Day Big Promotion, you can check the promotion link below:

http://www.multipelife.com/pavtube-2015-mothers-day-giveaway.html

Backup Furious 7 Blu-ray on Windows 10 with ease

Leave a comment

Furious 7 has been released on 3 April 2015 and movie fans swarm into theater to watch the last movie Paul Walker has filmed. Wake up and realize that “Fast & Furious 7” movie is approaching? Can’t wait to pre-ordered the much-anticipated movie in Blu-ray and expect to backup Furious 7 movie on Blu-ray onto latest Windows 10 to prevent your Blu-ray disc from being damaged?

Backup Furious 7 Blu-ray on Windows 10

Backup Furious 7 Blu-ray onto Windows 10? You can Make it!

Skipping Windows 9, Microsoft has announced Windows 10, which they claim has superior features and changes. However, not all the differences are positive. For example, we still do not have a glue on whether Microsoft will bring back the Blu-ray playing function that is lost on windows 8. (Read Windows 10 VS Windows 8 Comparison) If we want to copy Furious 7 Blu-ray on Windows 10 tablet or smartphone, we have to find a Blu-ray to Windows 10 Ripper to help you rip and copy Furious 7 Blu-ray to Windows 10 compatible video format like MP4 with ease.

Software Requirement:

Here we come to Pavtube BDMagic (Read review) as an example, because it wins the market mainly by public praises and recommended as the best and most cost-effective Blu-ray copying and ripping software. It combines a Blu-ray/DVD ripper, Blu-ray/DVD copy, Blu-ray/DVD Audio extractor and Blu-ray/DVD video editor, etc. together. For the Blu-ray ripping part, it is powerful and stable to remove all known Blu-ray copy protections and embrace Furious 7 Blu-ray, Blu-ray folder and ISO  file to Windows 10 tablet or smartphone compatible MP4 format with excellent quality of sound and pictures. More, you can also rip your Furious 7 Blu-ray to any formats compatible with iPad Air, iPad Mini 3, iPhone 6/6Plus), Apple TV 3, Surface 3, Galaxy S6/Note 4, HTC One M9, Xperia Z4, PSP, Xbox, Plex, WD TV, PS3, Smart TV, etc. for playback or storage at will.

  • Fast rip Furious 7 Blu-ray without any quality loss;
  • Convert Furious 7 Blu-ray to Windows 10, iPad, iPhone, Android supported MP4 with zero quality loss;
  • Extract Furious 7 Blu-ray background music to MP3, AC3, AAC, OGG, etc.;
  • Review CSS, Region or some other Blu-ray protection.

Note: Please make sure that all the Blu-ray ripping are just for personal use.

First, buy or download and install the best Blu-ray Ripper for Windows 10 on your computer:

Windows Download      Windows Buy

Guide of ripping and copying Furious 7 Blu-ray to Windows 10

Step 1. Load Furious 7 Blu-ray movie

Insert your Furious 7 Blu-ray in the drive, then launch the Blu-ray to Windows 10 ripper software, add or load your Blu-ray movie or your ISO file. You can then choose the subtitles and audio tracks you prefer. In order to save time and space in your PC, you can rip only the Main Title;

Step 2. Select Output Format for Windows 10

For Windows 10 tablets/phones, you can either find the device icon and select it as output format or simply choose “Common Video > H.264 High Profile Video(*.mp4)” or “HD Video > H.264 HD Video(*.mp4)″. (Learn Windows 10 Supported Media Formats)

Choose output file format

Step 3. Start converting Furious 7 Blu-ray movie

After all necessary settings, simply click the big “Convert” button to start converting the Furious 7 Blu-ray to Windows 10 compatible MP4 video with high quality. Wait for the conversion to complete and click “Open” to get the converted movie instantly. After that, you can connect your smartphone or tablet to computer via a USB device and transfer Furious 7 movie for enjoyment anywhere you go.

Action now, just getting the best Windows 10 Blu-ray Ripper software and start ripping Furious 7 Blu-ray to any Windows 10 devices playable format with excellent quality!

Tips: How to watch Furious 7 Digital Copy to Windows 10 devices?

Nowadays, many Blu-ray/DVD discs you purchased come with an additional Disc – Digital Copy which is a digital version of the movie and you can play it on that computer’s display. However, due to Digital Rights Management (DRM) in digital copy, we can’t play DRMed files on unauthorized devices. To watch Furious 7 Digital Copy movie on Windows 10 devices, we need a Digital Copy DRM Converter to remove DRM protection from Furious 7 DVD Digital Copy and convert Digital Copy movie to Windows 10 friendly format. Here is a similar reference article.

Continue Reading:

How can I watch DVD movies via StreamToMe on iPad Air 2, iPad Mini 3

Leave a comment

Transferring some videos stored on the PC/Mac to iPad and iPhone can definitely add more fun to our journey and help us to kill the time. However, it is always a time-consuming task to sync video files via iTunes. This is exactly why StreamToMe comes.

StreamToMe is a media player application for Macs and iOS devices that plays video, music and photo files (in a wide variety of formats) streamed over the network from another Mac or PC. Then wouldn’t it be nicer if you could simply stream your collected DVD movies from computer to StreamToMe and playback on iPad Air 2, iPad Mini 3 instantly anywhere?

stream collected DVD movies from computer to StreamToMe

Question:

I travel a lot (about 9-10 month per year) and I am very new to StreamToMe and so I would like some help on getting my DVD movies off my computer onto StreamToMe for streaming to my iPad Air 2 or iPad Mini 3 for watching while travelling. Right now I posses over 500 DVDs, every Star Trek episode and movie, Hard to find movies (Song of the South). How can I backup DVD on StreamToMe for playback freely? Any suggestions? Thanks.

Sometimes you have been having a feeling of “Had I known that the StreamToMe does not play DVD” or you are wondering “can you play DVD on StreamToMe”. In fact, although ServeToMe server is a great stream media player for playing moives, unfortunately it only supports limited formats like AVI, WMV, MP4, etc. When streaming from a ServeToMe server, StreamToMe cannot stream from DVDs. What a pity!

And see what video format can play on ServeToMe:

  • ServeToMe Video supported formats: MP4, AVI, MOV, FLV, MPG, MKV, WMV
  • ServeToMe Audio supported formats: MP3, AAC, FLAC, ALAC, M4A

For more on supported and unsupported file formats visit here.

So what if you want to stream DVD movies to ServeToMe for playback on iPad Air 2, iPad Mini 3? Here offers you an easy and effective way: to convert DVD movie to ServeToMe compatible video first; so that you can play it with your iOS devices. To help you easily achieve this, Pavtube DVDAid is highly recommended. (Read reason to choose it)

With it, you can easily rip DVD movies to ServeToMe supported MP4, AVI video files quickly with excellent output video quality in just a few clicks. Besides converting DVD files, it can also compress a DVD to smaller file size, saving the space for your console if you need. In addition, the built-in editor allows you to customize your DVD videos to get the very part and effect you want with ease. Now just download or buy the program and follow the easy guide below to convert and transfer DVD movies to ServeToMe for entertainment on iPad Air 2, iPad Mini 3.

Windows Download     Mac Download

Rip DVD to ServeToMe for streaming to iPad Air 2, iPad Mini 3

Step 1. Load DVD files

Insert your DVD into your DVD-Rom. Then click the Load DVD button to import the DVD movies or click the drop-down menu of “File” button to add files to this DVD ripper. DVD folder, ISO and IFO files are also supported.

Load DVD ISO

Step 2. Choose output video format for ServeToMe

For streaming to ServeToMe, you can simply choose Common Video > H.264 High Profile Video(*.mp4) or HD Video > H.264 HD Video(*.mp4).

Note:  The output format is preferably in a common format, like MP3 for audio, MPEG-4 for video. The more common format you use, the more devices you can stream to. Just keep in mind that not all devices support all formats of media.

Choose format for Roku 3

Tip – Advanced Settings:

If you like, you can click “Settings” to change the video encoder, resolution, frame rate, etc. as you wish. Keep in mind the file size and video quality is based more on bitrate than resolution which means bitrate higher results in big file size, and lower visible quality loss, and vice versa.

Step 3. Start Ripping DVD to MP4 for ServeToMe

At last, click the “Convert” button to begin converting DVD movies to ServeToMe playable video (MP4). The conversion will be finished only in a few seconds.

When the conversion is over, click “Open” to locate the ripped MP4 video files. After that, follow the steps below to setup the ServeToMe server and transfer the converted videos to iPad Air 2, iPad Mini 3 for enjoyment on the go while travelling.

1. Setup the ServeToMe server

a. On Windows, the ServeToMe program will start automatically at the end of the installation process. (If you see a message about Bonjour missing while running ServeToMe on Windows, we strongly recommend that you install Bonjour for Windows. While not required for ServeToMe, it can make a number of networking features significantly simpler.)

On the Mac, you should open the Applications folder and launch ServeToMe or locate ServeToMe in the Launchpad (Mac OS X 10.7 or newer) and launch it from there.

When ServeToMe is running, there will be an icon in right of the Mac menubar or right of the Windows notification area (aka System Tray in the taskbar).

b. StreamToMe works well with videos up to 1080p as well as the retina display. So just download StreamToMe app from AppStor, run it and then follow these detailed steps to connect your iPad/iPhone with StreamToMe.

2. Add converted files to shared folder

By default, ServeToMe will attempt to locate the default Movies/Videos folder for your account and add it to the list of Shared Folders. It may also add the Music or Photos folders for your account. If your media is stored in different locations, then use the “+” button underneath the list of Shared Folders to add the locations where your media is stored.

3. Playing media in StreamToMe

a. Launch the StreamToMe app on your iOS device, then StreamToMe “Servers” screen will appear. When you tap any file in StreamToMe, it will show a brief loading message and then play. Loading times can vary from less than a second to about 20 seconds depending on the network and any live-conversion the server may need to perform.

b. By default, the fullscreen player will appear. You can use the controls to seek within the file, skip to the next or previous file, skip back 30 seconds, select an AirPlay device (Apple TV or AirPlay enabled speakers).

Starting playback your DVD movies via StreamToMe on iPad Air 2, iPad Mini 3!

Additional Tip:

If you get some MKV, FLV, M4V, WMV, MOV, AVI, Tivo, XAVC, M2TS etc. videos, and have trouble to stream these Videos on your StreamToMe, you’re in the right place. Similarly, we need to solve the problem is still compatible format. Get Pavtube Video Converter Ultimate to transcode SD/HD Video files to StreamToMe friendly format .mp4 with the best video/audio parameter settings. Download this software and follow the steps to try it out now!

Windows Download      Mac Download

That’s all!

Continue Reading:

Rip and Stream music DVD to Apple TV on Mac

Leave a comment

Apple TV offers its users with full HD 1080p output as well as AirPlay functionality. Talk about the latest technologies Apple TV does not disappoint in this area, it comes with iCloud backup of the TV, and iTunes Match, Photo Stream, among other evident technologies. Of course, most of us are not to pay iTunes ridiculous prices to watch movies and TV shows we already own on DVD like a music DVD. Instead, we’ll just need to rip those music DVD discs to an Apple TV friendly format. Here I will put a quick guide for moving music DVD to Apple TV on a Mac.

Convert music DVD to Apple TV for playback on Mac

To copy music DVD to Apple TV on Mac, a DVD Ripping software is needed. There is a number of DVD Ripping software available to help you convert DVD videos on Mac. These software programs vary, so you might be confused when you have to choose one. If so, you are recommended to use Pavtube BDMagic for Mac. It’s rated as the best solution out there to rip music DVD movies for Apple TV playback on Mac. For windows users, read this review.

This professional DVD Ripper for Apple TV is specially designed for the Apple TV users to convert and rip your music DVD to Apple TV compatible format H.264 or MPEG-4 at super fast speed on Mac. This smart program provides the video presets for Apple TV, Apple TV 2 and the New Apple TV (Apple TV 3). What does that mean? That means you can convert DVD to videos with optimized settings for different Apple TVs and you don’t need to worry about the incompatibility anymore! Besides, with this program, you can freely select wanted subtitles for your DVD movies. I’ve found the quality to be excellent, and see no difference when compared to playing the discs themselves.

Free download it and follow the steps below:

Mac Download      Windows Download

The Steps: How to convert and copy music DVD to Apple TV on Mac

Step 1: Install and start  the Mac DVD to Apple TV converter. And then insert your DVD to your Mac DVD drive and click Load DVD button to load the movies from your DVD discs. You can also import ISO files, IFO, DVD Folders.

Tip: Freely select the subtitles for your DVD movies from the “Subtitles” option. Thus, you can watch DVD movie on Apple TV with preferred subtitles.

Step 2: Click on Format bar to and choose an output format for Apple TV. Move your pointer to Apple TV. For Apple TV 2/3 users, please select the “Apple TV 3 1080P Dolby Digital Pass-through(*.m4v)” or “Apple TV 2/3 720P Dolby Digital Pass-through(*.m4v)” will be suitable. For Apple TV users, Apple TV H.264 (*.m4v) will be better to keep the videos in HD.

Tip: Click on settings you could easily set bitrate, frame rate, codec, channels, sample rate, etc to adjust parameters that affect video quality and file size for the video you prefer. keep in mind that bitrate higher results in big file size, and lower visible quality loss, and vice versa.

Step 3: Click Convert button to begin converting music DVD to Apple TV immediately. The conversion will be finished only in a few seconds.

After the music DVD to ATV conversion, you can get the output H.264 video. Now stream the converted DVD movies to your Apple TV. Have fun.

Then, if the converted H.264 files contains AC3 5.1 sound, how to make full use of them?

From the specifications of the new Apple TV, the supported file format is H.264 video with stereo audio in .m4v, .mp4, and .mov file formats. Besides, the iTunes can not support AC3 5.1 files well either. Here there’s the solution to it.

First, with an iPad, you can stream video to Apple TV with AC3 5.1 (Dolby Digital) sound via Airplay.

Then, since the new Apple TV is not able to decode 5.1 surround sound to stereo by itself, if you want to play AC3 5.1 (Dolby Digital surround) audio you will need an AV receiver. Applet TV (including 2nd-gen and 3nd-gen) does not decode the surround audio itself, it will pass through the audio to AV receiver for decoding. If you do not have the AV receiver and connect Apple TV directly to your HD TV with HDMI, then there will be only video without sound while playing surround sound movie. But Apple TV itself just works ok with movie of stereo sound.

The Apple TV DVD Ripper for Mac not only have outputs for all Apple TV models, but also supports creating files compatible with your Android tablet/phone, Surface Pro, Game consoles and other devices.

Continue Reading:

Rip and Watch Blu-ray/DVD Movies through home network with ease

Leave a comment

How to Rip and Stream my Blu-ray and DVD Movies to play over home network?

I’d like to convert my Blu-ray and DVD into a format that is compatible on a home network for streaming. What can I do have a backup before I can share my BD/DVD on computers, hard drives, TV and media servers via home network(LAN) and play the movie?

Hot Search: Blu-ray to Windows Media Player | Blu-ray to iTunes | Blu-ray/DVD to Archos VR | Blu-ray to Roku 3 | Blu-ray/DVD to USB

Rip and Watch Blu-ray/DVD Movies through home network

What you need to stream Movies via home network

Streaming media from online sources provides a huge variety of movies, TV shows, and music that can be rented or watched for free. Still, you may have downloaded movies and music and stored them on your computer as well over home network.

The following things are required when streaming:

1. Media files stored on a computer, external hard drive, network attached storage (NAS) drive, or media server
2. Media-server software
3. An A/V home-network router
4. A connection to the router
5. A media player

How to Watch Blu-ray/DVD Movies through home network?

Most media players and servers would refuse to play Blu-ray and DVD due to disc protection, so the Blu-ray and DVD discs should be compatible with all devices over home network both in formats and specifications. In order to stream Blu-ray/DVD from computer to home network, the first thing you should do is to rip and convert BD/DVD to home network with some professional BD/DVD ripping program, such as Pavtube ByteCopy for Mac which is 50% OFF at 2015 Easter Special lasting to Apr 10th. Time-limited! Never miss! (Read review)

Overall, this program is designed for Mac uses to rip Blu-ray/DVD into digital formats for backup on home network for streaming everywhere. I’ve tried and I find it’s capable of converting just about every title that I own; it’s easy of use and choices for decode/encode to all popular formats playable by TV/network storage. I’ve found the quality to be excellent, and see no difference when compared to playing the discs themselves. The sound can be kept with the original Dolby Digital 5.1 surround sound. Download it and see the detailed tutorial as below. .

Mac Download      Windows Download

How to convert Blu-ray/DVD to backup and play over home network?

Step 1. Launch Pavtube ByteCopy for Mac; import disc.

Inset your DVD to computer; if you want to rip Blu-rays, use an external drive to connect it to your computer. Then hit “load disc” to import the discs. You can also drag and drop Blu-ray/DVD folder, ISO/IFO files to it directly.

Note that you shall keep Internet connected during this period.

load blu-ray movie for ripping to ps3

Step 2. Choose format.

Hit “Format” drop-down list and choose “HD Video > MKV HD Video (*.mkv)” as the most widely used format for playback on TV and Media Players.

convert dvd to mkv for mede8er media player

Step 3. Adjust output settings (Optional)

You can click “Settings” (besides “Format”) to change target video size, bitrate, frame rate and other specs. Change the size to “Original” to get full size picture that can be playback on TV clearly. And the higher bitrate you choose, the better video quality will be.

Step 4. Start the Blu-ray/DVD to MKV conversion.

Back to the main interface and hit the “Convert” to start converting Blu-ray & DVD to HD MKV; this converter will start all the tasks in batch. Wait for a while till the conversion completed; click “Open output folder” to quick locate the converted files. Now set up a Wi-Fi connection to the home network, upload the movies to your network storage, and then stream to TV or media players for playback.

What’s More about ByteCopy for Mac:

1. Wworks at No.1 fast ripping speed and with fantastic output quality;
2. It has the ability to parry all Blu-ray and DVD copy protections (the latest Disney X-program DRM included);
3. Built in with 200+ profiles, it can rip and convert Blu-ray/DVD to MP4, AVI, WMV, MOV, Apple TV, iPhone, iPad, Android, WP8, and so on;
4. Still have some trouble about how to rip BD/DVD to home network video? Please feel free to comment below >>

Continue Reading:

Put 2D/3D Blu-ray to iTunes library for Apple TV viewing

Leave a comment

Have lots of 2D/3D Blu-ray discs to rip in your collection, and want to put them in iTunes DB so that you can view at will on any of the screens via Apple TV? Yet, a general Blu-ray is in MTS format with copy protection. To put a 2D/3D Blu-ray onto iTunes for Apple TV syncing, you need a Blu-ray to iTunes ripper program to remove the protection and rip 2D/3D Blu-ray movie to iTunes compatible video first.

Hot Search: DVD to iTunes | Video_ts to iTunes | MOV to iTunes | AVI to Apple TV

Convert 2D/3D Blu-ray collection into iTunes

To help people with the process of converting 2D/3D Blu-ray collection into iTunes for ATV, below, I’ll throw a quick tutorial up.

The Tool you need:

The current software options for ripping a Blu-ray are virtually endless. From free to costly, easy to complicated, the right ripping tool is completely subjective to the end-user. If you’re looking for ease of use, and don’t mind spending $39.2, I recommend your to use Pavtube BDMagic, (Read review) which can convert 2D/3D Blu-ray, DVD and ISO image files to a iTunes compatible video formats for streaming to Apple TV with easy operation. I’ve found the quality to be excellent, and see no difference when compared to playing the discs themselves. Mac version is here. Free download it and follow the easy steps here.

Windows Download      Mac Download

Importing 2D/3D Blu-ray into iTunes for Apple TV syncing

1. After installing, launch the Blu-ray to iTunes Converter app on your computer. and then press “Load Disc” icon to import 2D/3D Blu-ray movie. Choose “File > Load from ISO/IFO” if you’d like to import Blu-ray ISO image file.

Pavtube BDMagic

2. Click format bar and find the optimized profiles for Apple TV under “Apple TV” category, also you can select “Apple TV 3 1080P Dolby Digital Pass-through(.m4v)” which works well for ATV 3 while maintaining 5.1 surround. To get a compatible format for iTunes, you can choose HD MP4, M4V and MOV format. If you want to keep 3D effect when ripping 3D Blu-ray,  choose the 3D Side-by-Side MP4 format from “3D Video”.

Tip: You can click “Settings” to change the setting from the new default HD profile 4000 to 5000~8000 bitrate (Note: bitrate higher results in big file size, and lower visible quality loss). Learn how to set up Apple TV for Dolby Digital 5.1 pass-through.

P.S. The key setting Video Size for your Apple TV is according to your source video exactly. If your source video is in 1080p such as Blu-ray, you can set your video size in 1920*1080 in H.264 codec; while, if your original video size is in standard, 720p in enough.

3. Press “Convert” to start converting 2D/3D Blu-ray to Apple TV MP4 videos with Dobly 5.1 audio. Wait till conversion completes. Then press “Open” to find the ripped movie.

4. Now you can add 2D/3D Blu-ray rips to iTunes movie library for streaming to Apple TV: Open up iTunes and follow “File>> Add file to Library…” to sync video to iTunes and then stream to ATV. Now you can bring new life to that 2D/3D Blu-ray collection collecting dust in your closet. Have fun!

More topics:

How can I keep English and Hebrew audios and subtitles when playing Blu-ray?

Leave a comment

Question: “I want to transfer my Blu-ray files to my computer in HD MKV format, but can not find the way I can have it in different audio (English and Hebrew) and also have subtitles (Hebrew and English) so family members from different countries can enjoy movies with their own native languages. Is there a way to do it?”

rip Blu-ray to lossless MKV

To transfer Blu-ray for playing with multi-track format, the first step is to remove commercial Blu-ray protection from film studio, and then do the conversion with multiple audio and subtitle tracks keeping. To help him to solve the problem, I tested some softwares and did comparison. Good News: Now I found a professional Blu-ray/DVD Copier & Ripper for Mac – Pavtube ByteCopy for Mac which is an ideal app that can help you remove the strict Blu-ray protection and convert Blu-ray movies to MKV format on Mac with multiple audio tracks and subtitles in great audio/video quality easily. What’s more, it can also help you to get Blu-ray Main Movie backup in original format without extracts and convert latest Blu-ray discs to your portable devices for playback on the way. ByteCopy for Mac combines all features in BDMagic for Mac such as various output formats selection, editing options support, etc. In other words, you get two Pavtube products in one.

Hot Search: Pavtube Products Comparison | Blu-ray Ripper Review | DVD Ripper Review | H.265 Video Converter Review | DRM Converter Review

Just free download or buy this best multi-track Blu-ray Ripper with 50% OFF discount at 2015 Easter Promotion:

Mac Download      

How to rip Blu-ray to lossless MKV with keeping multiple languages on Mac computer?

Step 1: Load Blu-ray movies.

Launch the best Mac Blu-ray to Multi-track Converter; import Blu-ray movies into the program. Loaded Blu-rays can be previewed in the right preview window.

Mac Blu-ray to Multi-track Converter

Step 2: Choose output format

To rip Blu-ray with multiple tracks, click the drop down box of “Format”, and choose the profile under “Multi-track Video”. This profile is designed to output videos with multiple audio tracks. To keep multiple audio and subtitle tracks from Blu-ray Disc, you are recommended to choose “Multi-track Video” > “Lossless/encoded Multi-track MKV (*.mkv)” for output.

Lossless mkv format

P.S. You can keep and uncheck the audios and subtitles you don’t need and only leave English and Hebrew audio tracks and subtitles, and save your settings.

Step 3: The last step you need to do is hit the “Convert” button to start the conversion of Blu-ray content to MKV with original subtitles, audios and chapters you choose. After conversion, find generated files by clicking “Open” icon and you can play Blu-ray Disc with English and Hebrew languges on your computer in your VLC player. And you can choose your desired audio stream when watching. Just enjoy!

Tips: If you have 3D Blu-ray discs, and want to get them playable, you can choose “MKV Top-Bottom 3D Video (*.mkv)”, or “MKV Anaglyph 3D Video (*.mkv)” or “MKV Side-by-Side 3D Video (*.mkv)” which can retain the 3D effect. The windows version is here.

More topics:

How to play Blu-ray/DVD with Archos VR headset

Leave a comment

Archos, the technology company that seems to diversify each time we hear from it, has entered the virtual market with its Archos VR Glasses. The headset is similar to the GearVR in that it requires a smartphone with a screen size of up to 6 inches to provide the display, but it isn’t just reliant on Android devices. It can be coupled with an Android, Windows Phone, or iPhone, any of which can slot into the front of the headset. Instead of going to theater to experience an immersive 3D environment, you can also get all your Blu-ray/DVD videos to Archos VR headset for watching on most smartphones.

play Blu-ray/DVD with Archos VR headset

Here’s how to create 3D movies for Archos VR headset by Blu-ray/DVD to SBS MP4/MKV conversion.

Hot search: ISO to VR Glasses | 3D movie to VR Glasses | iTunes to VR Glasses | VR Glasses Review

Before that, download, install and launch  Pavtube ByteCopy for Mac. (Good News! Since Easter is approaching, Pavtube Studio provides 50% OFF discount on ByteCopy for Mac! It saves your totally half price!) 

With it you can easily convert Blu-ray/DVD movies to MKV, AVI, WMV, MOV, MP4, etc with 3D (ide by Side, Anaglyph, Top/Bottom modes) effect; of course, you can also rip BD/DVD to normal 2D for more widely use. Plus, the original Blu-ray in 1080p can be output just in the same definition, or compressed to 720p video; the choice is yours. Now download app and follow below guide to learn how to Play Blu-ray, DVD on Archos VR headset.


How to Play Blu-ray, DVD movies on Archos VR headset

Step 1: Import Blu-ray, DVD movies

Launch the the Mac Blu-ray/DVD to Archos VR Converter and click “disc” button to import Blu-ray/DVD into the program. ISO and IFO files are also supported.

Mac 3D Blu-ray Converter

Step 2: Select output format

For adding Blu-ray, DVD to Archos VR headset, “MP4 Side-by-Side 3D Video(*.mp4)”  from “3D Video” column can be a suitable choice. (Read Differences Between Anaglyph 3D and Side-by-Side 3D)

Choose SBS 3D MP4 Preset

Step 3: Start conversion

Hit the Convert button; this video converter will start to convert Blu-ray, DVD to SBS MP4/MKV . After the conversion is over, connect the USB drive with computer and head to the destination folder where the converted files are stored and get them to Archos VR headset for enjoyment using its Archos Video Player app without any hassles. Now, just enjoy.

Archos Video Player

Continue Reading: