Convert Blu-ray to HD MKV, MOV, MP4, AVI, MPG, FLV etc

Leave a comment

Many Blu-ray fans are complain that the video quality is not as clear as the original Blu-ray after ripping. Generally speaking, an ordinary Blu-ray movie is often 25-50GB in size while the converted standard videos would be only hundreds of MB. So we have to face the problem that the code compress process would destroy most of unimportant data and the video quality get bad. You may felt so satisfied with the conversion effect, and still searching on search engine like Google.

Then is there an available way to resolve the issue? Of course. The answer is to rip Blu-ray High Definition video formats, for these HD videos are often bigger than standard video and decrease the video damage. So the HD video seems to be lossless compared with the original Blu-ray.

The easiest way to convert Blu-ray to 720p/1080p HD Video Format: 

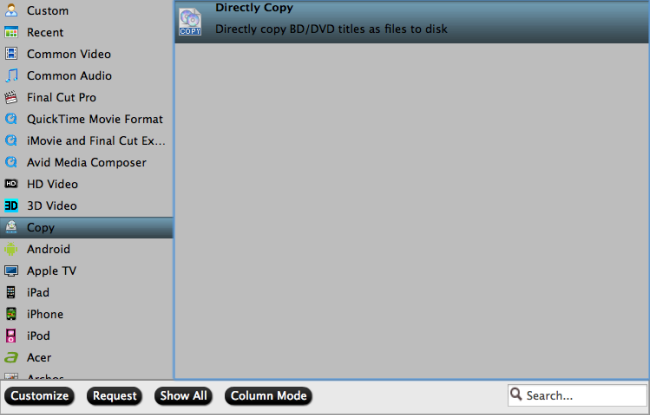
Here, Pavtube BDMagic is the best Blu-ray Ripper and that allows you to convert Blu-ray/DVD to HD MKV, MOV, MP4, AVI, MPG, FLV, etc. of 1280×720 pixels of 1280×720 pixels (720p) or 1920×1080 pixels (1080p), and also a decent Blu-ray copier which is capable of 1:1 copying Blu-ray disccontent to local computer or external hard drive in original file structure with all subtitle tracks and audio streams preserved. Read the review.

With it you can “Full copy your Blu-ray” or directly copy your Blu-rays without extra. You can convert your Blu-rays to more than 200 video/audio formats, and you also can transfer them to your iPhone, iPad, iPod or Anroid Tablets and Phones. More prominent, you can convert 2D Blu-ray or 3D Blu-ray to MP4 with 3D effect, and you can with 3D Movies on home theater. It also comes with editor, you can also edit your Blu-ray by yourself. There are more humane setting, waiting for your visit! For Mac users, you can turn to Pavtube BDMagic for Mac for further usage.

Highlights

  • 1:1 backup Blu-ray without quality loss.
  • Convert 2D/3D Blu-ray to MP4 or other HD video format with 3D effects.
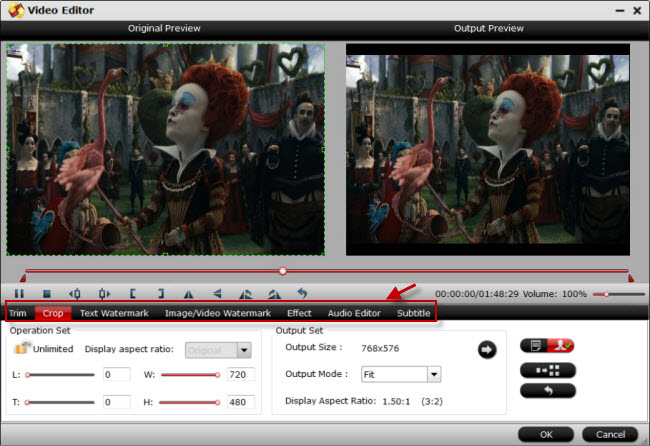
  • Edit Blu-ray by trimming, cropping, merging and add watermark.
  • Freely to choose the audio/subtitles and set the parameter for the format according to yourself.
  • Capable of extracting audio from Blu-ray and DVD movies for iTunes and QuickTime.
  • More…

Availability

Free trial for three months. Only $49 (You can save money at Pavtube summer holiday special offer) for lifetime license and upgrade.


Other Download:

– Pavtube old official address: http://www.pavtube.cn/blu-ray-ripper/
– Cnet Download: http://download.cnet.com/Pavtube-BDMagic/3000-7970_4-75922877.html

How to Convert Blu-ray to HD MKV, MOV, MP4, AVI, MPG, FLV etc videos easily and fast

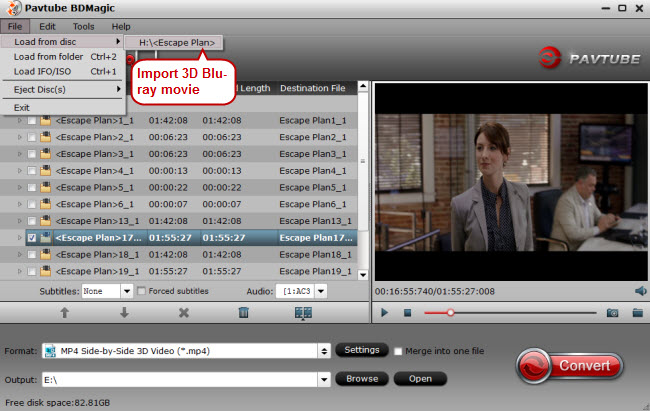
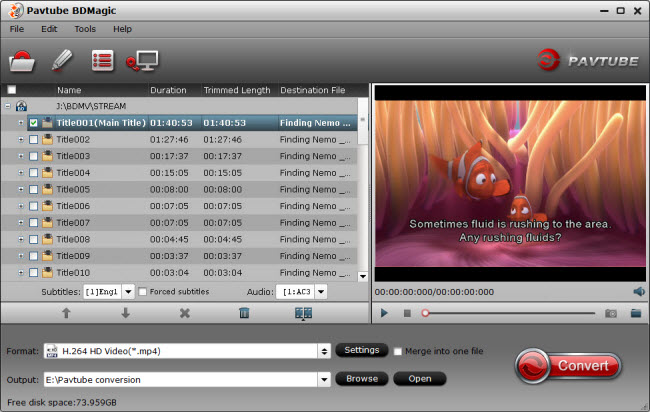
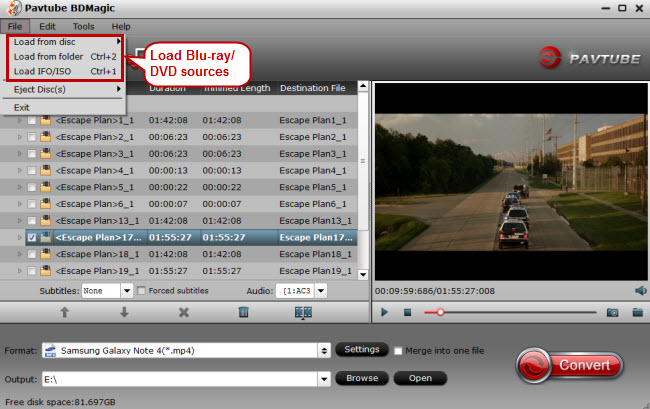
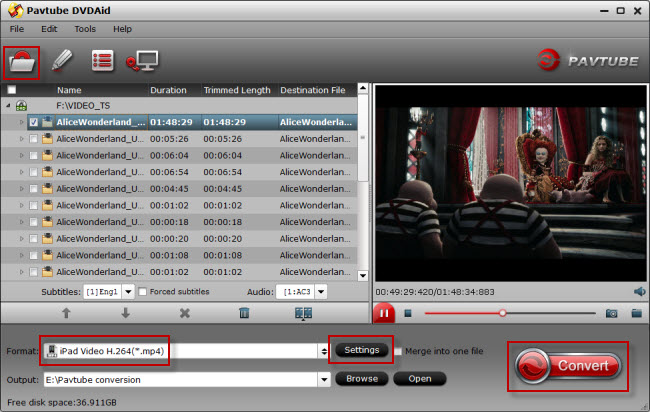
Step 1. Load Blu-ray files to the ripper

Download and install Pavtube TOP Blu-ray Ripper on your computer and run it. Now please insert the Blu-ray disc into your BD drive (necessary for ripping BD). DVD, DVD folders, ISO files and IFO files are also supported.

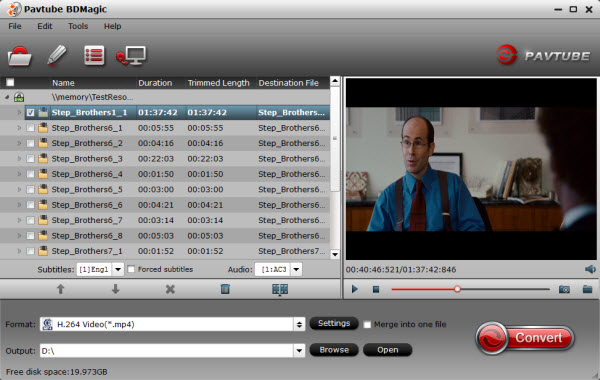
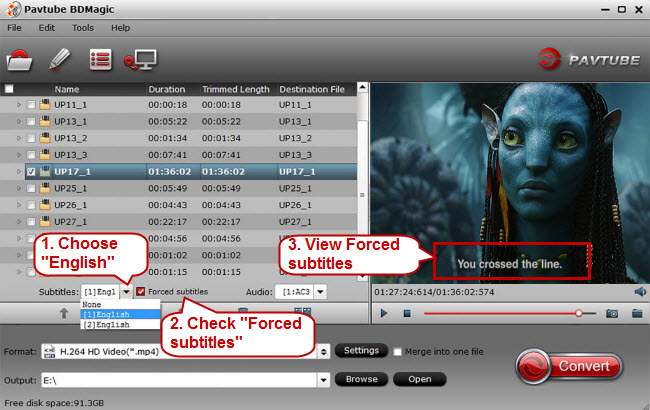
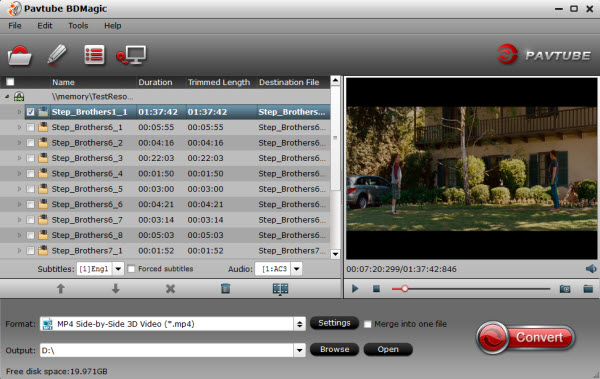
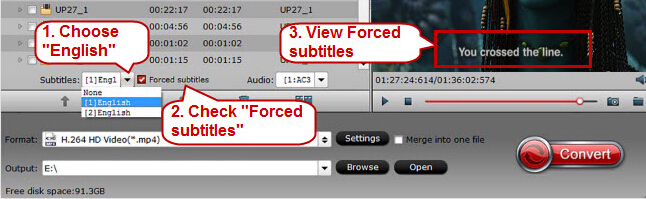
Step 2. Select desired episodes of the movie and set subtitle/ audio track.

When the Blu-ray is loaded to Blu-ray Ripper, you can select subtitles and audio track (English, French, German, Spanish…) for each chapter. Forced subtitles can be attained, too (learn more about setting forced subtitles in Blu-ray/DVD). To set Audio track, click on the Audio box and select an audio track with desired language.

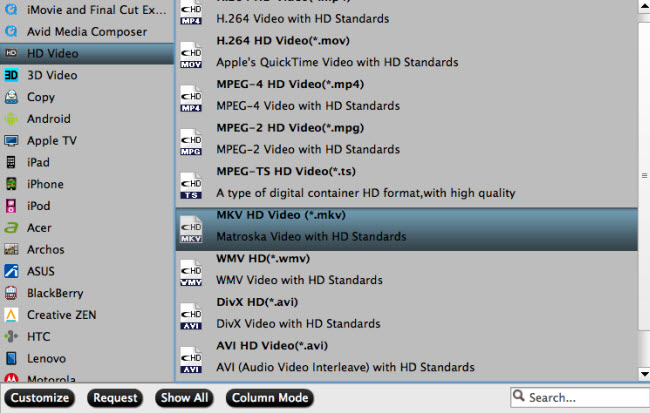
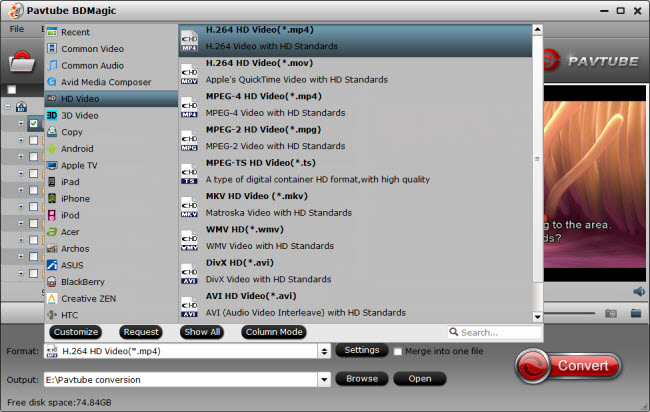
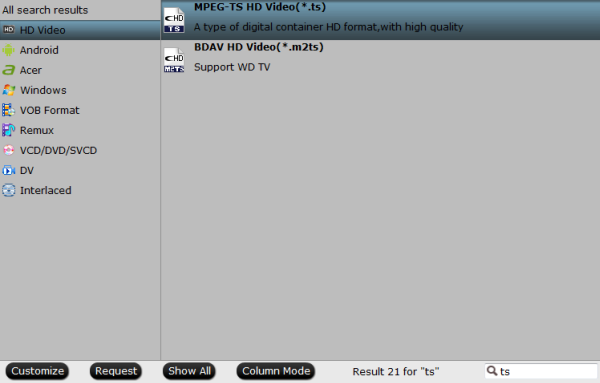
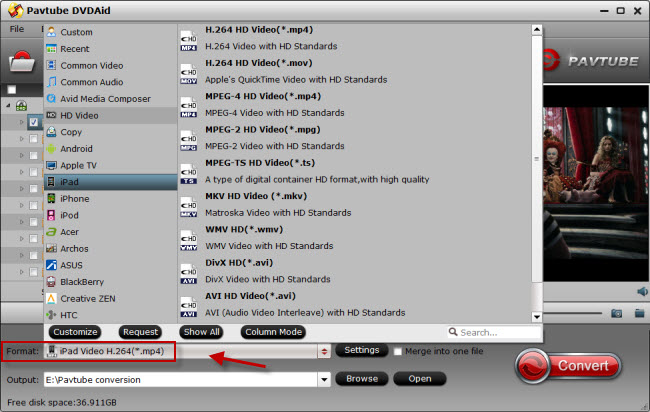
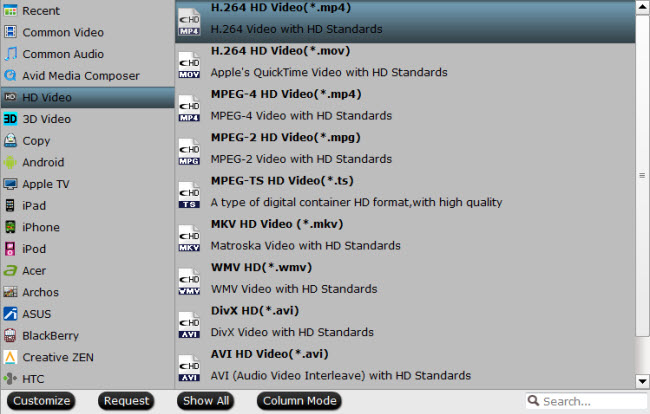
Step 3. Select output format for converting Blu-ray to 720p/1080p HD Video

Click on “Format”, and select output format from the drop-down list. H.264/AVC and MPEG-4 encoded MP4 formats are available. If you would like to play the Blu-ray movies on portable players like iPad, iPhone 6s/6s Plus, iPod touch 6, iPad Pro, PS4, Archos, Xbox One, Pocket PC, etc, simply follow the corresponding profile group and select customized MP4 format. There are 720p preset formats for iPad, Xbox 360PS4, etc.

Learn >> How to Convert 1080p Videos to 720p for Android Portable devices.

If you would like to watch the Blu-ray contents on HDTV via media players (e.g. Western Digital Media Player, Video DVD combos), HD quality should be attained. To maintain 1080p HD video quality, you may follow “HD Video” -> “H.264 HD Video” (*.mp4) or “MPEG-4 HD Video (*.mp4) and customize the A/V parameters based on the media player and your TV. AAC/AC3 5.1 audio is included in the HD video formats by default. HD MP4 formats create 1080p videos that play stunning picture on HDTV and meanwhile down size a 20GB Blu-ray movie to 10GB.

Step 4: Click “Convert” button to start converting Blu-ray to 1080p/720p HD MP4 format at fasted speed.

After the above steps are done, I click “Convert” button to start converting Blu-ray to MP4 video of 1080p/720p or SD quality. And you can click “Open” button to get the generated MP4 files for play back. With a NVIDIA CUDA supported graphics card the ripping time can be down to 2 hours comparing to 6 hours when shrinking Blu-ray movie with previous version.

Tips and tricks:

  • The Pavtube BDMagic rips not only Blu-ray Discs, but also DVDs.
  • Higher bitrate leads to higher video quality and bigger file size. To set higher video quality, click “Settings” and set “bitrate” to “high quality” or type in a high value manually.
  • To join chapters together, simply select the files and check the box of “Merge into one file” before conversion starts.

Note: Much wonderful software bundled with BDMagic will provide you more amazing experience in converting videos. Go to Money Saving Software Bundles to get special offer for more software, such as BDMagic($49) + DVD Creator($35) = Only $49.9, Save $28.1, BDMagic($49) + ChewTune($29)= Only $49.9, Save $28.1 and so on.

Read More:

Rip Blu-ray to MKV/AVI for Linux (Mint) Media PC

Leave a comment

Collect lots of Blu-ray movies and have no time to watch them cozily at home? Now want to watch those Blu-ray movies on your MKV or AVI-supported mobile devices like Xbox 360 or PSP from Linux (Mint) Media PC while on the go? If so, you’re in the right place. Below is a commen situation on ripping “Blu-ray to AVI/MKV files” on Linux (Mint) Media PC:

Q: ” I need a tool which can help me ripping my Blu Rays to store on my home server so I can watch any movie, any time, and I do not have to find the disk. Just search for the movie and double click to watch. I have a Linux (Mint) media PC and also I stream them on my Windows 10 laptop. So, any good suggestions about how to playback Blu-ray on Linux (Mint) media PC with MKV or AVI files which I prefered. Thanks a lot! ”

So if you update your Linux (Mint) Media PC systems to Windows 10 in 2016, you must need an affordable and flexible alternative to an electronic Blu-ray player, Pavtube Windows 10 Blu-ray player softwareenables Blu-ray playback on any Windows 10 PC in 2016. So what is the best, most professional and inexpensive Blu-ray to MKV/AVI player software compatible with Windows 10 in 2016? Here, Pavtube BDMagic will help you out! Read the review.

Hot Search: PC vs Cloud | Backup iTunes Videos | Blu-ray/DVD to DS916+/DS116 NAS | Blu-ray/DVD to Seagate |

Pavtube BDMagic is the 2016 best and most professional, even most economical Blu-ray to MKV/AVI software support Windows 10/8.1 Blue/8/7/Vista/XP. As the leading app in Blu-ray field, it features multi-funcions and advanced technology, including BD + and AACS decrpytion, multi-language, all media formats supported, especially Blu-ray Disc, Blu-ray ISO, super high audiovisual quality. This program has been updated and tested that it is compatible with Windows 10 and help users play any commercial Blu-ray discs on their computers and media devices without any problem. Users can choose to play Blu-ray chapter by chapter or title by title.

Besides playing Blu-ray, this Top Blu-ray Ripper can also play video files on Windows 10. The compatible formats include MPG, MPEG, VOB, MP4, MKV, MOV, AVI, FLV, H.264/MPEG-4 AVC, AAC, AC3, MP3, OGG, WAV, WMA, and so on. Moreover, this amazing player is able to play 1080p HD video with superior video quality.

To create even better viewing experience, this 2016 Windows 10 Blu-ray Player software allows users to freely choose audio track/channel/device and video subtitle. The screen size is also adjustable. This software possesses a user-friendly design- with only a few clicks, users can easily enjoy true home theater experience in 2016 for Linux (Mint) Media PC.

2016 Pavtube Windows 10 Blu-ray to MKV/AVI Rippper Screenshot: 

Key Features of 2016 Windows 10 Blu-ray to MKV/AVI Ripper:

1. Fully Compatible with Windows 10 ,Windows 8.1 Blue, Windows 8, Windows 7/Vista/XP.
2. Fast conversion with NVIDIA CUDA/ AMD GPU acceleration technology.
3. Play any commercial Blu-ray disc/DVD released in different regions.
4. 1:1 backup BD/DVD without quality loss.
5. Create 3D movies from DVD and 2D/3D Blu-ray with high audio and video quality
6. Play Blu-ray folder and ISO files without any quality loss and function miss.
7. Freely choose preferred language, video/audio quality, audio effect, subtitles,etc.
8. Wonderful 1080P video watching experience.
9. Insert SRT/ASS/SSA subtitles. Attach external subtitle file, add subtitles into your Blu-ray/DVD movie and save as personal creation for enjoyment.

User Comments on 2016 Blu-ray Ripper for Windows 10: 

1. “I love this Pavtube Blu-ray Player. It could help me enjoy all my Blu-ray collections on Windows 10 at home. And the video and sound quality is perfect.”

2.”The program is really excellent, simple to use and reliable. With it, I could easily enjoy Blu-ray and video files on my computer conveniently.”

Backup Blu-rays to MKV/AVI for Linux (Mint) Media PC Without Audio/Video Sync Problem

Step 1: Load the Blu-ray Movie

Run your Blu-ray to Linux PC Converter and insert your Blu-ray disc into your Blu-ray drive. Click “file” to find the “ load from disc” choice to import your Blu-ray movie.

Step 2. Click the “Format” option, and choose HD Video > H.264 HD Video(*.mp4) or MKV HD Video(*.mkv) or AVI as output format for Roku/Emby Media Server. MOV, MKV, AVI, etc can also be found in “HD Video” and “Common Video”

Step 3: Customize video presets. If you like, you can click “Settings” to change the video encoder, resolution, frame rate, etc. as you wish. Keep in mind the file size and video quality is based more on bitrate than resolution which means bitrate higher results in big file size, and lower visible quality loss, and vice versa.

Step 4: Backup Blu-ray to Linux (Mint) Media PC. Click Convert button to rip Blu-ray to Linux (Mint) Media PC in MP4 video. Afterwards, locate the created video in output folder.

There you get the job done. You backup Blu-ray movies to Linux (Mint) Media PC successfully and you can stream it on TV and computer without limitation. After you backed up Blu-ray, you still can place these Blu-ray replica to Linux (Mint) Media PC for your conveniently playback.

Read More:

Put Blu-rays onto Personal Samba Server for Further Playback

Leave a comment

If you’ve tons of Blu-ray movies and want to get these movies off of Blu-ray discs and onto Personal Samba Server for streaming with ease, you’ve come to the right place. This article gives you some hints on how to rip Blu-ray to Personal Samba Server for widely streaming to Roku, Xbox One, PS4, Android/iOS devices for playback anywhere. To copy Blu-ray to Personal Samba Server, a Best Blu-ray to Personal Samba Server is highly recommended to help you finish the task. Now learn the Blu-ray to Personal Samba Server brief workflow.

Hot Search: Blu-ray/DVD to Cyberlink | Backup Disney (3D) Blu-ray | Blu-ray to MP4 | Videos to MyBookLive NAS |

Here, I would introduce Pavtube BDMagic to help you digital Blu-rays for Personal Samba Server in suitable video format, such as MP4. Of course, if you want H.265, M3U8, MKV, MOV, AVI, FLV and any other popular format, it also can give you. If you just want to store your Blu-ray movies to Personal Samba Server to view in just one kind portable media players, like iPadApple TV 4iPhone 6, it can offer you the best preset for you which you don’t need to adjust the video and audio parameters on your own. (Learn more in its reviews.)

Note: Apart from Personal Samba Server, the program also has wide compatibility with Synology NAS models such as DS716+DS416/DS216play/DS216seDS215jDS414, etc.

How to Digital Blu-ray Collection to Personal Samba Server?

Step 1: Load Blu-ray discs

Click “File” to load your Blu-ray movie to this program. It will automatically choose the main content to convert. If there are several language subtitles in your Blu-ray movies, you can select the language subtitle you want to show in your movie by “Subtitle”.

Step 2: Specify output format

In drop-down format list, you can choose “HD Video” > “H.264 HD Video(*.mp4)” as output format for nearly all laptops, tablets, mobile phones can play MP4 videos from Personal Samba Server.

Learn Also: Rip 300 DVD Collection to External Drive for Dell/Lenovo/Toshiba Laptops

Tip: If you just want to digital your Blu-ray for more convenient organization and management, you also can choose to full disc copy Blu-ray or main title copy.

Step 3: Start backup Blu-ray to MP4

After all settings done, hit on the “Convert” button and Blu-ray to H.264 MP4 for Personal Samba Server conversion will start. After the conversion completes, open output folder and you will find the converted movies.

Now, the Blu-ray/DVD digitalize ends. You can move them to your personal cloud storage and play them on your Apple TV, PS3, HD TV or other various mobile multimedia players.

Learn>> How To Build a Home Server Using FreeNAS – Tested

Additional Tips: About Pavtube BDMagic

Pavtube BDMagic is a software developed by Pavtube Studio. This software is designed for circumventing copy restriction in Blu-ray/DVD discs and save the content to digital file. It has rich output video/audio format and can fulfill nearly all your needs in video playback on your devices.

– Convert Blu-ray/DVD to 4K/SD/HD MP4, MKV, AVI, WMV, MOV, M4V, FLV, H.265, M3U8, etc

– Adjust A/V size, bitrate, codec, frame rate, channel and aspect ratio.

– Built-in video editor to trim/crop video, add subtitle/watermark, deinterlace video, replace audio.

– Batch conversion and GPU acceleration

Free download and install:


Free download and install:


Note: Much wonderful software bundled with BDMagic will provide you more amazing experience in converting videos. Go to Money Saving Software Bundles to get special offer for more software, such as BDMagic($49) + DVD Creator($35) = Only $49.9, Save $28.1, BDMagic($49) + ChewTune($29) = Only $49.9, Save $28.1 and so on.

Read More:

Rip Blu-ray onto Synology NAS With Panasonic TV Format

Leave a comment

Synology NAS is a good investment for people who has limit storage space at home. If you have a Synology NAS device like DS216play, DS416, DS216se, etc., you probably would like to copy Blu-ray collection to Synology NAS drive to view via streamers( such as: Panasonic TV). Go to make a copy of it and then stream to your TV for playback. In this case, powerful third-party software for backup Blu-ray to Synology NAS is what you need.

Hot Search: iTunes Movie on Panasonic Viera Smart TVs | DVD to Panasonic TV | Blu-ray on Panasonic Plasma TV GT60 | 2015/2016 Top Deals on Smart TVs |

Well, to backup dozens of Blu-ray movies to Synology NAS device, you need to get the content off the Blu-ray disc as a protection-free and easily readable element for NAS. Most of you are likely familiar with the excellentHandbrake for ripping standard Def DVDs, but while the latest version of the software has added SOME support for reading Blu-Ray folder structures, it cannot yet decrypt the Blu-Ray discs the way it can with regular DVDs, so you’ll need to add an intermediate step. Here I recommend you Pavtube ByteCopy. You can learn the reasons why I choose it to help me rip Blu-ray to Synology NAS for viewing on Panasonic TV below:

*Break down the encryption in Blu-ray/DVD discs, including AACS, BD+, region codes, Sony encryption, etc.
*Rip Blu-ray/DVD to Synology NAS for Panasonic TV playback with original video quality and also can backup Blu-ray ASUSTOR AS1004T NASSynology NASQNAP NAS and other NAS
*Convert Blu-ray/DVD to H.265M3U8, MP4, MKV, AVI, FLV, MOV, etc with original video quality.
*Copy the entire Blu-ray/DVD disc to NAS in original file structure with all subtitle tracks and audio streams preserved.
*Has optimized preset for Samsung/LG/Sony/Panasonic TV
*Allows users to shrink Blu-ray/DVD movies size to store more movies to the NAS
*Compatible with Windows 10/8.1/8/7/XP, etc
*Has the equivalent Mac version which supports OS X El Capitan, Yosemite, Mavericks, etc

Free download and install:


Other Download:

– Pavtube old official address: http://www.pavtube.cn/bytecopy/
– Cnet Download: http://download.cnet.com/Pavtube-ByteCopy/3000-7970_4-76158512.html

With it, ripping Blu-ray onto Synology NAS is simple as ABC. After downloding, follow the wizard to install and run the program. The mac version is Pavtube ByteCopy for Mac. Then follow the steps below to convert Blu-ray to Synology NAS with Panasonic TV comaptible formats in a few clicks!

How to Copy Blu-ray to Synology NAS With Panasonic TV friendly format?

Step 1: Import Blu-ray movies

Run the app and insert Blu-ray to drive. Click “File” to load the Blu-ray movies to the program.

Tips:

1.You can add more than one Blu-ray movies at a time for it has batch conversion function.

2. You can choose desired subtitle and audio track and forced subtitle below the chapter list.

Step 2: Choose TV supported format

The main reason that I choose Pavtube ByteCopy is for its “TVS” profile. Since TV supported format is similar, so even though there is no your TV brand, you also can choose any Sony TV format here.

Note: In the “Format” dropdown list, two formats are recommended for lossless backup: Directly Copy under “Copy” option and Lossless/encoded Multi-track MKV under “Multi-track Video” catalogue. Choose any of them as you like.

A. Directly Copy will help you to backup 100% intact Blu-ray main movie, which will preserve all the multiple audio and subtitle tracks in the generated m2ts file. It is a very fast and effective way for backup Blu-ray.

B. Lossless/encoded Multi-track MKV will backup Blu-ray to mkv file with multiple audio tracks and subtitle streams preserved as well as obtain the chapter markers.

Step 3: Start to convert Blu-ray to Synology NAS

Now back to the interface, click “Convert” to start to rip Blu-ray to Synology NAS for your Panasonic TV. Once the process ends, you can open the output folder to locate the Blu-ray rip.

Backing up Blu-ray to Synology NAS or other DLNA certified NAS not can make you play Blu-ray movies via NAS on TV, iPad and other DLNA enabled devices, but can free space at home though which you can put the tons of Blu-ray discs to attic.

It is time to enjoy the Blu-ray on your TV. The lossless backup of Blu-ray will provide you the same picture quality of original Blu-ray. You can watch your favorite Blu-ray on your Panasonic HD TV together with your family or friends right now.

Much wonderful software bundled with ByteCopy will provide you more amazing experience in converting videos. Go to Money Saving Software Bundles to get special offer for more software, such as ByteCopy + DVD Creater, ByteCopy + Video Converter Ultimate and so on.

Read More:

Blu-ray Ripping, Conversion Software Alternative Skills Gathering

Leave a comment

Want to share your Blu-ray movies on Internet or just simply enjoy your Blu-ray movies on portable devices wherever you go? Here are some instructions on how to rip Blu-ray to all popular video and audio format.

Blu-ray Ripping Tips

Have a bunch of Blu-ray discs and want a more convenient way to manage and organize them? How about ripping your Blu-ray collection to NAS, Cloud Storage, Media Server, External Hard Drive? Or do you would like to play and view your Blu-ray movie on iPhone SE, iPhone 7, iPad Pro 9.7, iPad Air 3, Galaxy S7, Galaxy TabPro S, Galaxy Tab S2 without using Blu-ray discs?

No matter what you want to do on your Blu-ray discs, here gathered around all guides and tips about Blu-ray ripping and copying. If you can’t find the one you need, just leave the message at the comment area to let us know. We will find the solution for you, especially.

Featured Articles:

Related Topics

 Blu-ray to Software 

Look at this column to learn how to rip Blu-ray to common video formats so you can edit Blu-ray files in editing software like Windows Movie Maker, iMovie, Final Cut Pro and play Blu-ray on VLC, WMP, QuickTime and more.

 Blu-ray to Site

Here, you can learn how to rip and upload your Blu-ray movies to some video sharing site like YouTube, Facebook, Vimeo, etc.

Blu-ray to Video 

Read this column then you will get the best solution to rip Blu-ray and learn how to convert Blu-ray to any video/audio format like WMV, AVI, MOV, MP4, FLV, VOB and more.

Blu-ray to Device 

In this column you will learn how to rip Blu-ray to iPad, iPhone, Samsung Galaxy, Google Nexus, Nook HD, Amazon Kindle, TV, etc. mobile devices highly compatible format.

Blu-ray Software Alternative 

Want to get the best Blu-ray ripper/copying alternatives? These guides introduce the best Blu-ray ripping and Copying tools for ripping, converting and copying Blu-ray are simple as ABC.

 Blu-ray Backup Tips 

How to create Blu-ray collection backups quickly and safely? Here you will get all the tips on how to back up your Blu-rays.

 Blu-ray Knowledge Supplement

Why we can’t play any Blu-ray on our Blu-ray Player? Which are the decent Blu-ray Ripper/Copier? The answers for questions above can be found on this column.

Sometimes, you can’t play your Blu-ray on your Blu-ray player due to Blu-ray region codes. Region codes are basically DRM (digital rights management) techniques that allow studios to control the release of films in various regions. A Blu-ray player only can play the Blu-ray discs sold at the same region as the Blu-ray player manufactured.

There are 3 separate Blu-Ray region codes. These codes are classified alphabetically as Region A, Region B, and Region C.

Region A: This region covers all of North America, South America and South East Asia.
Region B: This encompasses Europe, Africa, Middle East, French territories and Greenland.
Region C: Region which covers the rest of the world including Russia, Asia, and China.

When you want to play Blu-ray of region A, B and C on your Blu-ray player freely or on your region-locked PS3/PS4/Xbox One/360, you can refer to the following guides:

 Top Blu-ray Ripper Recommendations

To fulfill all the tasks above, you need a Blu-ray Ripper or Blu-ray Copier. There are various Blu-ray ripping tool floating on the web but which one is the best? We gathered some top reviews on best Blu-ray ripper for you:

To give you a intuitionistic exhibition of the best Blu-ray Ripper software in 2016, we make a comparison chart for you.

Software Compare Pavtube ByteCopy (Win/Mac)

bytecopy

Pavtube BDMagic (Win/Mac)

Leawo Blu-ray Ripper (Win/Mac)

4Videosoft Blu-ray Ripper (Win/Mac)

MakeMKV(Win/Mac)

makemkv

Supported Source
Blu-ray Discs
Blu-ray Folder
Blu-ray ISO Image File

Output Formats
SD MP4/MOV/M4V
HD MP4/MOV/M4V
Samsung Galaxy Preset
iPad Optimized Preset
Encode MP4/MOV:with multi-audio track

MP3, AAC, FLAC,OGG

WAV, M4A, DTS,

Other Functions
Bypass Copy Encryption
Add SRT subtitle.

Adjust Aspect Ratio

Adjust Frame Rate

Adjust Resolution

Adjust Bitrate

Merge & Split Video

Trim & Crop Video

Add Watermark

Extract SRT Subtitle

Read More:

Making Backup of DVDs to MKV for NAS Storage

Leave a comment

MKV is becoming increasingly popular. Most of DVD collectors are strongly willing to rip and convert DVD to MKV format as a backup. Without doubt, you may have come across the same puzzle. Stop here and pick up the way as you like for backup DVD as MKV files for NAS storage and then playback on any devices.

Reasons for DVD to MKV Conversion for NAS Storage/Devices

1.MKV Preserves Complete Movie Content (Audio, Video and Subtitles)

One of the main advantages of ripping DVD to MKV rather than MP4, AVI or WMV is that MKV holds unlimited number of video, audio, subtitle tracks and metadata. To be exactly, by ripping DVD to MKV format, you can get the entire movie with sound, subtitle tracks, thumbmail, along with menus and chapter structure, into one single MKV file. See MKV vs MP4MKV vs AVI.

2.MKV Maximizes the Video/Audio Quality

MKV supports virtually any audio/video format, including MPEG1, MPEG2, H263, MPEG4, H264, WMV, FLAC, Ogg, Speex, and more, attributing to the EBML foundation of the MKV format. Accordingly, all the video and audio contents are packed into MKV file without en-decoding when copying DVD to MKV file. Thus you will retain the lossless quality at a shortened processing time.

3.Easily Play MKV on PC and Media Player

Due to the factor that MKV is open source, it is widely supported by media players, like VLC and MPlayer. Besides, Windows Media Player can play MKV file provided the codec packs are installed. In addition, WDTV Live Plus, PopCorn Hour 500 and other HDD media players support playing MKV file as well.

4.Add Subtitles into MKV Movies

MKV is a container format more flexible that any other formats like MP4, MOV, AVI and more. It supports soft subtitles, which means you can remove audio tracks and subtitles from MKV in case of unneeded subs in DVD. Besides, you can add srt subtitles to MKV, extract video stream for compression and remux it into MKV video.

5.Ripping DVD to MKV can remove DVD protections

Out of antipiracy purpose, DVD publishers put complicated copy protections on disc with the aim to prevent the content from being copied for commercial use. In case the protected discs, common DVD ripper software will crash while converting DVD to MKV format. But by taking advantages of MacX DVD Ripper Pro, you can smoothly rip DVD to MKV format as it supports decrypting any DVD with CSS encryption, RCE scheme, Sony ARccOS protection or Disney X-Project DRM.

How to convert DVD to MKV directly? Follow this step by step tutorial, we will show you three methods of DVD to MKV for NAS, you can convert DVD to MKV files flawlessly and quickly using the versatile while easy-to-use DVD to MKV converter on Windows or Mac. Enjoy!

Option 1: Rip DVD to MKV with DVDFab and Handbrake

You can also shrink the DVD size in MKV format using DVDFab and Handbrake, which are considered to be a more complicated process, though. Just follow the steps to free rip DVD to MKV as below.

1. Free download and install DVDFab for DVD decryption. Then download and install Handbrake which is used for converting to MKV format.
2. Pop in the DVD, after you open the DVDFab, it will analyzes the disc within 30 seconds, relying on the speed of your DVD drive.
3. Select the dropdown, DVD5 for the smallest size or DVD9. Change the Volume Label to a name you want. Hit Start button to begin DVD decrypting.
4. Find the VOB files you just ripped and import it into Handbrake by hitting the Source tab.
5. Choose MKV as the output format under the Output Settings. Handbrake will convert VOB to MKV file in over 2 GB. You can tweak the aspect ratio, audio quality, subtitles and more just like those in MacX DVD Ripper Pro.
6. Start converting to MKV file by hitting the Start button.

Optional 2: Using MakeMKV to Convert DVD to MKV

MakeMKV has been favored by many editors for its easiness in DVD to MKV ripping. It is regarded as a two-click DVD decrypting and ripping tool. You just pop in the disc you want to rip, click the DVD icon and hit Make MKV. Just 30 minutes later, you can get the high-definition MKV video and play it on many media players. It is available for you to rip chapters and edit the video with its advanced features. Generally, the default settings are recommended in case you are not versed in DVD ripping.

Optional 3: Choose Best DVD to MKV Converter for NAS Storage

Pavtube BDMagic <review> can be used as a wonderful DVD to MKV ripper which converts DVD to MKV video for playable on any device that supports this format. This all-in-one DVD ripper software can help you decrypt DVDs of any copy protection from Disney, Sony, Warner, Paramount and more, and straightly rip and convert DVD to MKV format on PC/Mac in simple clicks. The conversion process is fast without any quality loss. With this best DVD to MKV Converter, you can make MKV files from DVD like a cork. For Mac users, you can turn to Pavtube BDMagic for Mac for further usage. Next let’s take a look at how to rip DVD to MKV video with it.

Supported NAS Storage: Lenovo IX2, WD My Cloud EX4 Diskless, WD My Cloud 4TB, Synology DiskStation, Thecus NAS, WD My Cloud EX2, Drobo 5N, Synology America DiskStation, BUFFALO LinkStation Pro Duo, NETGEAR ReadyNAS 104, Asustor AS6104T, AS6102T, AS3102T, and AS3104T NAS or higher-end N3150 CPU AS6202T and AS6204T etc for storage.

Step 1. Load DVD discs

Step 1. Insert the DVD disc into your DVD-ROM and then load the DVD movies to the program by clicking the disc icon. A DVD usually contains several subtitles and audio tracks. Just click to select the subtitles and audio soundtracks you need.

Step 2: Choose MKV/HD MKV format

You can click “Format” bar and you will find Common Video and HD Video. In their drop-down list, you can find “MKV(Matroska) Video(*.mkv)” and “ MKV HD Video(*.mkv)”.

What’s more? For PS4 or Xbox One, you can convert the DVD to MP4 files, just choose the “HD Video > Select “H.265 High Profile(*.mp4)” as the best one.

Tip: You can then personalize the output video by setting the video/audio parameters like resolution, frame rate, audio quality, bit rate, etc.

Step 3. Click the “Convert” button to start DVD to MKV format conversion. It will not take much time. Just wait for the conversion process to get done.

Free Download best DVD to MKV Converter:


Other Download:

– Pavtube old official address: http://www.pavtube.cn/bytecopy/
– Cnet Download: http://download.cnet.com/Pavtube-ByteCopy/3000-7970_4-76158512.html

After backuping DVD to MKV format, you can even use 5KPlayer to playback MKV video. Since MKV is open-sourced, it is quite easy to find a component MKV Player on both Windows and Mac OS. Meanwhile, after converting DVD to MKV on Mac, you are allowed to use Pavtube another choice – iMedia Converter for Mac for convert MKV to iPhonetransfer MKV to iPad, iPod touch, Apple TV, etc. Thus, you can enjoy MKV movies ripped from DVDs on portable devices when you are on a trip.

Note: Much wonderful software bundled with Pavtube BDMagic will provide you more amazing experience in converting videos. Go to Money Saving Software Bundles to get special offer for more software, such as BDMagic($49) + DVD Creator($35) = Only $49.9, Save $28.1
BDMagic($49) + ChewTune($29) = Only $49.9, Save $28.1 and so on.

Read More:

Convert Any Blu-ray to TS files for display on HD devices

Leave a comment

About TS Files

TS is a video stream file format that is used for storing video on DVDs. TS stands for Transport Stream. TS files can also store audio and data information. TS files are specified for MPEG-2 part 1 systems, which compresses the video data. TS files hold multiple pieces of data in a container-format. It allows for simultaneous streaming of audio, video, and data output. TS files can be converted into .AVI, .WMV, .WMA, .MPG, .MP3, and .MP4 files by using a TS Converter.

Are you looking for a tool to convert Blu-ray to TS files? just give it a shot. If you are not satisfied with other sloppy converter software, then it is time to download it free from us. And guiding by this detailed instruction, you will experience an unbelievable fast conversion process with the best reserved output quality.

Pavtube BDMagic is especially made for Blu-ray ripping, conversion and backup. And it takes everything from the Blu-ray, including the chapters, extras, and subtitles. It helps you copy and rip Blu-ray to TS files or other popular video and audio formats like MP4, AVI, WMV, MOV, MPEG, FLV, MP3, M4A, AC3, AAC, WMA, etc. bypassing protection. It’s not only easy to use, high in quality, but also flexible on customization. Read the review.

Plus, it has more than 150+ optimized outputs which can helps you simply convert or rip Blu-ray to play on a large variety of mobile devices like iPad Pro 9.7, iPhone SE, Kindle Fire HDX, Samsung Galaxy Tab Pro S, Galaxy S7/S7 Edge, Surface Pro 4 etc with excellent output quality and fast conversion speed. The well-designed interface makes it easier to operate for everything. If you are on Mac, please turn to Pavtube BDMagic for Mac for ripping Blu-ray to TS on Mac OS X (El Capitan included).

Next let’s have a look at how to convert Blu-ray to TS video with Pavtube Best Tool.

Free Download and trail:


Other Download:

– Pavtube old official address: http://www.pavtube.cn/blu-ray-ripper/
– Cnet Download: http://download.cnet.com/Pavtube-BDMagic/3000-7970_4-75922877.html

With only three simple steps, you can finish ripping Blu-ray movies:

1.Load Disc: Insert your Blu-ray disc into Blu-ray drive. Launch the TopBlu-ray to TS Ripper and click “Disc” button to import the Blu-ray movies.

2.Choose output format: Clicking the Format bar, here you can select “MPEG-TS HD Video (.ts)” from the Common Video profile list as the target format as your favorite ts profile.

Tip: You can also check the “Settings” box , and set video codec, video size, Bitrate, frame rate to get a decent video you want on your Media Players.

3.Start the conversion: When all settins are done, what you need to do now is to click the big Convert button and the program will begin ripping Blu-ray immediately. So there you have it. Pretty simple. If you want to convert Blu-ray videos to various format and your devices, this Blu-ray ripper will be absolutely the best choice. Just get it and have a try!

Read More:

Rip DVD Chapters Use Top DVD Ripper With Fast Speed

Leave a comment

Want to only rip desired chapters from a DVD? Looking for fast and easy ways to rip DVD chapters to play on your portable devices, share on video sites, etc.? So many titles and chapters are included on a standard DVD disc. As we know, a DVD movie can contain many chapters and titles. But you may just want to get some of the wanted chapters so as to save time. Sometimes we do not need to rip and save the whole DVD movie to hard drive. How to rip DVD chapters individually on Windows or Mac? If you have no idea about this, then you are definitely in the right place here! This article will tell you how to rip and convert DVD chapters you’re selected to video/audio in MP4, MOV, AVI, WMV, MP3, WMA, etc. with ease.

Hot Search: DVD to MP4 | DVD to Roku 4 | DVD to NAS | DVD to Tablet |

To convert your desired DVD chapters, you need to get some help from a professional DVD ripping tool. These software programs vary, so you might be confused when you have to choose one. If so, you are recommended to usePavtube DVDAid to help you finish your task. With it, you can rip only certain DVD chapters and convert them to virtually any popular video format like MP4, MOV, MKV, FLV, WMV, AVI, etc. In plus, this DVD Chapter converter is capable of extracting audio from your DVD movies and customizing videos by cropping, trimming, rotating, adding watermarks, etc with its built-in video editor.

Besides, you can even extract audio from your DVD movies. If you’re using a Mac, turn to Aimersoft best Mac DVD ripper, which allows you to convert selected DVD chapters on Mac OS X (including El Capitan). Now download the program and follow the steps below to rip the desired chapters from your DVDs.

Free Download Top DVD Chapters Converter:


Other Download:

– Pavtube old official address: http://www.pavtube.cn/dvd_ripper/
– Cnet Download: http://download.cnet.com/Pavtube-DVDAid/3000-7970_4-76158510.html

How to Easily Rip DVD Chapters on Windows/Mac with Brilliant Quality?

Note that this guide uses Pavtube DVDAid for Windows screenshots to better describe how to finish ripping DVD chapters. The way to do this on Mac is the same. So just make sure you get the right version.

Step 1: Launch DVDAid and Load DVD movie

Insert DVD into DVD-ROM, open DVDAid, and click the “Load Didc” icon to successfully import standard DVD into this app.

Step 2: Choose optimized video output format

Tap on the Format pane, and select the desired video/audio format for output. There are around 200 video and audio profiles lised, you will always find your devices as output format. Even if your device is not listed, Pavtube DVDAid offers general format for all Android and Windows devices.

Step 3: Customize DVD chapters in your own way

You can optionally adjust video and audio parameters including video codec, size, video bitrate, or frame rate, in Settings to achieve the best movie enjoyment on your portable devices.Besides, with the built-in video editor, you are allowed to cut off unwanted video scene from source DVD, remove black bars in the image, attach external subtitle file, or add video effects, etc.

Step 4: Start to convert DVD chapters

Everything is ready and you can start to rip DVD chapters. When the conversion completes, click on the “open output folder” button on the conversion UI to get the generated file, and you can watch the DVD chapter on your smartphones, tablets, HD Media Players, Game consoles, and any other portble devices.

Read More:

Copy Blu-ray/DVD to Asustor AS3102T 2-bay NAS for TV Playback

Leave a comment

Have you purchased a Asustor AS3102T 2-bay NAS to store all your media files on it? There is a huge collection of Asustor NAS(network attached storage) devices as you see. Asustor isn’t only fast with encrypted files as it is also capable of smooth 4K multimedia playback over the NAS’s HDMI port, and a NAS meant to play a major role in a home should be compatible with 4K content since 4K monitors and TVs are widely available now. The Celeron CPU’s hardware transcoding engine helps with 4K and 1080p content playback, and the NAS has a decent amount of RAM for a home NAS to make sure it won’t bottleneck.

If so, it’s would be a wise choice to copy Blu-ray, DVD library to Asustor AS3102T 2-bay NAS for easier streaming while clean up those physical discs. In this article, we will teach you how to backup Blu-ray/DVD to Asustor AS3102T 2-bay NAS for TV streaming and keep the best video quality.

Take a try with Pavtube BDMagic. (review). This software is designed to backup Blu-ray/DVD to MP4 or any other formats (AVI, WMV, FLV, MOV, etc) with all information including subtitles, chapters, audio tracks and movie languages included. What’s more, it can also enable you to rip Blu-ray/DVD for directly playback on Android, iOS, HD TV or Windows based devices. If you are using Mac, you can also use the Pavtube BDMagic for Mac for copy Blu-ray/DVD to Asustor AS3102T 2-bay NAS via Mac OS X El Capitan.

Learn >> how to compress 1080p Blu-ray to compatible size for Asustor AS3102T 2-bay NAS/Portable Devices.

Tips: You can also use Pavtube Top Blu-ray/DVD Copy Software to backup Blu-ray/DVD to MP4 with subtitle and then transfer to NAS devices for playback, these NAS devices are popular, include the Lenovo IX2, WD My Cloud EX4 Diskless, WD My Cloud 4TB, Synology DiskStation, Thecus NAS, WD My Cloud EX2, Drobo 5N, Synology America DiskStation, BUFFALO LinkStation Pro Duo, NETGEAR ReadyNAS 104, Asustor AS6104T, AS6102T, AS3102T, and AS3104T NAS or higher-end N3150 CPU AS6202T and AS6204T etc for storage.

Free Download the Blu-ray/DVD to Asustor AS3102T 2-bay NAS Converter:

Other Download:

– Pavtube old official address: http://www.pavtube.cn/blu-ray-ripper/
– Cnet Download: http://download.cnet.com/Pavtube-BDMagic/3000-7970_4-75922877.html

Step 1: Insert your Blu-ray/DVD disc into your BD drive, run the best Blu-ray/DVD to NAS Converter and click “BD/DVD disc” icon to load movie from Blu-ray/DVD source (Disc, folder, ISO).

Step 2: Click the “Format” option, and choose HD Video > H.264 HD Video(*.mp4) as output format. You can also choose MKV HD Video(*.mkv) for your Asustor AS3102T 2-bay NAS device.

Tip: If you like, you can click “Settings” to change the video encoder, resolution, frame rate, etc. as you wish. Keep in mind the file size and video quality is based more on bitrate than resolution which means bitrate higher results in big file size, and lower visible quality loss, and vice versa.

Step 3: Click the convert button under the preview window, and the Blu-ray/DVD ripper will start the conversion from Blu-ray DVD movies to MP4 for Asustor AS3102T 2-bay NAS devices.

After conversion, you can stream Blu-ray/DVD movies through Asustor AS3102T 2-bay NAS or other DLNA-compliant devices for playback. Just have a try!

Note: If you have many iTunes purchased movies and want to remove the DRM to transfer to ASUSTOR AS3102T 2-bay NAS, you can use Pavtube ChewTune.

Money saving tip – Software Bundles: Pavtube BDMagic ($49) + Pavtube ChewTune ($29) = $49.9, Saving $28.1. That means, you can get a DRM removal program only if you paid more $0.9.

Read More:

Losslessly Rip Disney (3D) Blu-ray Effortlessly in Windows/Mac

Leave a comment

SUMMARY: This guide will show you the best way to rip Disney (3D) Blu-ray movies to MKV, MP4, AVI, MOV etc, files with fast encoding speed and perserving the original quality.

Disney Blu-ray movies have attracted great attention in the movie field. They have released a lot of popular movies, such as Tomorrowland, Cinderella, Into the Woods, Monkey Kingdom, Avengers: Age of Ultron, Ant-Man etc on 2015. And will be release the Zootopia, Star Wars: The Force Awakens etc. If you have collected lots of Disney Blu-ray discs (especially for your Kids), you may want to put those Disney movies to computer, iPad, Galaxy Tab and more other media devices for enjoying at home or on the go.

Still have no idea about solve this? Below we will throw a quick tutorial up, guaranteed to effortlessly backup (3D) Disney Blu-ray movies to hard drive to keep them away from being damaged, and rip Disney Blu-ray to virtually any format on Window 10 and Mac El Capitan as you need.

See Also: Superhero Movies on 2016 Upcoming Lists | The 20 Biggest 3D Movies of 2016

Though Disney Blu-ray movies are much more complicated than ordinary ones, there are also some Blu-ray ripping programs that can decrypt Disney Blu-ray and convert them to various popular video/audio formats. Maybe you are searching for the tool to help you to rip Disney Blu-ray to MKV, AVI, MP4, MOV or other formats on your computer, here you can take a free try on our Pavtube BDMagic for Disney Blu-ray movies, this software will rip Disney Blu-ray to MKV, MP4 or any other formats you need, and then you can backup Disney Blu-ray on your Mac or Windows computer, or transfer converted Disney Blu-ray movies to tablets or smartphone for watching. Read the review.

Besides, it’s a yet professional 3D Blu-ray Ripping software. With it you can easily convert 3D Blu-ray movies to MKV, AVI, WMV, MOV, MP4, etc HD media formats with 2D or 3D(Red-Blue, Red-Green two modes) effect. Plus, the original Blu-ray 3D in 1080p can be output just in the same definition, or compressed to 720p video; the choice is yours.

With it, you can fast decrypt Blu-ray disc with copy protections, Disny code, region code, CSS, RCE, Sony ArccOS, UOPs etc has made it the strongest ever to rip Blu-ray for playing and sharing anywhere you like. It also supports load Disney Blu-ray discs, Blu-ray ISO files, Blu-ray folder. Besides Blu-ray ripping, it can also rip DVD disc, DVD ISO file, DVD folder for you.

Note: For Mac users, turn to Pavtube BDMagic for Mac software, which allows you to convert Disney Blu-ray on Mac OS X (including El Capitan). Now download the right version according your situation and follow the steps below.

Free Download Disney Blu-ray Ripper:


Other Download:

– Pavtube old official address: http://www.pavtube.cn/blu-ray-ripper/
– Cnet Download: http://download.cnet.com/Pavtube-BDMagic/3000-7970_4-75922877.html

How to convert Disney Blu-ray movies to video/audio files?

This guide uses Blu-ray Ripper for Windows (Including Windows 10) screenshots. The way to rip Disney disc on Mac is almost the same. Just make sure you’ve downloaded the right version.

Step 1: Load Blu-ray movies into the program

Once you run the Disney Blu-ray Ripper, click BD disc button to load Blu-ray movie up into the Blu ray ripping program.

Step 2: Decide Blu-ray Copy Mode

A. Full Disc Copy Mode: Copy Disney Blu-ray Disc to a full Blu-ray folder containing all the content in original BD.

B. Directly Copy Mode: Backup Disney Blu-ray Disc to a file with M2TS as filename extension. This mode enables copy movie only from Blu-ray discs, compared with former mode, save time in copying AACS Blu-ray Disc and space to store the output M2TS file to make reasonable and practical use. It support adding .srt /.ass/.ssa subtitles into movies.

Step 3: Choose an output video format

If you wanna rip Disney Blu-ray to your needed file types, you need specify a format as output format. Click on the dropdown menu of “Format”, and then choose your needed one from the multiple output format presets. You can rip Blu-ray to MKV, MP4, MOV, WMV, or rip Blu-ray for playback on iPad, iPhone 7, PS4, Nook HD, Galaxy Tab S3 and more other portable devices you can think of.

Tip: Click “Settings” button, then you are able to adjust all the settings in the following window to customize the output file quality, including codec, size, bit rate, frame rate, sample rate and audio channel.

Step 4: Rip and copy Disney’s (3D) Blu-ray movie

Once the above mentioned steps are finished, you can click “Convert” button to copy Disney Blu-ray movie to either the hard drive of your PC, or to your portable devices, like iPad Pro 9.7, Apple TV 4, Kindle Fire HDX, Nexus 9, etc.

When the copying/ripping task is completed, you can click “Open” button to get the ripped files of Disney Blu-ray movie. Then, you can play, share Disney Blu-ray with your families anywhere you want.

Now, It will be great if you put Disney Blu-ray on tablets or smartphone, and then enjoy the movies at anytime, anywhere.

Read More: