Put 2D/3D Blu-ray to iTunes library for Apple TV viewing

Leave a comment

Have lots of 2D/3D Blu-ray discs to rip in your collection, and want to put them in iTunes DB so that you can view at will on any of the screens via Apple TV? Yet, a general Blu-ray is in MTS format with copy protection. To put a 2D/3D Blu-ray onto iTunes for Apple TV syncing, you need a Blu-ray to iTunes ripper program to remove the protection and rip 2D/3D Blu-ray movie to iTunes compatible video first.

Hot Search: DVD to iTunes | Video_ts to iTunes | MOV to iTunes | AVI to Apple TV

Convert 2D/3D Blu-ray collection into iTunes

To help people with the process of converting 2D/3D Blu-ray collection into iTunes for ATV, below, I’ll throw a quick tutorial up.

The Tool you need:

The current software options for ripping a Blu-ray are virtually endless. From free to costly, easy to complicated, the right ripping tool is completely subjective to the end-user. If you’re looking for ease of use, and don’t mind spending $39.2, I recommend your to use Pavtube BDMagic, (Read review) which can convert 2D/3D Blu-ray, DVD and ISO image files to a iTunes compatible video formats for streaming to Apple TV with easy operation. I’ve found the quality to be excellent, and see no difference when compared to playing the discs themselves. Mac version is here. Free download it and follow the easy steps here.

Windows Download      Mac Download

Importing 2D/3D Blu-ray into iTunes for Apple TV syncing

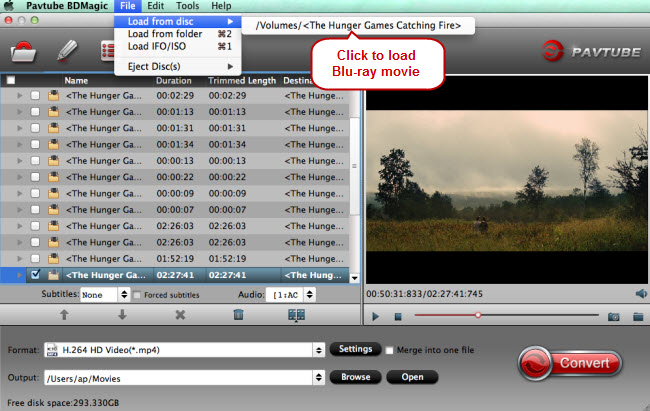
1. After installing, launch the Blu-ray to iTunes Converter app on your computer. and then press “Load Disc” icon to import 2D/3D Blu-ray movie. Choose “File > Load from ISO/IFO” if you’d like to import Blu-ray ISO image file.

Pavtube BDMagic

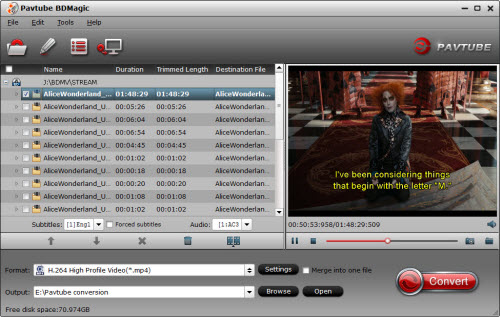
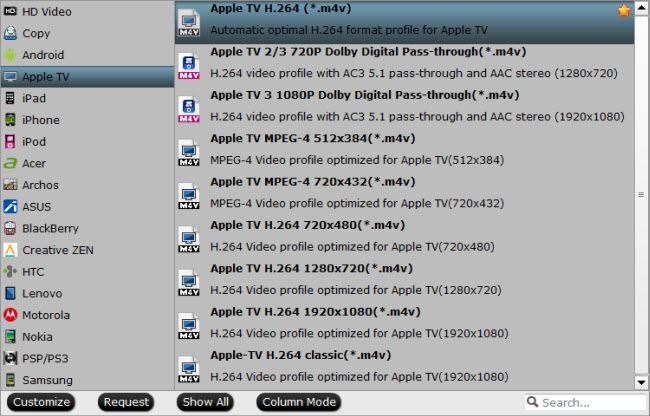
2. Click format bar and find the optimized profiles for Apple TV under “Apple TV” category, also you can select “Apple TV 3 1080P Dolby Digital Pass-through(.m4v)” which works well for ATV 3 while maintaining 5.1 surround. To get a compatible format for iTunes, you can choose HD MP4, M4V and MOV format. If you want to keep 3D effect when ripping 3D Blu-ray,  choose the 3D Side-by-Side MP4 format from “3D Video”.

Tip: You can click “Settings” to change the setting from the new default HD profile 4000 to 5000~8000 bitrate (Note: bitrate higher results in big file size, and lower visible quality loss). Learn how to set up Apple TV for Dolby Digital 5.1 pass-through.

P.S. The key setting Video Size for your Apple TV is according to your source video exactly. If your source video is in 1080p such as Blu-ray, you can set your video size in 1920*1080 in H.264 codec; while, if your original video size is in standard, 720p in enough.

3. Press “Convert” to start converting 2D/3D Blu-ray to Apple TV MP4 videos with Dobly 5.1 audio. Wait till conversion completes. Then press “Open” to find the ripped movie.

4. Now you can add 2D/3D Blu-ray rips to iTunes movie library for streaming to Apple TV: Open up iTunes and follow “File>> Add file to Library…” to sync video to iTunes and then stream to ATV. Now you can bring new life to that 2D/3D Blu-ray collection collecting dust in your closet. Have fun!

More topics:

Rip Blu-ray to MacBook Pro for use HDMI to large TV Playback

Leave a comment

Equipped with fourth-generation dual-core and quad-core Intel processors, brand-new graphics and PCle-based flash-storage, Macbook Pro shows us stunning playing effect on its Retina display and provides us large capacity for tons of files. With over 5 million pixels in 15-in version and over 4 million on the 13-in version, both deliver unprecedented clarity in playing video. All these make this laptop a perfect place for Blu-ray playing. Read >> why you needbackup blu-rays.

Hot Search: Blu-ray to unRAID Server | Blu-Rays to PowerBook | Blu-ray to Apple TV | Blu-ray on Mac El Capitan | Blu-ray on iPad

Although the new 13-inch MacBook Pro with Retina display, it is still unable to play Blu-ray Disc. To play Blu-ray discs on MacBook Pro laptop via Mac 10.11, you need an external Blu-ray drive and third party Blu-ray player software, and thing will be a piece of cake. If you don’t have an external Blu-ray drive now, you can get one from amazon.com.

However, here, I can show you two methods to get the above job done. Method one: Play Blu-ray on MacBook Pro with external Blu-ray drive and MacBook Pro Blu-ray Player; Method two: Rip and backup Blu-ray to MacBook playable video format.

Method one: Play Blu-ray on MacBook Pro with external Blu-ray drive and MacBook Pro Blu-ray Player

First, you should prepare a external Blu-ray drive. And then you could download a MacBook Pro Blu-ray Player. Macgo Blu-ray player is popular among MacBook Pro users.

Step 1: Launch Macgo Blu-ray Player on MacBook Pro

After installing Mac Blu-ray Player, you can go to “Launchpad” and click on its icon to launch the program. The simplified main interface will reduce certain misoperations. You can see two buttons there: Open File and Open Disc.

Step 2: Choose a Blu-ray ISO File and Play It

If you want to play a Blu-ray ISO file, just click on “Open File” and choose the Blu-ray video you would like to watch from your local multimedia files, and then click “Open”.

Step 3: Enjoy Your Blu-ray Movie

Wait a second till the main menu pops out and you can make some adjustments there according to your own preferences. You can choose where you want to watch in “Chapter”, or choose the audio language in “Audio” and the “Subtitles”. Then you can directly click “Play Movie” to enjoy some Blu-ray time.

Method two: Rip Blu-ray to MacBook Pro supported M4V, MOV, MP4 format

This method still needs another external Blu-ray drive but don’t need another Mac Blu-ray player. For Blu-ray software, Pavtube BDMagic for Mac is highly recommended here. This tool allows you to enjoy the Blu-ray disc, Blu-ray folder, Blu-ray ISO in MOV,M4V, MP4M3U8 formats so that Quicktime on MacBook Pro via Mac OS X El Capitan directly, whether your Pro is 13-inch or 15-inch, the Blu-ray disc will be played on it limitlessly and smoothly. Besides, Pavtube BDMagic for Mac is compatible with MacBook Air, iMac, Mac mini, PowerBook, etc. Read the review.

Here is the Pavtube Customer review: “ In terms of format, I like to have copies of my BDs available on our home network via iTunes and use this to record and catalogue the details of the performances. I also create audio only versions for use on my phone. So I have been trying out various versions of h264, so that I can get good playback on a Macbook pro while travelling and on a large TV.”

You can free download and install BDMagic for Mac here:


Other Download:

– Pavtube old official address: http://www.pavtube.cn/blu-ray-ripper-mac/
– Cnet Download: http://download.cnet.com/Pavtube-BDMagic/3000-7970_4-76177782.html
.
Steps to rip Blu-ray to M4V for MacBook Pro with BDMaigc for Mac

Step 1: Load Blu-ray movie.

Connect an external Blu-ray disc drive to your MacBook Pro, instert Blu-ray disc, and click “Add Disc” button on this Blu-ray to MacBook Pro Ripper to import Blu-ray into this app.

Step 2: Choose video format and set profile.

Select the optimized video format for output. You are suggested to choose MP4/M4V from Format menu as best playable format for Mac.

Step 3: Rip Blu-ray to MacBook Pro

Hit on the “Convert” icon and start ripping Blu-ray to M4V for MacBook Pro. When it is done, open output folder and now you can watch ripped movies on MacBook Pro.

Both the two methods can make you successfully play Blu-ray on MacBook Pro. But with the two method, you can sync the ripped Blu-ray to iTunes, so that you not only can watch Blu-ray on MacBook Pro, but also can enjoy Blu-ray on iPadiPhone conveniently.

Read More:

Apple TV AVI solution – Stream XviD/Divx files to Apple TV for watching

Leave a comment

I have an Apple TV and I want to join my XviD and Divx video into Apple TV- the 3rd generation for playback but there seems to be some problem with it. Which is the best way?

Stream XviD/Divx files to Apple TV

Apple TV is a hot media device for us watching movies. (Read Apple TV vs Chromecast comparison review) But just like other Apple devices it can only supports MP4, MOV, M4V videos. As you see, the XviD/Divx AVI isn’t in the supported format list. If you wanna view XviD/Divx files on your Apple TV, the best solution is to encode/re-encode XviD/Divx to Apple TV supported video format first. Here’s is how:

First of all, download and launch Pavtube Video Converterr Ultimate which would do XviD/Divx AVI to ATV conversion which only a few clicks. With it, you convert almost various formats of 1080p/720p HD videos including XviD/Divx AVI, MKV, VOB, MPG, TiVo, WMV to Apple TV friendly format for playback. It directly offers users an optimized pre-setting for Apple TV. Even if you don’t know what format is the best for Apple TV, you can also do it well. Meanwhile the quality of the converted videos is as decent as possible as original. The equivalent Mac version is iMedia Converter for Mac.

Following is the guide about how to XviD/Divx file formats to M4V for Apple TV:

Step 1: Download and Install Apple TV Video Converter. Select your movie. Click “Add Video” to import your source materials in XviD/Divx format. Batch conversion is supported so that you can add multiple files.

Apple TV Video Converter

Step 2: Choose the output format. Click on Format > Apple TV. From the drop down menu, select the proper output format.

a. For Apple TV 3 users, Apple TV 3 Dolby Digital Pass-through (*.m4v) is recommended.
b. For Apple TV 2 users, please select the Apple TV 2 Dolby Digital Pass-through (*.m4v).
c. For Apple TV users, Apple TV H.264 1280×720(*.m4v) will be better to keep the videos in HD.

Apple TV Video Format

Step 3: Click the “Settings” icon and you will go into a new interface named “Profile Settings”. You can adjust codec, aspect ratio, bit rate, frame rate, sample rate and audio channel in the interface to optimize the output file quality.

Find no 5.1 Surround Sound from Apple TV, here is the solution. Actually, Apple TV cannot support AC3 5.1 audio track. While, we usually have the demand to get the full AC3 5.1 surround sound to let Apple TV pass-through Dolby Digital to A/V receiver to take advantage of our surround sound system. This Apple TV Video Converter provides pre-set Apple TV profiles. The particular profiles are H.264 video files with AC3 5.1 pass through and AAC stereo. Both AC3 and AAC audio are retained so that you can either let Apple TV pass-through Dolby Digital to A/V receiver to take advantage of your surround sound system, or have Apple TV decodes AAC and exports stereo audio

Apple TV Format Settings

Step 4: After above settings, you can start the XviD/Divx to Apple TV conversion. Once the process completes, locate the files and transfer and copy the converted .m4v videos to Apple TV. As you see, now you can effortlessly watch XviD/Divx videos on Apple TV with the best quality. Besides mkv, you can also rip Blu-ray/DVD or convert MKV and MTS to play on Apple TV.