Put DVD to Zeiss VR One for Enjoyment via Oculus Cinema

Leave a comment

My question is can I play DVD Movies on Zeiss VR One directly? If not, any workable workaround to help me get 3D movies onto Zeiss VR One? Here, you will find the best solution.

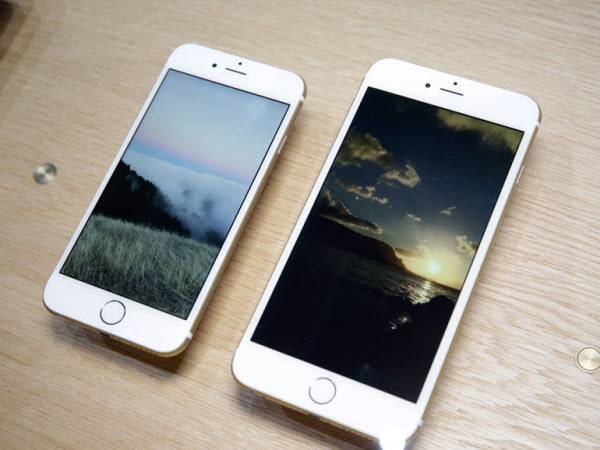
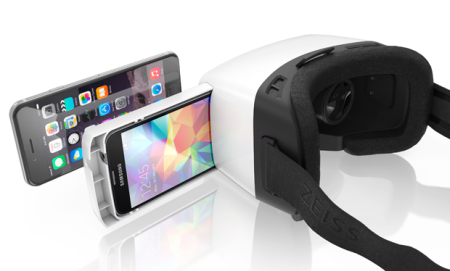
The ZEISS VR One currently has two trays available – Samsung Galaxy S5 and the iPhone 6 (4.7″). Currently compatible with iPhone 6, Samsung Galaxy S4, S5, S6, Nexus 5, and LG-G3 smartphones, plus hundreds of apps available on Google Play and AppleApp Store made for mobile VR devices.

With the phone connected to the Zeiss VR One mobile app, users can view saved photos and videos, and stream 2D and 3D clips from YouTube; enable the “Side Tap” setting and tap the glasses to jump through images and videos. Or you can wander through Google’s Street View database, looking at 360-degree images and moving through scenes by tapping on the front of the glasses.

You see DVD movies files can be played by VLC, DVD Player and more, but VR One is an exception. Hence, in the event that you hunger for putting DVD to VR One for viewing, the most important piece of the equation is that you have a DVD ripping tool hooked to your PC or Mac for the sake of ripping DVD to VR One compatible videos (The VR One Cinema app by default supports playing “.mov”, “.m4v” and “.mp4” file formats and side-by-side videos.)

Hot Search: DVD to Google Cardboard 2 |  DVD to FCP | DVD to Plex | DVD to NAS | DVD to Roku | DVD to Macbook Pro

To convert DVD to Zeiss VR One for watching everywhere, Pavtube DVDAid is highly recommended. It can professionally rip DVD to Zeiss VR One supported 3D SBS MP4/MKV video format with fast speed and excellent output quality. Equipped with 3 different 3D effects: Side by Side, Red/Blue and Top/Bottom. In addition, this DVD ripping tool can also convert DVD to various popular video formats like AVI, MP4, WMV, MPEG, MOV, FLV, MKV, 3GP, etc. as well as rip DVD to optimized video for playback on iPad, iPod, iPhone, Zune, Creative Zen, Archos, iRiver, Blackberry, Xbox 360 and more. Read the review.

Free download the DVD to Zeiss VR One Converter:


Other Download:

– Pavtube old official address: http://www.pavtube.cn/dvd_ripper/
– Cnet Download: http://download.cnet.com/Pavtube-DVDAid/3000-7970_4-76158510.html

How to Rip DVD to MP4 videos view on Zeiss VR One in Oculus Cinema

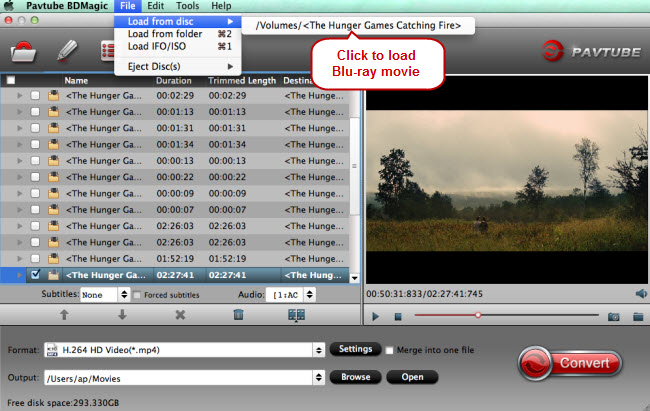
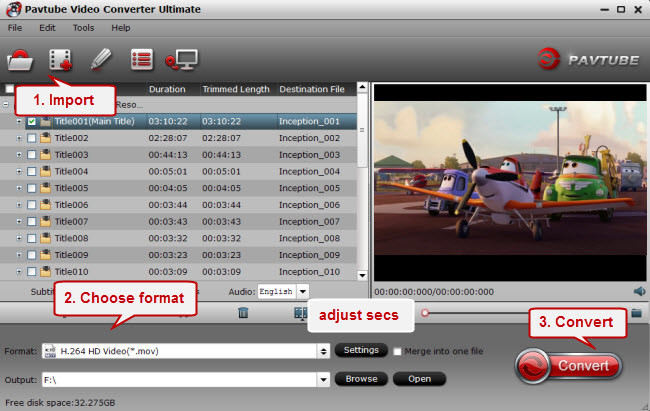
Step 1. Import DVD movies

Insert the DVD disc into your DVD drive and launch the Zeiss VR One DVD ripper. Click “Load DVD” to select and import the DVD movies you want to rip. ISO and IFO files are also supported.

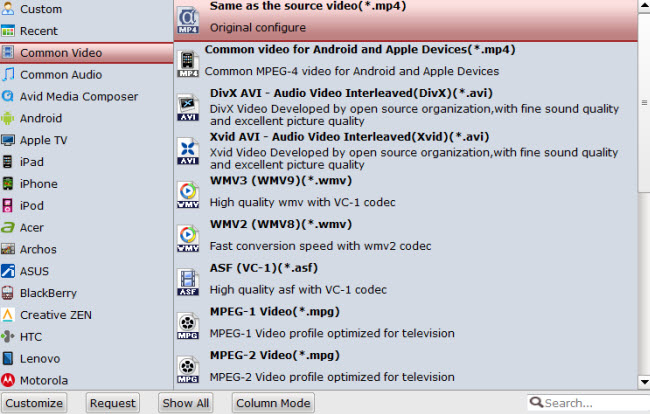
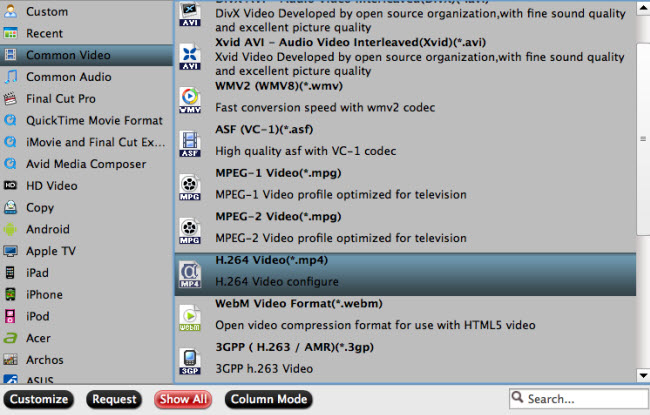
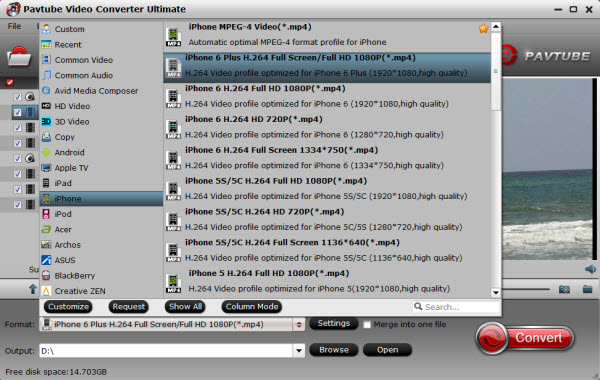
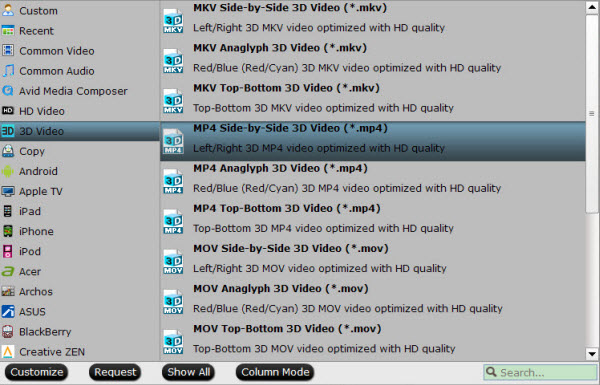
Step 2. Specify output format

From the Format bar, find “3D Video” catalogue, you will find several presets for Side-by-Side 3D, Top-Bottom 3D and Anaglyph 3D. You can choose the one according to your device specification. SBS MP4/MKV is usually the recommended one which is perfect for Gear VR Innovator Edition. (Read Differences Between Anaglyph 3D and SBS 3D). Or you can choose the commen videos for your devices.

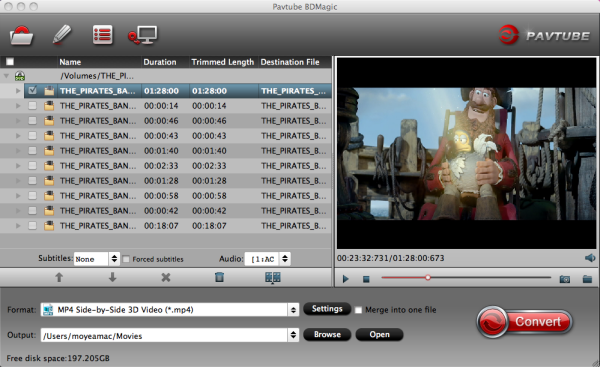
Step 3. Start to convert DVD to Zeiss VR One

Now go to the last step: click “Convert” to begin ripping DVD to Zeiss VR One compatible MP4 video files. After the conversion, you can tap “Open” to locate the converted videos immediately.

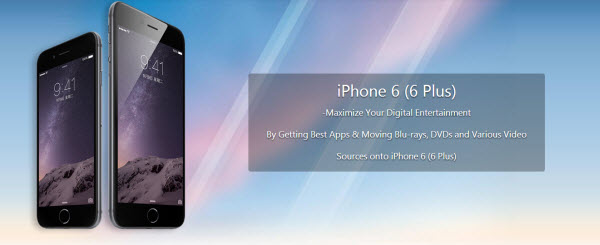
Step 4. Add and view SBS 3D movie on VR One via iPhone/Android

The ZEISS VR ONE Cinema app enables you to enjoy your movies in an immersive environment with the lights off. Download it on the Apple App Store/Google Play and run it.

Transfer your movies to your iPhone

  • Connect your iPhone 6 to iTunes
  • Select your iPhone and go to “Apps” / “File Sharing” / “VR ONE Cinema”
  • Drag and drop any .mp4 / .mov file into the list of documents.
  • Important: DRM-protected movies (e.g. purchased movies from iTunes Store) are not supported.
  • Hint: For 3D side-by-side (SBS) movies, please make sure that the filename contains “SBS”.
  • Movies in 720p resolution are best for watching in the VR ONE Cinema.
  • Download detailed Instructions for iOS

Transfer your movies to your Android phone

  • Connect your Android phone via USB cable and open Android file transfer
  • Create a folder “VRCinema” on your phone at root level
  • Drag and drop any .mp4/.mov file into this folder.
  • Important: DRM-protected movies (e.g. purchased movies from Google Play) are not supported.
  • Hint: For 3D side-by-side (SBS) movies, please make sure that the filename contains “SBS”.
  • Movies in 720p resolution are best for watching in the VR ONE Cinema.

Note: What’s More? you can simply add the keyword “SBS” to the file name of the video, and the app will automatically show the correct content for each eye.

After connect your iPhone 6, Samsung Galaxy S4, S5, S6, Nexus 5, and LG-G3 smartphones to computer and transfer the video files to your Zeiss VR One for enjoyment on the go. As you see, it is extremely easy to for DVD enjoyment on VR One in VR ONE Cinema without any hassles.

Read More:

How to Transfer iTunes Movies to USB Flash Drive

Leave a comment

Q: “How to transfer iTunes Movies to flash drive? I need to download my itunes collection to a usb mass media flashdrive.When I select the playlist the usb option poes not come up,just the cd-drive will.How do I format or whatever i need to do,to download this so I can plug it in to my car stereo instead of an ipod. So, my questions is that how to transfer movies and music from iTunes to USB flash drive? ”

There will always come a time when you need to transfer your movies in iTunes library to a USB stick. But it’s a pity that transferring iTunes movies to USB flash drive is no easy job at all. If you are portable device user, you may have this question., follow this guide will show you how to download and transfer iTunes movies to USB flash drive for playing. Convert iTunes movies to USB flash drive best playback format.

Part One: Download and Transfer iTunes Movies to USB Flash Drive

If you don’t already have iTunes installed on your computer, you’ll need to get the free download and install it on your computer. iTunes is available for Mac or PC, and the website will automatically detect which version you need.

Run iTunes on your Windows or Mac computer. Go to iTunes on your computer, sign in to the iTunes Store, and choose Store > Check for Available Downloads and be able to download the movie using your computer. You can transfer the downloaded iTunes movies to your USB flash drive easily.

Hot Topics About iTunes >> iTunes to Android | iTunes videos to Surface RT | iTunes to Roku 3

Part Two: Remove DRM-protection from iTunes Movies for Playing via USB Flash Drive

To play the purchased or rented iTunes movies/TV shows on tablet, smartphone, even Smart TV and 4K UHD TV, currently the only way to make the iTunes DRM movies readable by USB is to remove DRM protection from iTunes movies before transferring them to the USB drive because of your USB flash drive will not recognize the DRM-protected iTunes movies properly. The popular DRM removal – Pavtube ChewTune as the Top DRM Removal Tool is the fastest and best iTunes DRM Removal you can find.

With it you can remove DRM protection and convert iTunes movies and Episodes losslessly to USB drive supported normal MP4 format in 6X fast speed. For Mac users, you can turn to Pavtube ChewTune for Mac.

Now you can download the right version of Pavtube iTunes DRM Video Converter and begin to transfer iTunes videos to USB stick by following the instructions below.

| (here for Mac OS X 10.5)

Step 1. Download and install Pavtube ChewTune. There would be a command window pop up during the installation, please do not shut down it and let it running until the installation completed.

Step 2. Add iTunes Movies and choose target format. Drag and drop your videos to it directly, or you can click icon to import them as below.

Let’s click the drop-down-list besides “Format” and choose “Same as the source video”.

Step 3. Customize target video specs. (Optional)

Click “Settings” as above to enter Profile Settings window, you can find settings for video size, codec, bitrate and frame rate. Change them at your own needs.

Step 4. Start (batch) conversion.

Now click the big red “Convert” icon to start converting DRM videos; this converter will activate your media player automatically and start to play this video (let’s keep it running). The player windows cannot be removed or closed. After conversion, click “Open output folder” to quick locate the converted video. Now, you can move the converted videos files to your USB drive.

Follow these steps to transfer the iTunes library to a flash drive:

a.Plug your USB flash drive into your computer’s port. Launch iTunes on your computer

b. Go to the “Edit” menu within iTunes and click on “Preferences.”

c. Click on the “Advanced” tab to see where exactly your iTunes library is stored. It will be an XML file.

d. Open your library by going to the “Start” menu, selecting “computer,” clicking on the appropriate drive and browsing to the location of the file.

e. Open a second window in “computer” and click on the icon for your flash drive. Drag and drop your library to the drive. This could take a long

time, depending on the size of your library.

Now, you can transfer the converted videos to your USB flash drive and you are free to move all the movies to USB flash drive.

Read More:

Rip Blu-ray to MacBook Pro for use HDMI to large TV Playback

Leave a comment

Equipped with fourth-generation dual-core and quad-core Intel processors, brand-new graphics and PCle-based flash-storage, Macbook Pro shows us stunning playing effect on its Retina display and provides us large capacity for tons of files. With over 5 million pixels in 15-in version and over 4 million on the 13-in version, both deliver unprecedented clarity in playing video. All these make this laptop a perfect place for Blu-ray playing. Read >> why you needbackup blu-rays.

Hot Search: Blu-ray to unRAID Server | Blu-Rays to PowerBook | Blu-ray to Apple TV | Blu-ray on Mac El Capitan | Blu-ray on iPad

Although the new 13-inch MacBook Pro with Retina display, it is still unable to play Blu-ray Disc. To play Blu-ray discs on MacBook Pro laptop via Mac 10.11, you need an external Blu-ray drive and third party Blu-ray player software, and thing will be a piece of cake. If you don’t have an external Blu-ray drive now, you can get one from amazon.com.

However, here, I can show you two methods to get the above job done. Method one: Play Blu-ray on MacBook Pro with external Blu-ray drive and MacBook Pro Blu-ray Player; Method two: Rip and backup Blu-ray to MacBook playable video format.

Method one: Play Blu-ray on MacBook Pro with external Blu-ray drive and MacBook Pro Blu-ray Player

First, you should prepare a external Blu-ray drive. And then you could download a MacBook Pro Blu-ray Player. Macgo Blu-ray player is popular among MacBook Pro users.

Step 1: Launch Macgo Blu-ray Player on MacBook Pro

After installing Mac Blu-ray Player, you can go to “Launchpad” and click on its icon to launch the program. The simplified main interface will reduce certain misoperations. You can see two buttons there: Open File and Open Disc.

Step 2: Choose a Blu-ray ISO File and Play It

If you want to play a Blu-ray ISO file, just click on “Open File” and choose the Blu-ray video you would like to watch from your local multimedia files, and then click “Open”.

Step 3: Enjoy Your Blu-ray Movie

Wait a second till the main menu pops out and you can make some adjustments there according to your own preferences. You can choose where you want to watch in “Chapter”, or choose the audio language in “Audio” and the “Subtitles”. Then you can directly click “Play Movie” to enjoy some Blu-ray time.

Method two: Rip Blu-ray to MacBook Pro supported M4V, MOV, MP4 format

This method still needs another external Blu-ray drive but don’t need another Mac Blu-ray player. For Blu-ray software, Pavtube BDMagic for Mac is highly recommended here. This tool allows you to enjoy the Blu-ray disc, Blu-ray folder, Blu-ray ISO in MOV,M4V, MP4M3U8 formats so that Quicktime on MacBook Pro via Mac OS X El Capitan directly, whether your Pro is 13-inch or 15-inch, the Blu-ray disc will be played on it limitlessly and smoothly. Besides, Pavtube BDMagic for Mac is compatible with MacBook Air, iMac, Mac mini, PowerBook, etc. Read the review.

Here is the Pavtube Customer review: “ In terms of format, I like to have copies of my BDs available on our home network via iTunes and use this to record and catalogue the details of the performances. I also create audio only versions for use on my phone. So I have been trying out various versions of h264, so that I can get good playback on a Macbook pro while travelling and on a large TV.”

You can free download and install BDMagic for Mac here:


Other Download:

– Pavtube old official address: http://www.pavtube.cn/blu-ray-ripper-mac/
– Cnet Download: http://download.cnet.com/Pavtube-BDMagic/3000-7970_4-76177782.html
.
Steps to rip Blu-ray to M4V for MacBook Pro with BDMaigc for Mac

Step 1: Load Blu-ray movie.

Connect an external Blu-ray disc drive to your MacBook Pro, instert Blu-ray disc, and click “Add Disc” button on this Blu-ray to MacBook Pro Ripper to import Blu-ray into this app.

Step 2: Choose video format and set profile.

Select the optimized video format for output. You are suggested to choose MP4/M4V from Format menu as best playable format for Mac.

Step 3: Rip Blu-ray to MacBook Pro

Hit on the “Convert” icon and start ripping Blu-ray to M4V for MacBook Pro. When it is done, open output folder and now you can watch ripped movies on MacBook Pro.

Both the two methods can make you successfully play Blu-ray on MacBook Pro. But with the two method, you can sync the ripped Blu-ray to iTunes, so that you not only can watch Blu-ray on MacBook Pro, but also can enjoy Blu-ray on iPadiPhone conveniently.

Read More:

Apple iPhone 6 and iPhone 6 Plus on Pavtube Special Topic

Leave a comment

Pavtube Studio just released iPhone 6/6 Plus topic page related to everything you should know about iPhone 6 and iPhone 6 Plus, the brand new mobile phones announced by Apple recently to reach the new high of all Apple phone devices.

The 4.7-inch iPhone 6 and the 5.5-inch iPhone 6 Plus with a complete redesign and a much larger screen size than any iPhone that came before catch people’s eyes at the moment Apple announced their release. Even with a slightly larger screen, the iPhone remains comfortable to hold. With fast performance, a great display, an elegant new design and a much-needed software update, it’s one of the best smartphones you can buy right now.
With the increasing number of people become Apple fans and would-be users, there was the need for a topic page to be able to link everything about Apple new phones so that they could find a shortcut to learn more about the devices from all the aspects.
On Pavtube iPhone 6/ 6 Plus page, Apple fans can find hot news, useful tips, unique features, popular apps and almost everything related to the new iPhone 6/6 Plus in order to get familiar with these two devices.
More importantly, this special page also features with tips & Solutions about how to transfer movies, watch videos, and share joys on iPhone 6 and iPhone 6 Plus without time and space limits.

Ripping Commercial DVDs to iTunes 12, 11 on Mac for Personal Use

Leave a comment

“I have a range of TV Series such as Yes Minister, West Wing, All Creatures Great and Small as well as general family movies and music DVDs. And I’m trying to find an easy way to ripping commercial DVDs that I had purchased onto iTunes for personal use. But have no idea. Any suggestions?”

Most Commercial DVDs are copy protected for there is encryption within and it is still not an impossible task to ripping commercial DVDs onto iTunes 12,11 for personal use. Let me walk you through the basic steps and available software applications to get those movies off the plastic and into your Mac. In actually, I discovered Pavtube BDMagic for Mac on several websites that recommended it as the best and simplest ripping software. And I had already tried Handbrake with no success.

Overall, it is especially designed for Mac, and is free and easily handles CSS, Region Code protections, even Disney, Paramount, Dream Works ones with more output video format on Mac. For our purposes, the mission is to get a commercial DVD into iTunes so we can watch it on an iPhone 6/ 6 Plus, iPad Mini 3 or through an Apple TV 3. Pavtube will not let you down. For Windows users, you can free download Pavtube BDMagic.

How to Convert Commercial DVDs to iTunes 12, 11 on Mac?

Step 1: Load DVD source.

First, insert your DVDs into DVD Drive, and then click “Add dics” icon to load the DVD files to the program. You can also add Blu-ray/DVD ISO, Blu-ray/DVD folder files that you can want to rip to iTunes.

Rip Commercial DVDs to iTunes

Step 2. Choose export format.

You can click the dropdown menu between “Format” and “Settings”, you will see many presets sorted of different device models and programs. Move your cursor over the left column to locate your device model/manufacturer, or you can try the small search box on the bottom right corner. For example, if you own an iPhone, iPad, iPod, just choose the best profile from iPad/iPhone/iPod column.

Rip Commercial DVDs to mp4 onto iTunes

Tips: You might wonder how to watch YouTube videos on your iPhone 6/6 Plus? Read here. To viewing DVD movies on iPad Mini 2 with subtitles, you can use the Pavtube BDMagic to help you easily.

Step 3. Adjust specs or edit video before conversion (Optional).

Click “Settings” button to configure target file quality. After entering “Profile Settings” panel, you are allowed to adjust video and audio parameters such as bit rate, frame rate, sample rate, etc.

Step 4. Start conversion.

Now hit the big red “Convert” to start converting DVD movies to MP4 with best settings for playback on different devices. After the conversion, you can get the converted DVD rips in *.mp4 format by clicking the “Open” or “Open output folder” icon.

Tips: If you don’t know how to Sync Local Contents to iTunes on PC/Mac? You can read here. And then, you need to transfer  Media Files from iTunes Library to iPhone or iPad. Have fun!

Now, you can have DVD videos in iTunes library as many as possible to enjoy HD videos without buying. It is fair legal to backup your own DVDs for non-commercial use.

iPhone Videos playback – Watch Youtube Videos on iPhone 6/6 Plus

Leave a comment

Apple has released the iPhone 6 and iPhone 6 Plus, both are similar in design with curved lines all around. They go on sale Sept. 19 and one of the major selling points of the iPhone 6/6 Plus are the larger screen, iPhone 6 with 4.7-inch screen and iPhone 6 Plus with 5.5-inch. The “Bigger than bigger” screen are ways better for displaying videos, as long as you get to see those videos at full screen.

iPhone 6 and iPhone 6 Plus

YouTube has an enormous collection of videos that can entertain, educate and inform. A growing amount of content on the Internet can be found in video form. so you might wonder how to watch YouTube videos on your iPhone. I like watch YouTube videos on my iPhone, maybe you have the same hobby. How to solve this problem once and for all? Fortunately, I found an easy way to do it. Here are some tips for you.

So to enjoy downloaded videos (Tips:How to download videos from Youtube)to iPhone 6/6 Plus from YouTube for offline enjoyment without any barrier, you should turn the incompatible YouTube FLV/F4V video, to be the new iPhone 6/6 Plus friendly. Here, Pavtube Video Converter Ultimate is your best choice. With it, you can easily convert Youtube video to MP4 for iPhone 6/6 Plus. Besides, you can rip Blu-ray and DVD discs or Any video files such as AVI, WMV, MOV, MKV and more to your new iPhone 6/6 Plus.

What’s new? Find everything about the new releases of Apple iPhone 6 and iPhone 6 Plus on Pavtube Special Topic: iPhone 6/6 Plus topic page.

How to watch Youtube Videos on iPhone 6 Plus and iPhone 6?

Step 1. Just free download this top Youtube to iPhone 6/6 Plus Converter.

For Mac users, you can try to download the iMedia Converter for Mac, It works perfectly.

Watch Youtube Videos on iPhone 6/6 Plus

Step 2. Load source videos.

After installing and launching this top Youtube to iPhone 6/6 Plus Converter., press “Add Video” icon to load the source videos.

Step 3. Choose output format for iPhone 6/6 Plus.

For iPhone 6/6 Plus, Click “Format” menu to get the output video format list. A mass of formats are listed. Go to choose “iPhone 6 Plus H.264 Full Screen/Full HD 1080P(*.mp4)” from “iPhone” option for output.

Step 4. Set customized settings.

The Youtube to iPhone 6/6 Plus Converter allows users to customize profile presets by clicking “Setting” button. You can adjust audio and video parameters tooptimize the output file quality, including video and audio codec, bitrate, framerate, display resolution, audio channel, etc.

Tips:The iPhone 6 and iPhone 6 Plus also see their screen resolutions jump to 1334 × 750 and 1920 × 1080, respectively. You can choose the size as you want.

Step 4. Start YouTube to iPhone conversion task.

After you have finished the above steps, click “Convert” in the New Download window to start. The Youtube to iPhone 6/6 Plus converter will run smoothly. Then you can transfer videos to iPhone 6/6 Plus for watching with ease.

Now, you may have known how to watch YouTube videos on iPhone 6 Plus and iPhone 6, just put YouTube videos to your new iPhone and enjoy it!

How to Recover contacts from stolen iPhone4S

Leave a comment

“My iPhone 4S was stolen when I was crowded subway yesterday. All my contacts have gone, I would like to view the contacts and get contacts back from my stolen iPhone. Who can do me a favor?”

Well, you are lucky to have a chance to restore contacts from stolen iPhone 4S with the help of iFonebox. iFonebox enables you to preview the contacts, and the most important is that you can restore iPhone 4S contacts with backup freely.

Free download the iFonebox by clicking the icons below to have a try!


Step 1. Choose a recovery mode.

Run iFonebox and connect your iPhone to the computer. You’ll see the window below. Then select “Recover from iTunes backup” to scan data.

Step 2. Select an iTunes backup for your iPhone 4S.

All of the iTunes backup you synced with this computer will be displayed. Just choose the one you need and click “Start Scan” bottom.

Step 3. Preview and recover deleted contacts.

iFonebox will scan your iPhone 4S automatically. Then you will see all of the data displayed in the interface. You can click “Contacts” to preview all your contacts including the deleted one. Then, select the one you want to save by clicking “Recover” bottom.

Note: If you want to separate deleted and existing ones, you can use the checkbox” Only display the deleted items”

Wish you success to recover contacts from stolen iPhone 4S and you can also find the contacts from stolen iPhone 5S/5/4/3!

How to Recover Deleted iMessage on iPhone5

Leave a comment

“How stupid I am! My iMessage on iPhone5 has gone due to my carelessness. Is there anyway to recover deleted iMessage from my iPhone5?The message is very important to me that a account number is on it. How should I do?”

It is common that you deleted your iMessage by accident. If you intend to get deleted iMessage back from iPhone5,iFonebox is a good choice. When you select iFonebox, you will  have a surprise. You are allowed to preview the iMessage deleted and recover selectively. In fact, there are two ways to recover deleted iMessage on iPhone5 with iFonebox.

Free Download the iFonebox by clicking below icons to have a try


Part 1   Recover deleted iMessage from iPhone5

Step1.Connect your iPhone5 to the Computer
Install and run iFonebox on computer, then connect your iPhone5 to the computer. Then select the “Recover from iOS Device” to scan data on your iPhone5. You’ll see the window below.

recover-deleted-imessage-on-iphone5

Step2.Preview and recover deleted messages

IFonebox will scan iPhone5 automatically. The scanning time depends on the database on your iPhone5. After scanning finished, all of the data on your iPhone5 could be displayed in the interface. Click “Messages”, you could preview all the messages on your iPhone5. Then select the messages you want to save them by clicking “Recover” button.

recover-deleted-imessage-on-iphone5

Note: The data displayed in the scan result contains deleted and existing files on your device. Both of them have their own color. If you want to separate them, you can use the checkbox” Only display the deleted items”.

Part 2  Recover deleted iMessage from iTunes backup

If you have backed up before, and you don’t want to sync all of the backup,just the one you want you can choose this way:
Step1. Choose a backup file to extract
Install and run  iFonebox on computer. Choose “Recover from iTunes Backup” On the main interface.

recover-deleted-imessage-on-iphone5

then you will see all your iTunes backup files displayed in the main interface, select the one for your iPhone5 and click “Start Scan” button.

Step2.Preview and recover iPhone5 messages

After scanning finished, all of the data on your iPhone5 could be displayed in the interface. Click “Messages”, you could preview all the messages on your iPhone5.

recover-deleted-imessage-on-iphone5

Then select the messages you want to save by clicking “Recover” button.
Note: The data displayed in the scan result contains deleted and existing files on your device. Both of them have their own color. If you want to separate them, you can use the checkbox “Only display the deleted items”.

Wish you success to recover the deleted messages!

Directly Recover and Transfer lost Contacts back to iPhone 5s

Leave a comment

“I accidentally deleted one of the contacts of my old friends when I edit it. It is very important for me. Is there any way to recover lost contacts back to device? I am using iPhone 5s and the ios
version is 7.1. Is there a way to recover the deleted contacts on my iPhone 5s?”

One way is that you can check your contacts on iCloud.com., and syncing your contracts with iCloud. If the contacts are not on your iCloud, please don’t worry. There is another way to help you to recover your contracts back to your iPhone 5s. What meets you need is a iPhone contacts recovery . When you search on Google about“ iPhone 5s lost contacts recovery”,you may find lots of iPhone deleted contacts recovery on the internet. However, most of them just support recovering deleted contacts to computer, instead of transferring lost contacts to you iPhone 5s. Is there a software could help you to transfer your lost contacts back to iPhone 5s? The answer is absolutely yes!iFoneboxis a top contacts recovery software which
can help you do it easily!

Step 1: Choose Recovery Mode

Install iFonebox on your computer and launch it, connect your iPhone 5s with computer by USB cable, your device will be automatically detected by iFonebox. Here choose “Recover from iOS device” as recovery mode.

Step 2: Scan your iPhone

iFonebox will automatically scan your iPhone after clicking the “Recover from iOS Devices”. The scan time depends on the number of the database on your iPhone. Just wait patiently until the software finish the scanning.

Step 3: Recover deleted Contacts to iPhone

After the scanning, all of your data in your iPhone will be displayed in the software. Click “Contacts” and you could preview all the contents of your Contacts in your iPhone , including deleted. Choose these deleted that you want to transfer to your device, then click “transfer all selected to device” button on the bottom of the interface. Just a few seconds, all your lost Contacts will be recovered in your iPhone.

Tip: You could do some edit before transfer these contacts to iPhone 5s. Choose one deleted contacts, and click the “Edit” on the bottom right of the interface to edit the content of this contact like Tell, Address, Birthday, etc. Then choose “Save” to transfer the contact back to device.

Free download the trail version to have a try.

Win: iFonebox
Mac: iFonebox for Mac

At last, I hope our contacts recovery software iFonebox could help you solve the problem!

Is it possible to Save multiple iTunes backup for my iPhone5S

Leave a comment

create-more-than-one-backup-for-iphone-5s

“Is it possible to save multiple iTunes backup for one iPhone? I have an iPhone 5S,every time I synced it to iTunes, the old backup will be overwritten and only keep one backup file. some ios data in old backup were deleted, I am wondering can iTunes create more than one backup for my iPhone 5S?

Actually, iTunes only keeps one normal backup per iOS device. So it only saved the most recent backup everytime you sync your iPhone 5S. It’s an incremental backup in that only data that has changed is actually backed up. When you upgrade your iPhone to a version that is not compatible with the previous backup it will start a new backup, and the old one will still be listed, but this is the only time more than one backup will be saved in iTunes for the same iPhone. If you want to keep multiple backups in iTunes you will have to use a backup program on your computer.

Here introduce an iPhone backup program, as well as iOS data recoveryprogram. With this iPhone data backup program, you can save multiple iPhone backup file with date & time stamp. backup your iPhone data include Photos, Videos, Contacts, Call history, Message, Notes, etc, what’s more, you can also select to backup data rather than the whole iPhone backup.

How to create more than one backup for iPhone 5S with iPhone backup program

Firstly, free download the trial version of this iPhone data backup program, both windows and Mac version are easy to use and works well with iPhone5S/5/5C/4S/4, iPad air/ mini/mini2/3/2/1 etc. Here take windows version as an example, if you are Mac user please take the same operation as below.

Step1. Install and Run iFonebox, connect your iPhone 5 to your Mac via a USB cable, and then choose “Recover from iOS Device”

create-more-than-one-backup-for-iphone-5s

Step 2. Scan your iPhone to extract data on it
The software will automatically scan your iPhone to find out and analyze all the existing and deleted files. Scanning time depends on the number of the file on your device. So if there are lots of data on your device, please wait patiently until the software finish the scanning task.

Notes: this software could recover deleted data like CONTACTS, NOTES,CALL HISTORY, MESSAGES, CALENDARS, etc. So if you want to recover deleted data and have no backup, this iOS data recovery program is your savior.

create-more-than-one-backup-for-iphone-5s

Step 3. Preview and backup iPhone data selectively
After the scan, all data found on your iPhone will be listed and displayed in the scan result, just click the categories on the top side of the window like camera roll, contacts, messages, notes etc to check which you want to backup and which you don’t. Tick off those you want and click “Recover” button. Then select a folder to save the backup file on your computer.