


The following article will show you the step by step to convert a video format in 4 different ways with both free and paid software. You can conveniently convert between various different file formats like 4K/2K/HD/SD with the formats of AVI, WMV, MP4, MOV, FLV, MKV, Divx, Xvid, MPEG-1, MPEG-2, H.264, H.265, etc.
Video Conversion/Encoding
Video conversion or video encoding is the process of converting or transcoding digital video files from one format to another. You can then play the converted video on computer with media players, or transfer to smartphone, tablets, stream to game consoles, TVs, DVD player or upload and share on video sharing sites like YouTube, Facebook, Vimeo or Instagram.
Video Converter
A video converter software is an application that allows you to convert your video files to various different plain digital file formats or devices/programs preset profile formats. When you are searching on the market, you may find that there are many video converter software out there, it will be a little difficult for you to find the one that you need. If you are looking for a remarkable free video converter, we highly recommend Pavtube Free Video DVD Converter Ultimate and Handbrake to you. If you are looking for a splendid paid video converters, then Pavtube Video Converter Ultimate and iFastime Video Converter Ultimate will be the best choice.
Video Container & File Formats
A video file format is a type of file format for storing digital video data on a computer system and the video is almost always stored in compressed form to reduce the file size. A video file normally consists of a container format containing video data in a video coding format alongside audio data in an audio coding format. The container format can also contain synchronization information, subtitles, and metadata such as title.
Examples of video container and file formats:
. MP4 (.mp4)
. AVI (.avi)
. MKV (.mkv)
. FLV (.flv, .swf)
How to Convert Video Files with Pavtube Video Converter Ultimate?
Pavtube Video Converter Ultimate (review) is a splendid video converter which allows you to easily convert your video to:
Video formats:
SD formats: AVI, WMV, MP4, MOV, FLV, MKV, ASF, 3GP, 3GPP, 3GPP2, Divx, Xvid, MPEG-1, MPEG-2, WebM, M4V, WMV3, WMV2, ASF
HD formats: H.264 HD MP4, H.264 HD MOV, H.265 HD, MPEG-4 HD MP4, MPEG-2 HD, MPEG-TS HD, MKV HD, WMV HD, Divx HD, AVI HD, BDAV HD
4K formats: H.264 High Profile MP4, H.265
3D Video formats: 3D SBS/TAB/Anaglyph AVI/WMV/MP4/MOV/MKV
Audio formats: MP3, M4A, AAC, FLAC, MKA, OGG, WAV, WMA, DTS, M4R
Web: FLV, F4V, SWF
Devices: iPhone, iPad, Apple TV, Samsung Galaxy, Sony Xperia, Surface, Surface Pro, PlayStation, Xbox, Sony/Samsung/Panasonic/LG TV
Editing programs: Avid Media Composer, Premiere Pro, Premiere Elements, After Effects, Davinci Resolve, Sony Vegas Pro, Vegas Movie Studio Platinum, iMovie, Final Cut Pro, CyberLink PowerDirector, Pinnacle Studio
Apart from convert digital video with the program, you can also use the program to do the following work:
– Copy/Backup commercial Blu-ray/DVD movies to digital formats or devices/programs preset profile formats
– Flexibly adjust output profile parameters to get better output video and audio quality
– Enhance or customize video by trimming, merging, cropping, deinterlacing, adding watermark, applying special rendering effect, splitting video, inserting external subtitle
– Batch conversion mode to load multiple videos at one time for conversion
– Up to 6x H.264 codec encoding speed with Nvidia CUDA and AMD App technology
– Up to 30x H.265 codec encoding speed with Nvidia NVENC technology
Get Mac version of Pavtube Video Converter Ultimate.
Convert Videos with Pavtube Video Converter Ultimate?
Step 1: Import video files.
The following article will show you a step by step guide to convert video to plain digital file formats or device preset profile formats.
Step 1: Download and install Pavtube Video Converter Ultimate.
Step 2: Add video files.
Download the free trial version of the program. Launch it on your computer. Click “File” menu and select “Add Video/Audio” or click the “Add Video” button on the top tool bar to import source video files into the program.

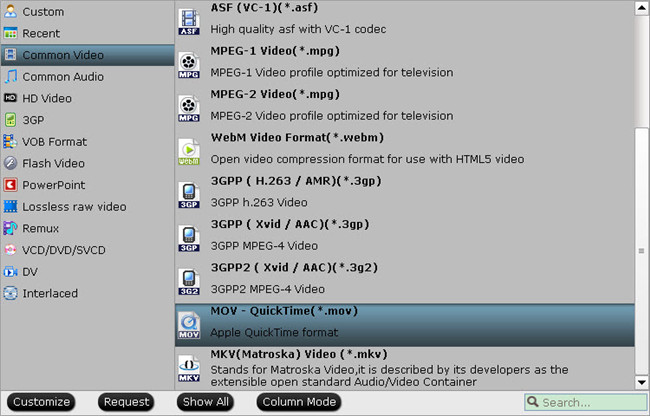
Step 3: Define the output format.
Clicking the Format bar, from its drop-down list, select a video format or device preset profile formats to output.

Tips: Click “Settings” on the main interface to open “Profile Settings” window, here, you can flexibly choose or specify exactly the profile parameters including video codec, resolution, bit rate, frame rate, audio codec, bit rate, sample rate, channels, etc as you like to get better output video and audio quality.
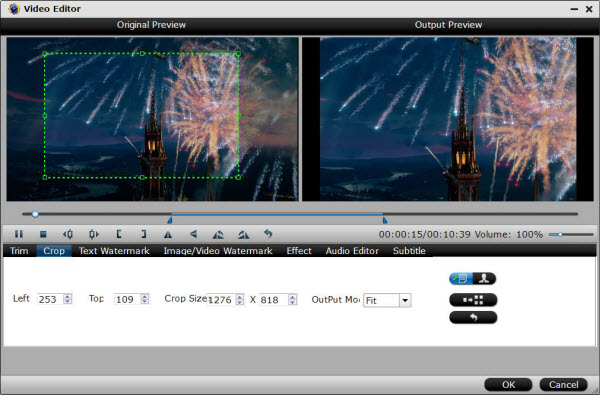
Step 4: Edit video with built-in editing function.
If you want to edit a video, select a video to activate the Edit menu. When a video or movie is selected, click the pencil like Edit icon on the left top tool bar to open the video editor window, here, you can play and preview the original video and output effects. Also you can flip or rotate video, trim, crop, add watermark, apply special effect, edit audio or insert external.

Step 5: Begin the conversion process.
After all setting is completed, hit the “Convert” button at the right bottom of the main interface to begin the conversion process
When the conversion is finished, click “Open Output Folder” icon on the main interface to open the folder with generated files.
How to Convert Video Files with iFastime Video Converter Ultimate?
iFastime Video Converter Ultimate is your one stop solution to convert video to any of your desired file formats to:
Video formats:
Generally video formats: AVI, WMV, MP4, MOV, FLV, MKV, ASF, 3GP, 3GPP, 3GPP2, Divx, Xvid, MPEG-1, MPEG-2, WebM, M4V, WMV3, WMV2, ASF
HD formats: H.264 HD MP4, H.264 HD MOV, H.265 HD, MPEG-4 HD MP4, MPEG-2 HD, MPEG-TS HD, MKV HD, WMV HD, Divx HD, AVI HD, BDAV HD
4K formats: H.264 High Profile MP4, H.265
3D Video formats: 3D SBS/TAB/Anaglyph AVI/WMV/MP4/MOV/MKV
Audio formats: MP3, M4A, AAC, FLAC, MKA, OGG, WAV, WMA, DTS, M4R
Web: FLV, F4V, SWF
Devices: iPhone, iPad, Apple TV, Samsung Galaxy, Sony Xperia, Surface, Surface Pro, PlayStation, Xbox, Sony/Samsung/Panasonic/LG TV
Apart from acting as a powerful video converter, the program can also do the following work for you:
– Fine tune output video profile parameters
– Edit video by trimming, cropping, watermarking, deinterlacing, adding subtitles, etc
– And more
This tutorial will show you step by step how to change a video format in a few different ways using free and paid software.
You can convert all kinds of video files, such as MP4, AVI, WMV, MOV, FLV, MKV, DIVX and many other video files.
Convert Videos with Pavtube Video Converter Ultimate
Step 1: Import video files.
The following article will show you a step by step guide to convert video to plain digital file formats or device preset profile formats.
Step 1: Download and install iFastime Video Converter Ultimate.
Step 2: Add video files.
Click “File” drop-down menu, and select “Add Video/Audio” or “Add from folder” to load source files.
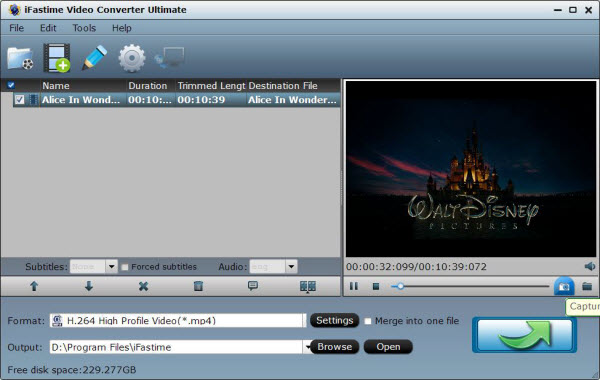
Step 3: Define the output format.
From the “Format” drop-down list, you can select your desired output format or hit the left bottom “Customize” button to define which formats to be shown on the list.
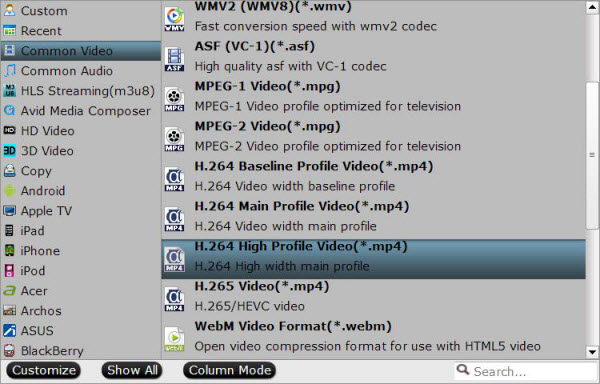
Tips: All formats are output with optimized profile parameters. You can still customize according to your own needs or preference. Hit the “Setting” button on the main menu to open the “Profile Settings” window, here you can adjust video/audio codec, size, bit rate, frame rate, sample rate, channels, etc. And you can compare the detailed information of the source video and the target video in the Task Information section.
Step 4: Edit video with built-in editing function.
If you want to edit a video, select a video to activate the Edit menu. When a video or movie is selected, click the pencil like Edit icon on the left top tool bar to open the video editor window, here, you can play and preview the original video and output effects. Also you can flip or rotate video, trim, crop, add watermark, apply special effect, edit audio or insert external.
Step 4: Begin the conversion process.
After all setting is completed, hit the “Convert” button at the right bottom of the main interface to begin the conversion process
When the conversion is finished, click “Open Output Folder” icon on the main interface to open the folder with generated files.
How to Convert Video Files with Handbrake?
Handbrake is a free and open source program designed for converting videos from nearly any format to a selection of modern, widely supported video formats and devices.
You can download HandBrake here.
1. Open HandBrake.
2. A sidebar called “Source Selection” should appear on the left side of the program. If not, then click on “Source” located at the top left.
3. Choose between:
Folder, then go to the location on your computer where the folder is stored, select the folder and click on “Select Folder”.
File, then go to the location on your computer where the video file is stored, select the video file and click on “Open”.
4. Go to “Destination” and click on the “Browse” button.
5. Open the location on your computer where you would like to save the converted video file.
6. Enter a name for your video file at “File name” and click on “Save”.
7. If you want you can specify presets and custom settings:
Presets: here you can choose from among the various presets. You can convert your video to MP4 or MKV, but also to a few devices like iPhone, iPod, iPad, Android and Windows Phone.
Output Settings: here you can specify custom settings such as cropping, applying video filters, adding or removing subtitles, adding audio tracks, create chapter markers, and more.
If you don’t know what all of this means, then just choose a preset, like Universal and Container > MP4.
8. If you want to add subtitles to your video, then click on “Subtitles” (located at Output Settings), click on “Import SRT”, select the srt subtitle file, click on “Open” and then check “Burn In”.
9. Click on “Start” (top menu).
HandBrake will now convert your video file(s). This may take a while. The amount of time it takes depends on your computer’s hardware and the size of the video file(s).
How to Convert video with Pavtube Free Video DVD Converter Ultimate?
Pavtube Free Video DVD Converter Ultimate is your all-in-one solution to rip, encode DVD and convert even edit videos in one place.
You can free download Pavtube Free Video DVD Converter Ultiamte here. The program is very clean and safe, it doesn’t feature any ads or bundled adware. In addition, it is easy to use, no matter experienced user or fresh could handle it very well.
Convert Video Files
Step 1: Add source video.
Load Disc: Insert the DVD disc to the DVD-ROM, launch the freeware, and click the “Load Disc” button upload source DVD. You can also import DVD VIDEO_TS folder, ISO image files, or IFO files for conversion.
Add Videos/Audios: Click “Add Vide/Audio” or “Add from folder” button to load video or audio files.
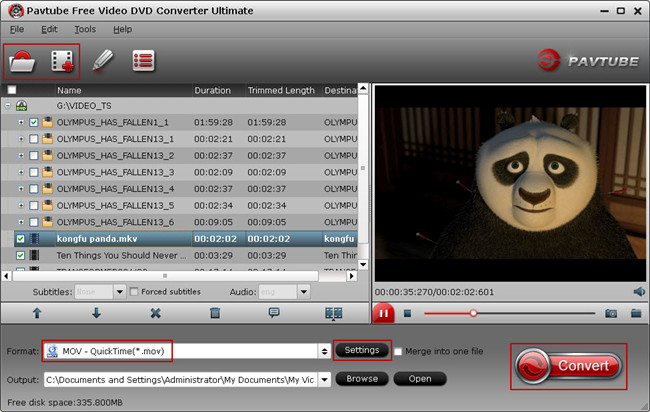
Step 2: Select output format
Click on the Format bar and you can choose any video and audio format like MOV, MKV, WMV, AVI, FLV, MP3, M4A, WMA, WAV, etc for output.
To achieve best video and audio playback, you could click the “Settings” button to customize output video quality like resolution, frame rate, bit rate, audio channel, etc.
Step 3: Edit DVD, Video and Audio files.
Click the “Edit” button on the main UI and edit your movies before conversion. Many video editing options are available: Trim, Crop, Text Watermark, Image/Video Watermark, Effect, Audio Editor, and Subtitle.

Step 4: Start to convert DVD/Video/Audio
After above settings, click the big “Convert” button to start to convert DVDs. Once the conversion is done, simply click the “Open output folder” button, find the created file and watch it freely.


