Question: “I want to transfer my Blu-ray files to my computer in HD MKV format, but can not find the way I can have it in different audio (English and Hebrew) and also have subtitles (Hebrew and English) so family members from different countries can enjoy movies with their own native languages. Is there a way to do it?”

To transfer Blu-ray for playing with multi-track format, the first step is to remove commercial Blu-ray protection from film studio, and then do the conversion with multiple audio and subtitle tracks keeping. To help him to solve the problem, I tested some softwares and did comparison. Good News: Now I found a professional Blu-ray/DVD Copier & Ripper for Mac – Pavtube ByteCopy for Mac which is an ideal app that can help you remove the strict Blu-ray protection and convert Blu-ray movies to MKV format on Mac with multiple audio tracks and subtitles in great audio/video quality easily. What’s more, it can also help you to get Blu-ray Main Movie backup in original format without extracts and convert latest Blu-ray discs to your portable devices for playback on the way. ByteCopy for Mac combines all features in BDMagic for Mac such as various output formats selection, editing options support, etc. In other words, you get two Pavtube products in one.
Hot Search: Pavtube Products Comparison | Blu-ray Ripper Review | DVD Ripper Review | H.265 Video Converter Review | DRM Converter Review
Just free download or buy this best multi-track Blu-ray Ripper with 50% OFF discount at 2015 Easter Promotion:
How to rip Blu-ray to lossless MKV with keeping multiple languages on Mac computer?
Step 1: Load Blu-ray movies.
Launch the best Mac Blu-ray to Multi-track Converter; import Blu-ray movies into the program. Loaded Blu-rays can be previewed in the right preview window.

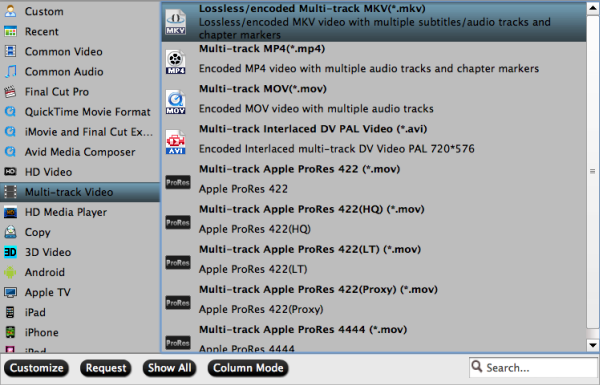
Step 2: Choose output format
To rip Blu-ray with multiple tracks, click the drop down box of “Format”, and choose the profile under “Multi-track Video”. This profile is designed to output videos with multiple audio tracks. To keep multiple audio and subtitle tracks from Blu-ray Disc, you are recommended to choose “Multi-track Video” > “Lossless/encoded Multi-track MKV (*.mkv)” for output.

P.S. You can keep and uncheck the audios and subtitles you don’t need and only leave English and Hebrew audio tracks and subtitles, and save your settings.
Step 3: The last step you need to do is hit the “Convert” button to start the conversion of Blu-ray content to MKV with original subtitles, audios and chapters you choose. After conversion, find generated files by clicking “Open” icon and you can play Blu-ray Disc with English and Hebrew languges on your computer in your VLC player. And you can choose your desired audio stream when watching. Just enjoy!
Tips: If you have 3D Blu-ray discs, and want to get them playable, you can choose “MKV Top-Bottom 3D Video (*.mkv)”, or “MKV Anaglyph 3D Video (*.mkv)” or “MKV Side-by-Side 3D Video (*.mkv)” which can retain the 3D effect. The windows version is here.
More topics:


