


Question:
Hello.
The last two attempts at converting two different DVD Discs using a free program output black bars at the top and bottom of movies. I tried to enlarge and disappear blackbars, but video would be stretched to wrong aspect ratio.
Please advise me what to extract videos without black bars but in correct aspect ratio as soon as possible.
Thank you
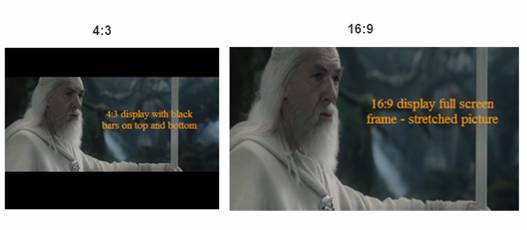
Generally, commercial DVDs are made in a way that is suitable for playing back on a 4:3 TV. So you get black bars added at top and bottom of the picture. When playing DVD on a 16:9 wide screen TV, we tend to display movies at full screen in order to make full use of the wide screen display. In that case the image is slightly stretched, but stills look fine. This is because the original aspect ratio of DVD is 2.35:1 or 1.85:1 instead of 1.78:1 (16:9).
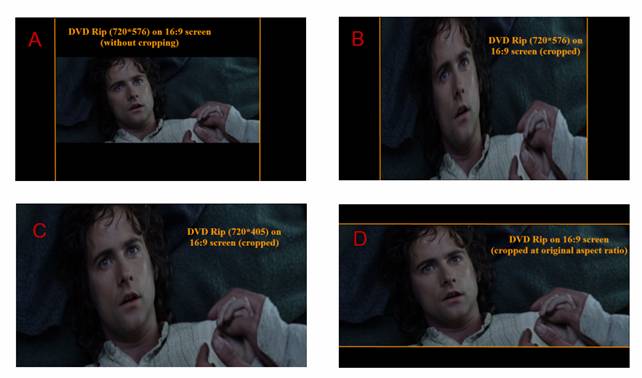
However, when copying or converting DVD movie to video for playback on 16:9 PC or wide screen TV, you may get black boarders around the movie image or serious squeezed picture, like snapshoot A and B in the below image. I suppose you want a perfect fit on 16:9 screen (snapshoot C) or movie at original aspect ratio (snapshoot D)? Pavtube DVD Ripper can help you through. The software rips DVD to MKV, AVI, WMV, MP4, MOV, etc and meanwhile crop DVD at custom size (pix) / aspect ratio. You may also load stretched video files to the software to correct the aspect ratio.
Follow the guide below to crop DVD at correct size when ripping DVD movie.
Step 1. Load DVD and decide which chapters to convert.
Place the DVD you’d like to rip into optical drive first. Both commercial DVD and self-made DVD are OK. Run the trial of Pavtube DVD Ripper software, and click “DVD ROM” to load DVD from source drive. If your DVD is saved as files on your computer, click “DVD Folder” and browse to the folder that contains DVD files. Now your movie is now loaded as source. Expand the folder and select the chapters to keep, and set subtitles as long as you like. If you would like to combine all selected DVD videos into one file, please check “Merge into one file”.

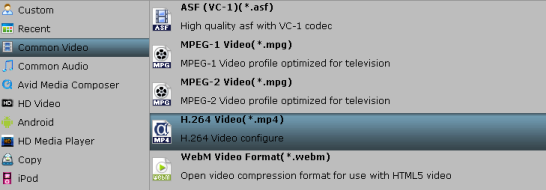
Step 2. Set an output format for playback on 16*9 display.
Click the Format bar, and choose a desired format in “Common Video” group. HD Video formats (1280*720, 1920*1080) are not recommended for common DVD (720*480 for NTSC, 720*576 for PAL). Here I select H.264 Video (*.mp4) in “Common Video” as output format.
Step 3. Crop out the black bars on the top and below and adjust aspect ratio.
Let’s see how to get rid of the black edges. First, you select a chapter, and click “Edit” to enter the Video Editor. Here you see the Original Preview and Output Preview area. The original video is put in green frame. Drag the dotted frame to crop out black bars.
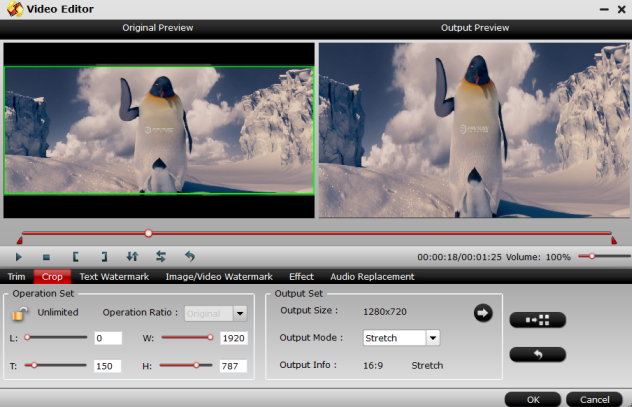
To use the original Cinema Scope aspect ratio (snapshoot D), just check the box “Keep original aspect ratio” and click “OK” button to confirm. To play DVD movies without any black edges (snapshoot C), click “OK” and back to the main interface, then click “Settings” button to set a video size of 16:9 in the “Settings” panel, for instance, 720*405, 800*450, 960*640, or 1280*720 (leave the “Keep original aspect ratio” unchecked).
Step 4. Start copying cropped DVD to hard drive.
When back to the interface, click the “Convert” button to start cropping and converting DVD movie to hard drive. After conversion completes, click “Open” to find converted movie.
Read More:
- Play Exercise and Art DVDs Video on iPad Air 3
- Failure to Play TV Programmes on Old DVD Player
- How to Rip TV Series DVD to Episodes for Plex?
- How to Rip and Convert DVD to QuickTime MOV on Mac
- Copy DVD to Exteral Hard Drive For Streaming on TV/Laptop/PC
- Copy 600 DVDs for CyberLink PowerDVD 15 Watching


Hey there, I ran across your site by using Yahoo even as seeking a relevant subject, your web site came upward, it looks wonderful. I have included in favorites|put into bookmarking.